Process
This chapter will describe the processes for performance management. This includes the maintenance of activities and objectives. But it also covers the process of discussion performance between manager and employee, based on PDR templates.
In general the employee is responsible for maintaining his personal objectives, activities and is the owner of his continuous professional development (CPD). Depending on the organisational processes, the start of the PDR can be done by employee, manager or an administrator (bulk creation):
Performance Employee
Depending on the company process and settings in the application, processes can be different. But in this example the employee will continue the following steps before submitting the PDR in the workflow to his manager:
Employee: Maintain CPD
The CPD (continuous professional development) contains about learning moments. All learning moments combined works towards professional development. In order to have this as a continuous process, learning moments should happen frequently.
From the Dashboard click on number of current CPD to start the process.

Figure: CPD
Explanation of the fields/actions:
| Items | Description |
|---|---|
| Learning event title | The items that have been identified as part of the continuous development. |
| Date | The date the activity has been executed, completed. |
| New | Use this to add a new CDP to the list: |
 |
|
| Figure: Add new CPD | |
| 3 dot menu (Ellipsis) : Edit | Use this option to maintain an CPD. It's important to add activities add comments and details, if the title is not clear enough: |
 |
|
| Figure: Edit CPD | |
| 3 dot menu (Ellipsis): Delete | Use this to remove an item from the list. |
Employee: My CDP
A Career Development Plan is a written list of the short and long-term goals that employees have pertaining to their current and future jobs, and a planned sequence of formal and informal experiences to assist the employees in achieving their goals. These goals should be linked to each person's strengths and potential.
From the Dashboard click on number of current CDP to start the process.

Figure: CDP
Explanation of the fields/actions:
| Items | Description |
|---|---|
| Title | The item that is added to the career development plan of the employee. |
| Start & End date | The dates that are set to work on the activities on the career development plan |
| New | Use this to add a new CDP to the list: |
 |
|
| Figure: Add new CDP | |
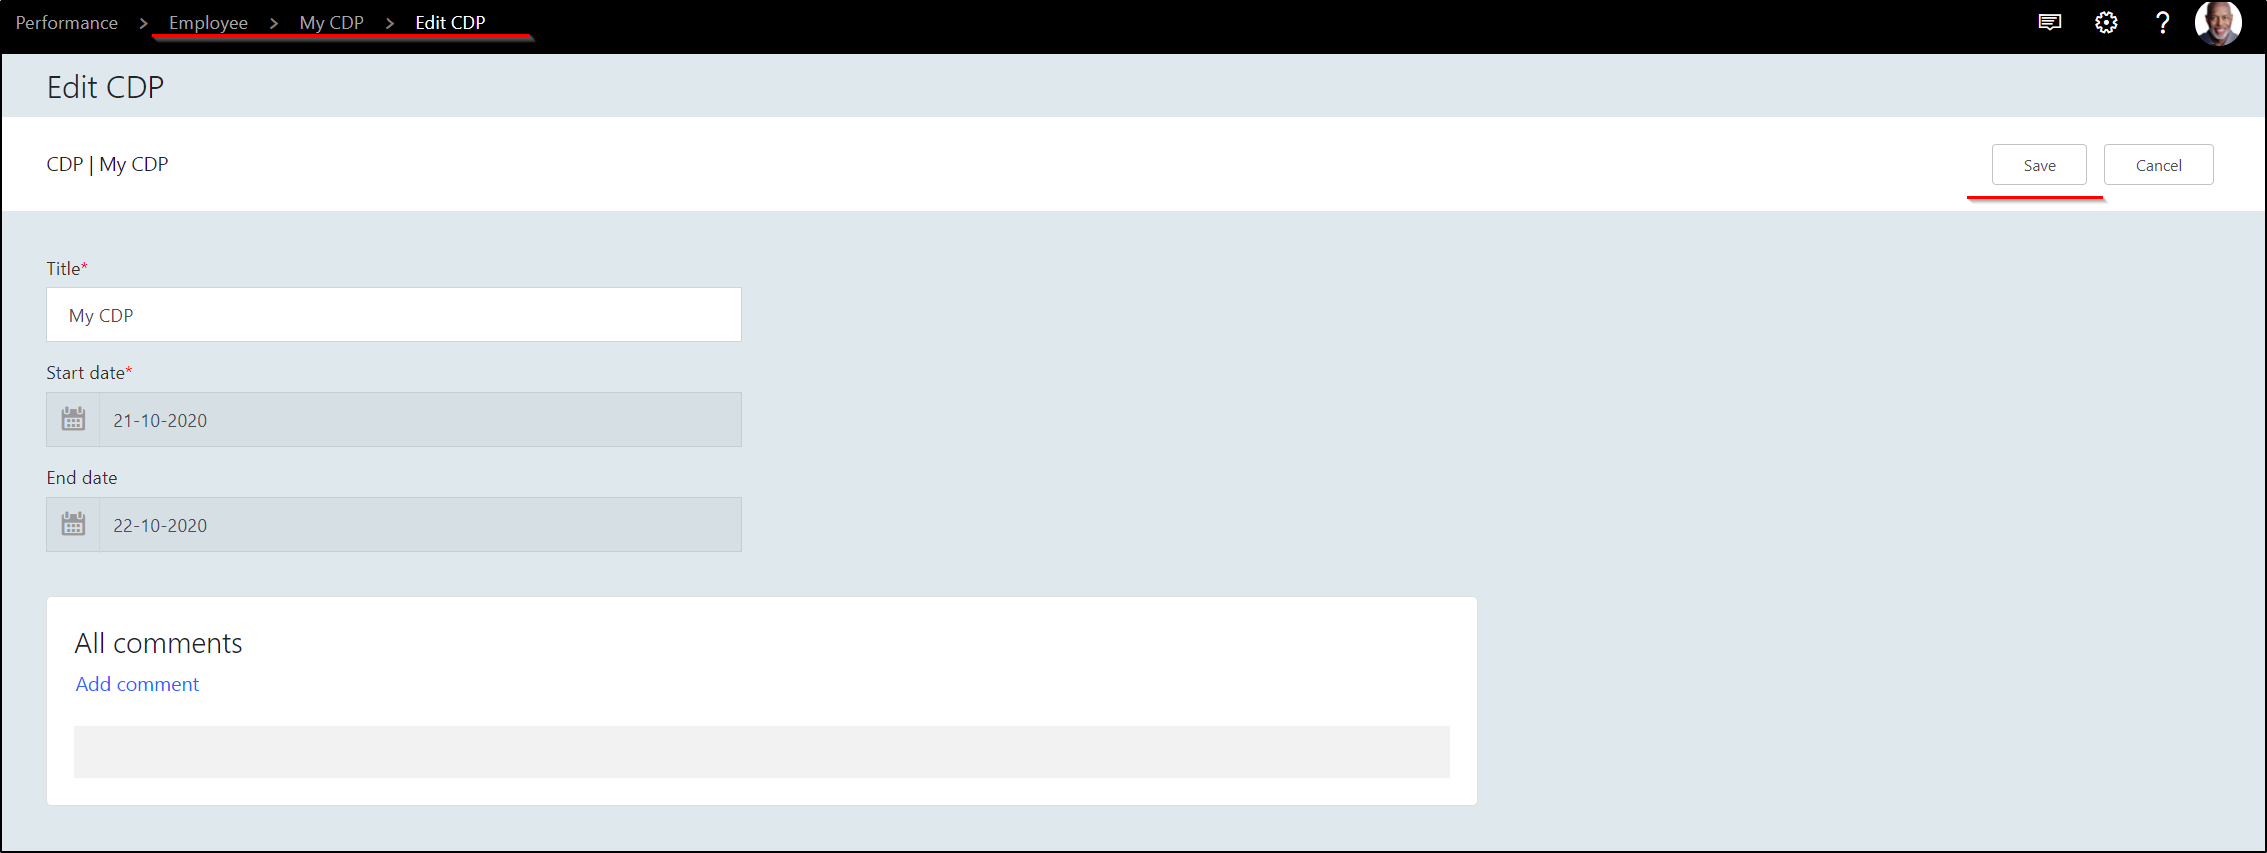
| 3 dot menu (Ellipsis) : Edit | Use this option to maintain an CDP. It's important to add activities add comments and details, if the title is not clear enough: |
 |
|
| Figure: Edit CDP | |
| 3 dot menu (Ellipsis) : Delete | Use this to remove an item from the list. |
Employee: Maintain operational portfolio
The day to day responsibilities of the employee can be seen as his/her operational portfolio. These are the items that are part of his/her ownership and he/she is accountable for. In order to maintain this, activities needs to be maintained.
From the Dashboard click on number of operational portfolios to start the process:

Figure: Operational portfolios
Explanation of the fields/actions:
| Items | Description |
|---|---|
| Title | The name of the portfolio |
| Activity | The associated activity, Click here. |
| Date | The date the activity has been executed, completed. |
| New | Use this to add a new operational portfolio to the list |
 |
|
| Figure: Add new operational portfolio | |
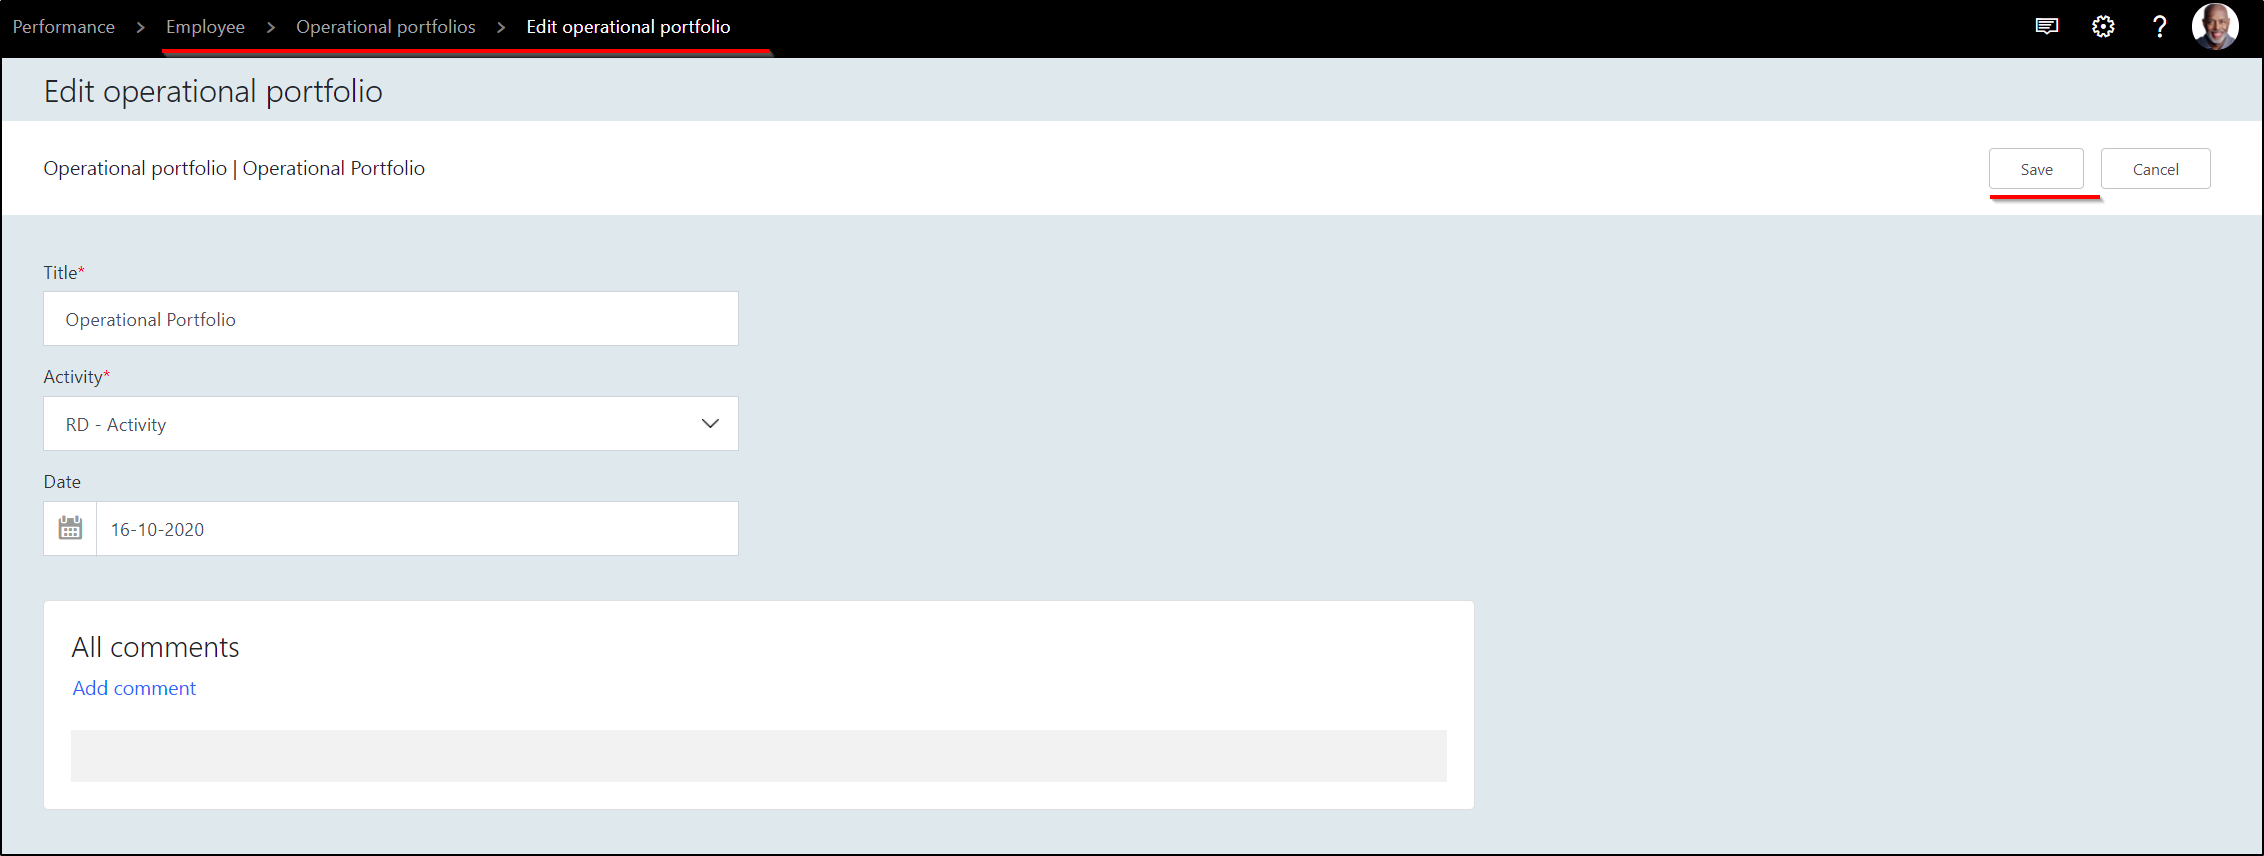
| 3 dot menu (Ellipsis): Edit | Use this option to maintain a operational portfolio. It's important to add activities add comments and details, if the title is not clear enough: |
 |
|
| Figure: Edit operational portfolio |
Employee: Create Objectives
When an Employee is logged into the application, he/she can maintain his/her own objectives. These can be set individual, as team/department or as company.
From the Dashboard click on My Objectives to start the process:

Figure: My objectives
Explanation of the fields/actions:
| Items | Description |
|---|---|
| Title | The name of the objective |
| Objective type | This is a predefined list that is used to classify objectives: |
| - Strategic; | |
| - Individual; | |
| - Department; | |
| Objective category | The objective category, as setup Click here |
| Status | The status can be selected and maintained (see New or Edit). This can be: |
| - Planned | |
| - On track | |
| - Needs improvement | |
| - Completed | |
| - Cancelled | |
| Completion | It shows the completion of the objective in % |
| Start date | The associated start date of the objective. |
| This is typically aligned with the performance cycle. | |
| End Date | The associated end date of the objective. |
| This is typically aligned with the performance cycle. | |
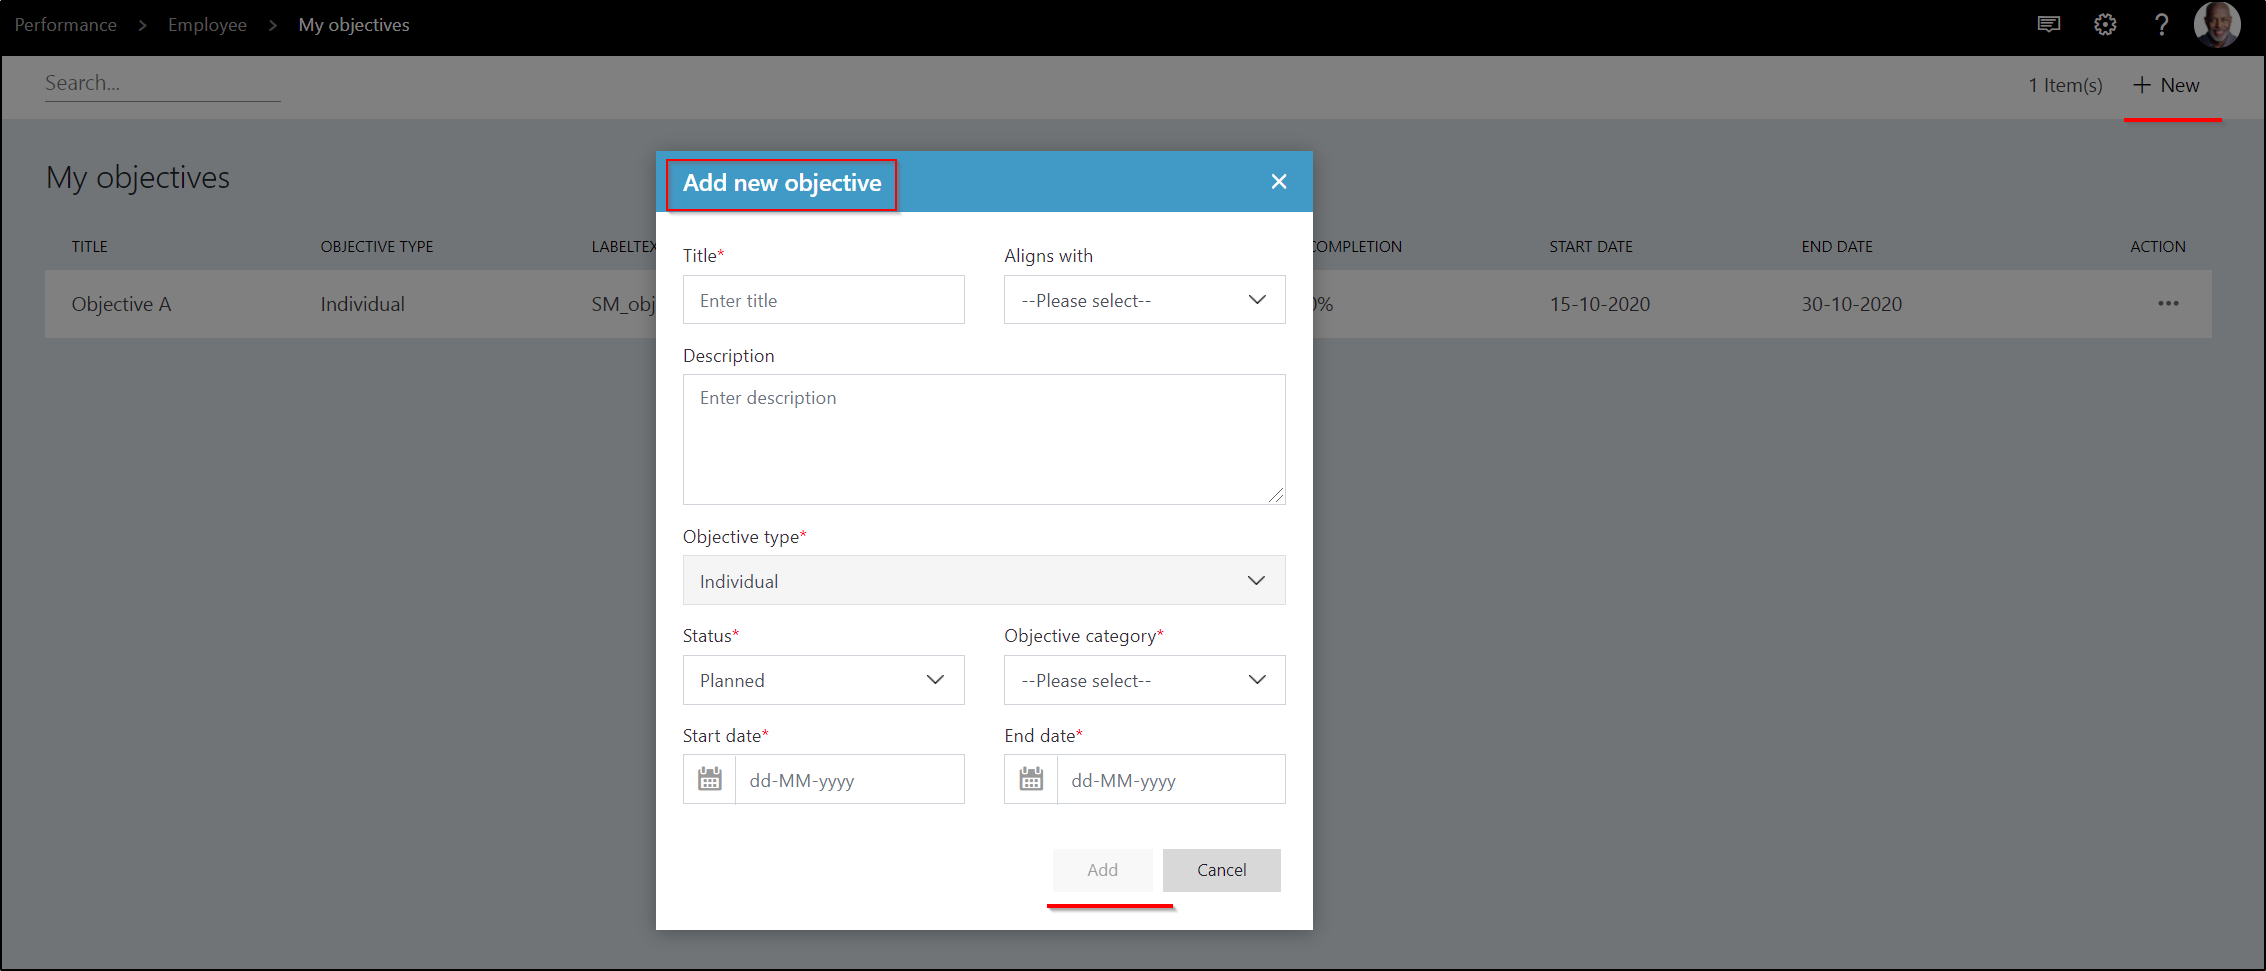
| New | Use this to add a new objective to the list. |
 |
|
| Figure: Add new objective | |
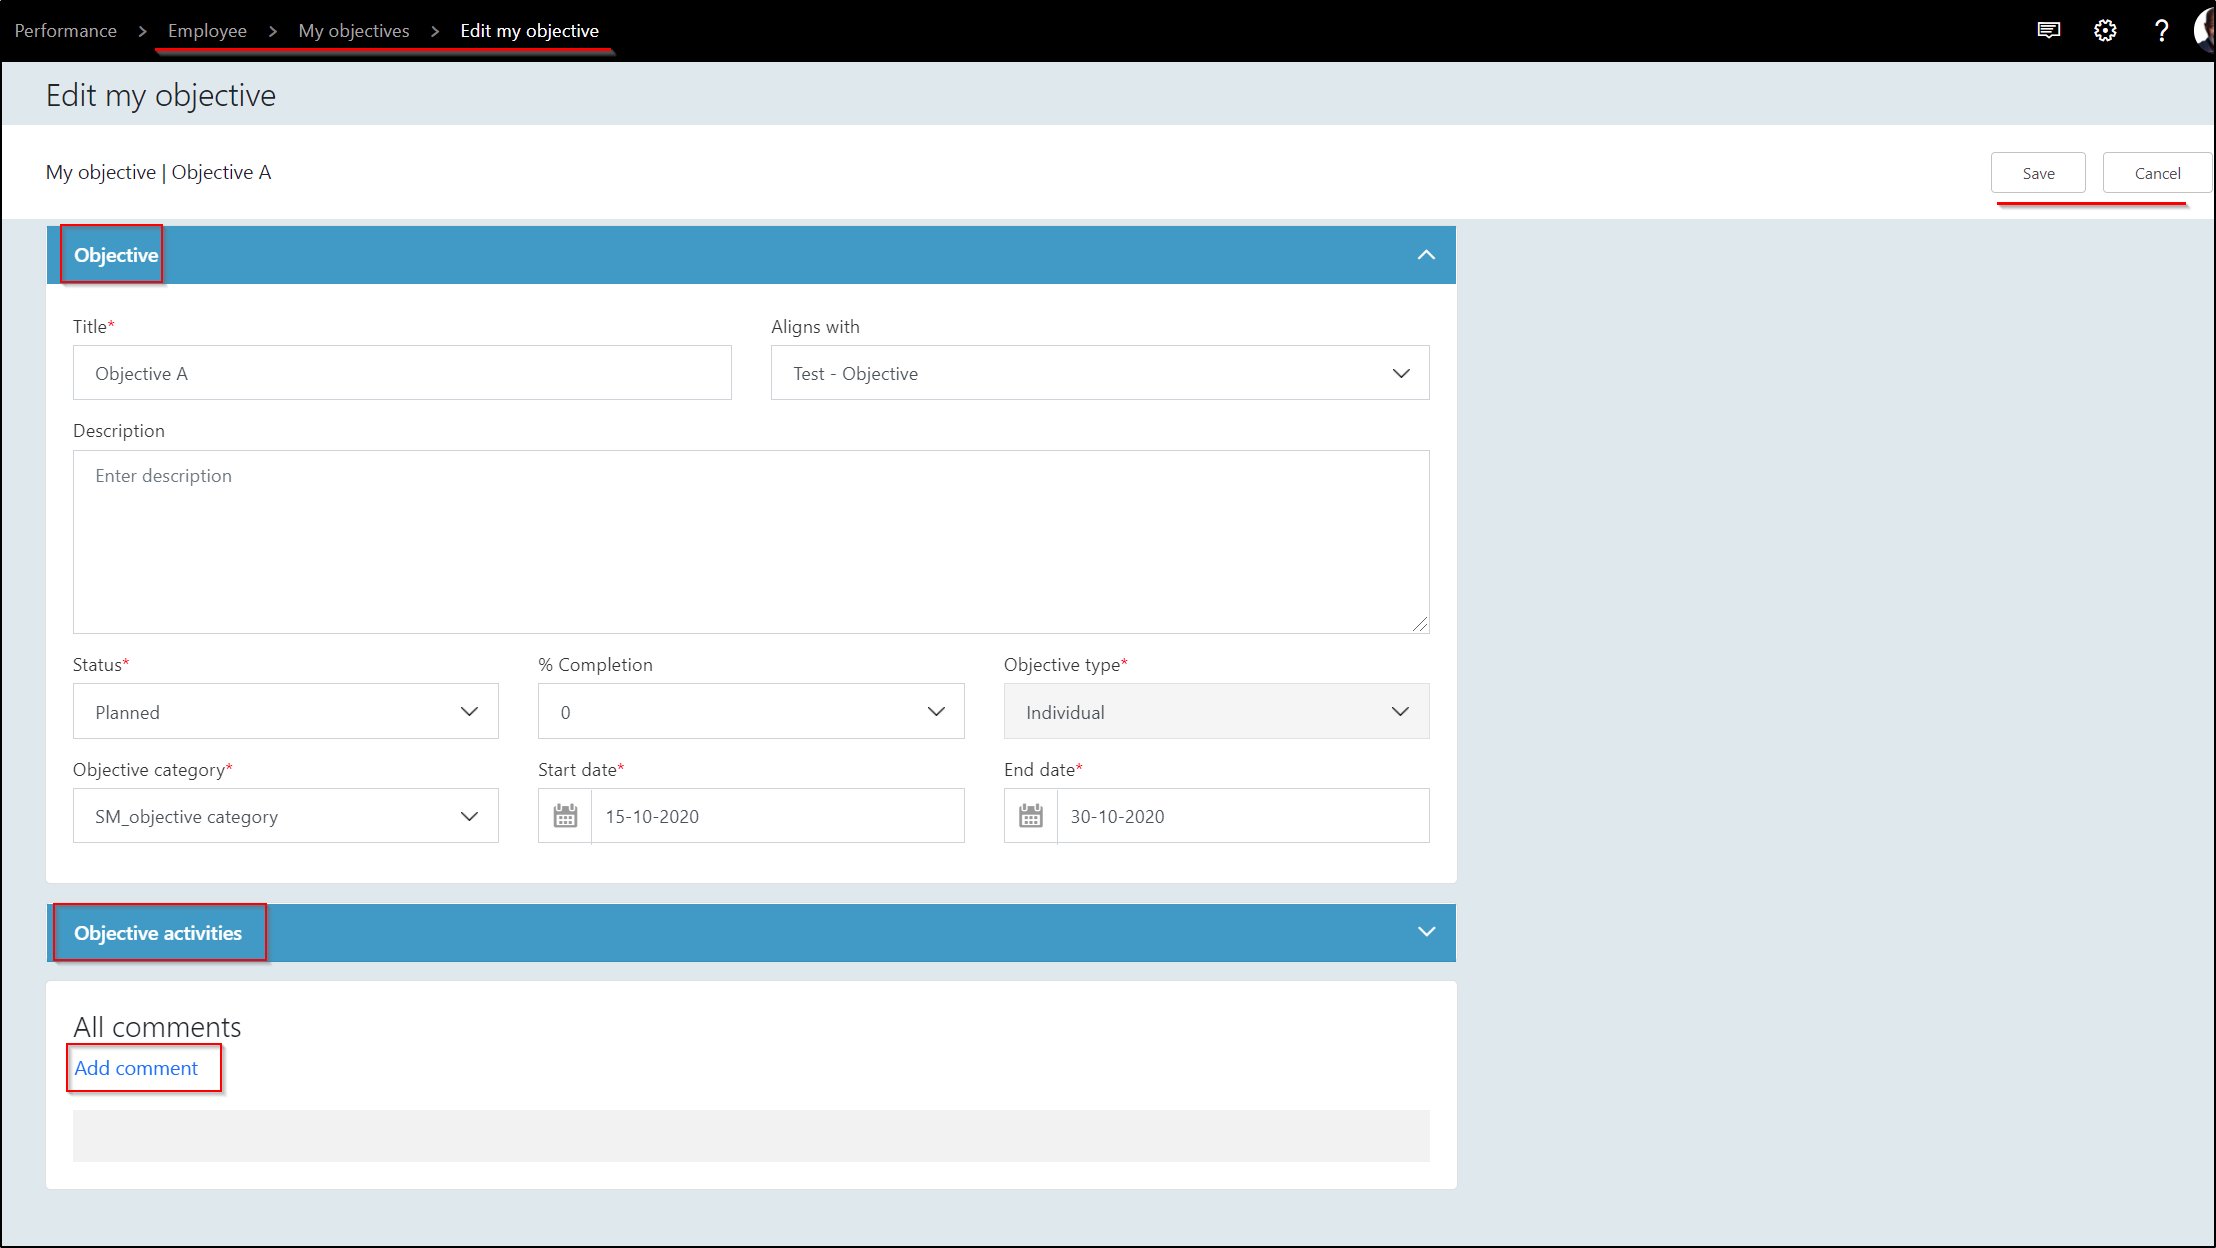
| 3 dot menu (Ellipsis) : Edit | Use this option to maintain a created objective. This includes the description, status, or start and end dates. |
| In addition, it's important to add activities that have been executed as part of the objective (continuous updates) and add comments. This is required to keep track of the objective: | |
 |
|
| Figure: Edit objective | |
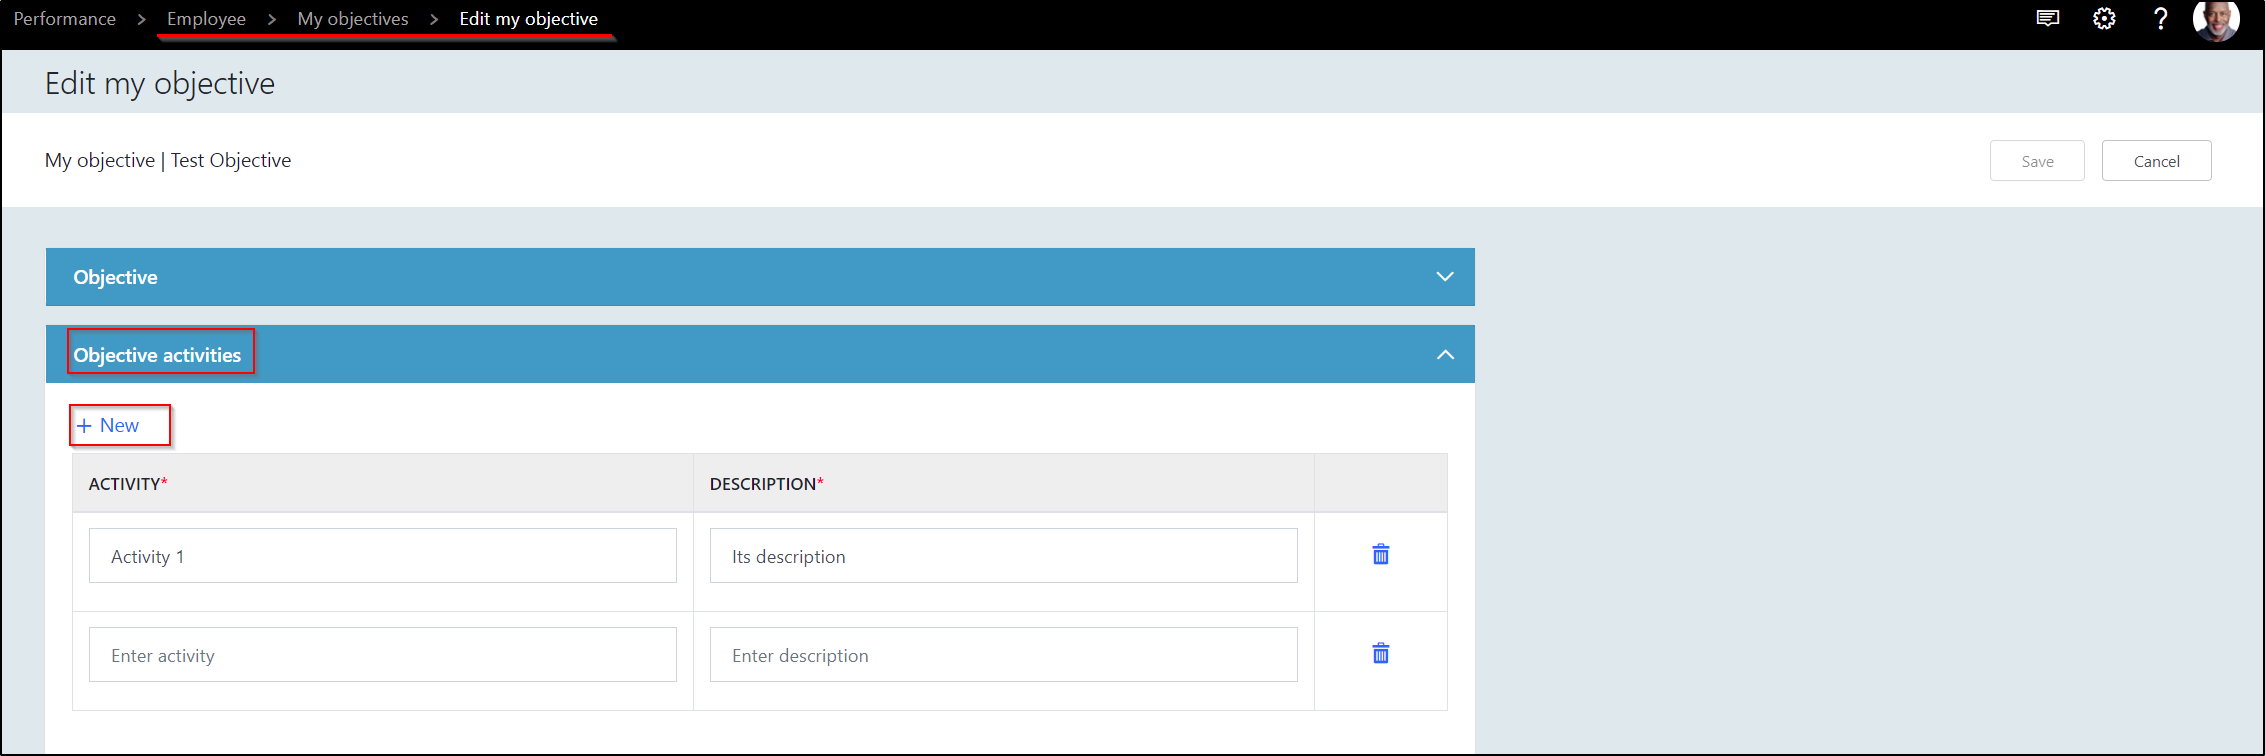
| Objective activities - Here, user add new activities and its description | |
 |
|
| Figure: Objective activities | |
| Measurements - Add new measurements | |
 |
|
| Figure: Add measurements | |
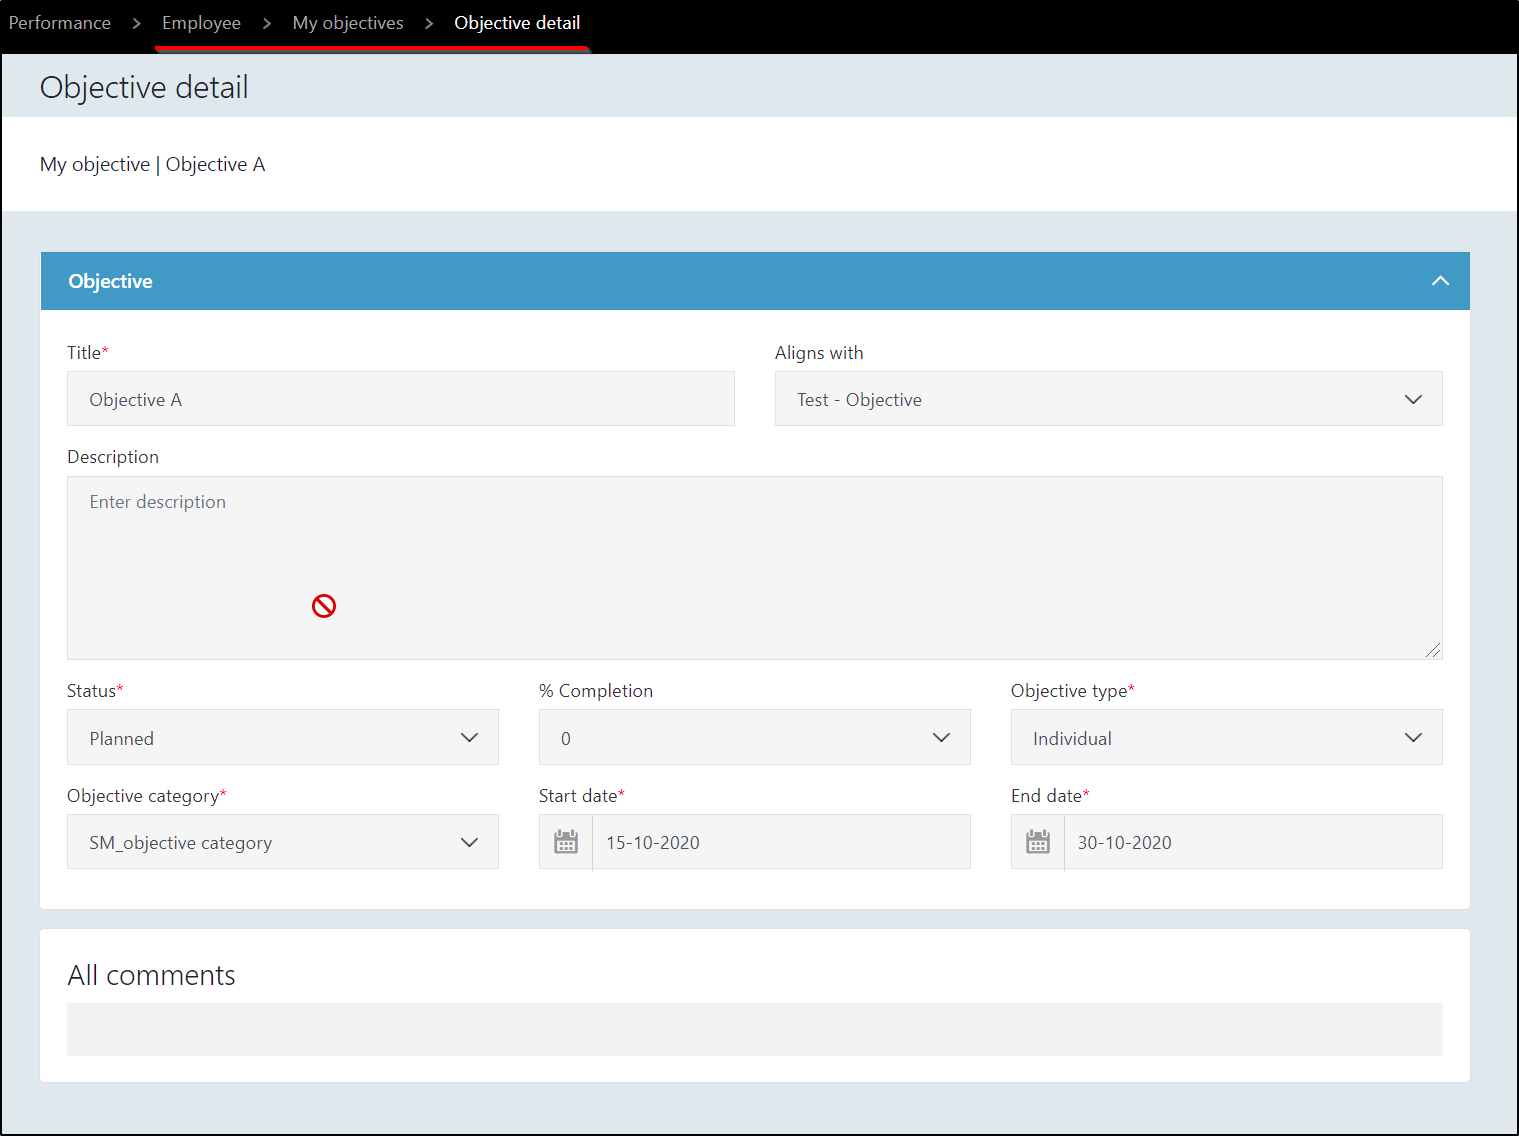
| 3 dot menu (Ellipsis) : Detail | Click to see the details of the objective . |
 |
|
| Figure: Detail objective |
Employee: See "Behaviour"
The Behaviours are setup by the Performance Admin and assigned to the jobs of Employees. These are maintained on global level, but the results are individually visible. The Employee can see his/her expected behaviours based on his/her position assignment.
From the Dashboard click on Behaviours to start the process.

Figure: Detail objective
Explanation of the fields/actions:
| Items | Description |
|---|---|
| Name | The name of the assigned behaviour (for details Click here ) |
| Description | The longer description of the behaviour |
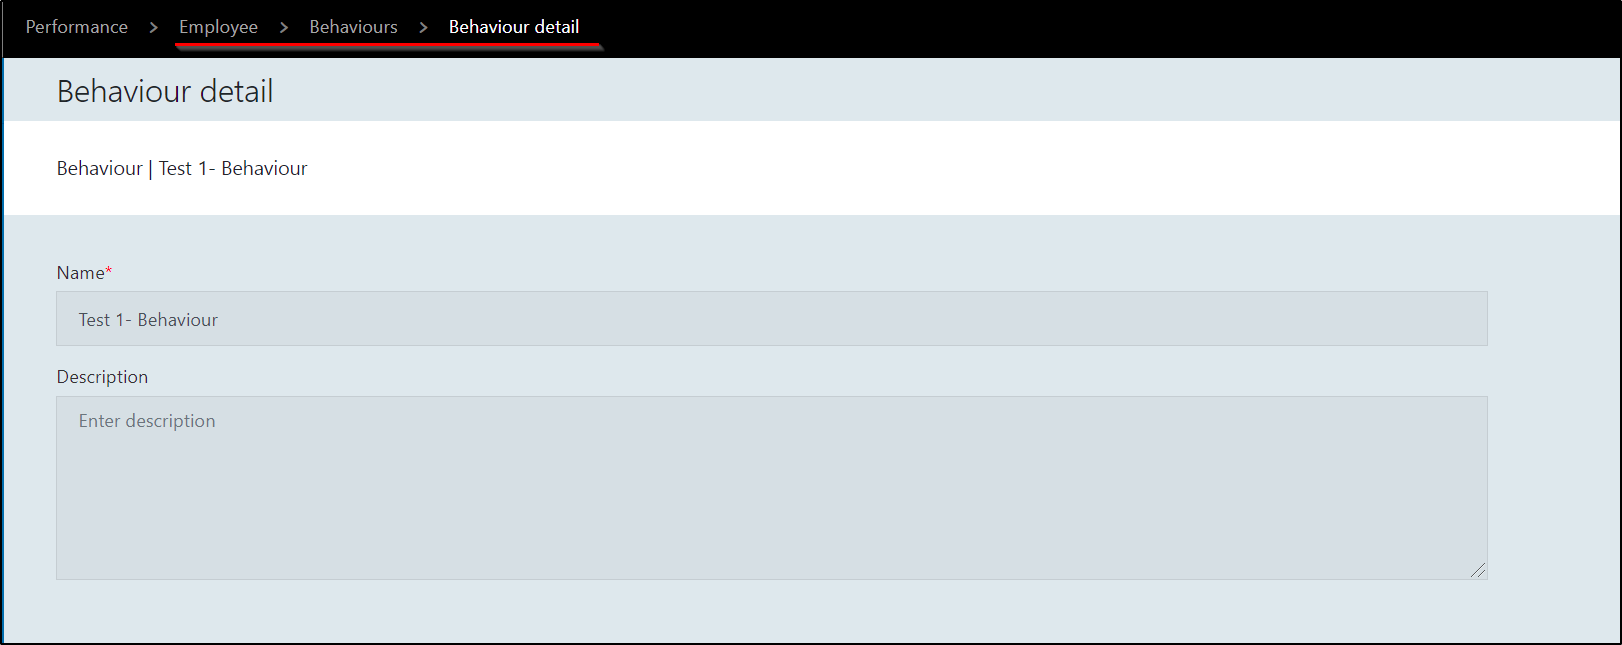
| 3 dot menu (Ellipsis): Details | Click to see the details of the assigned behaviour including the positive indicators: |
 |
|
| Figure: Behaviour detail |
Employee: Start with PDR
- My open PDR
- My PDR
The Performance and Development Review can start with a Manager, HR Admin or the Employee. This is dependent on Business Processes, Workflow Setup and Parameter Settings.
From the Dashboard click on create new registration to start the process.

Figure: PDR from the employee dashboard
The following screen (depending on the selected tile) will be available:

Figure: PDR
Explanation of the fields/actions:
| Items | Description |
|---|---|
| PDR No. | The number of the PDR. This is a auto generated number across the complete application, and can't be changed based on setup. |
| PDR Template | The selected PDR template from the setup. This determines what tabs are added to the template (and conversation). |
| Period | The selected period (from the setup). Based on that the start & end date will default. |
| Start Date | It shows the start date of the PDR when it is created |
| End Date | It shows the end date of the PDR, when the PDR process completed |
| Status | Based on the workflow (aligned with the PDR template) the status will update. The first status is 'draft'. |
| Assigned to | The person (worker) who is responsible for the PDR action. This can be initial creation, approval by manager, or (for example) final validation by HR. |
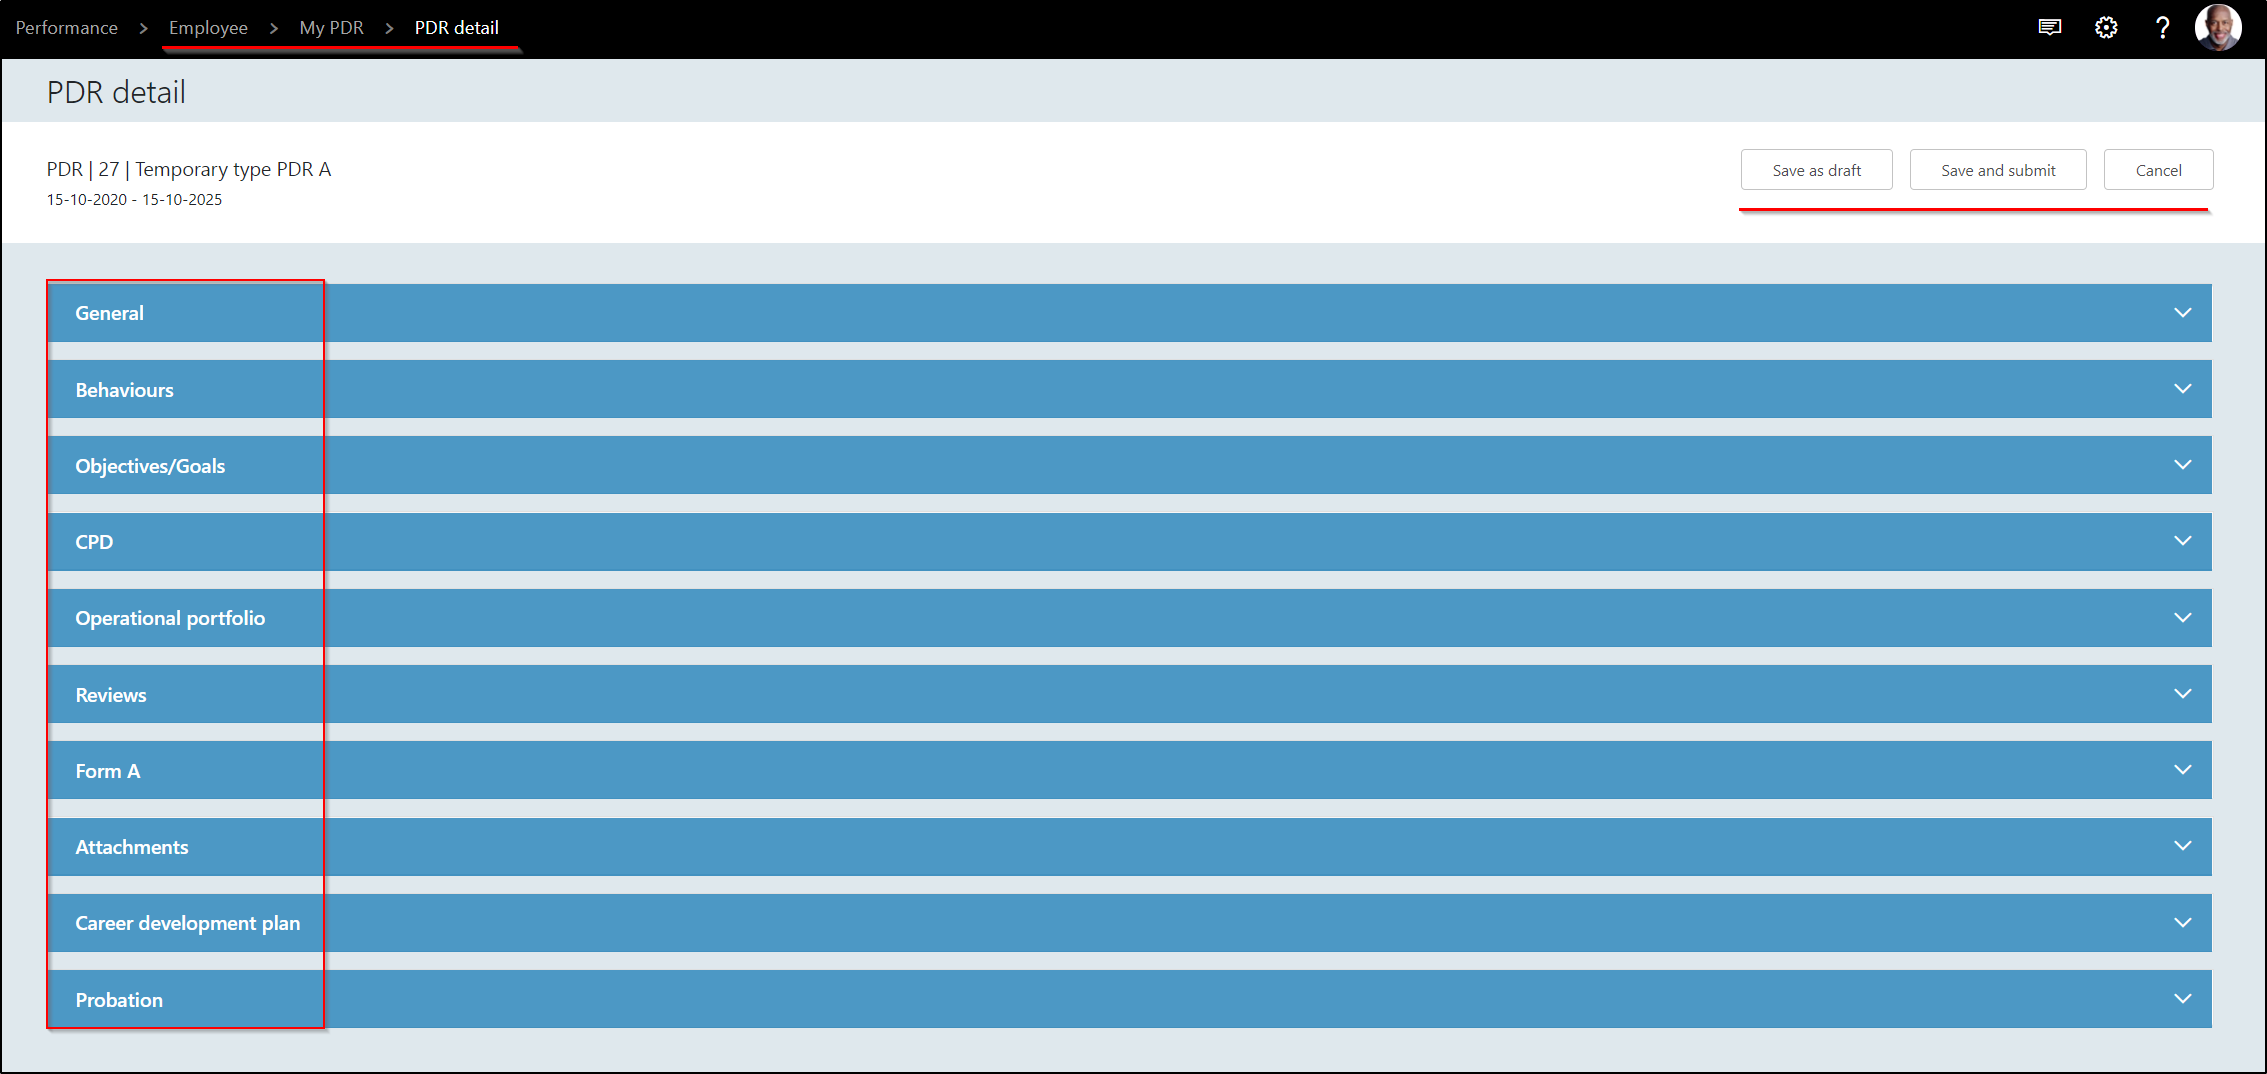
| 3 dot menu (Ellipsis) : Detail | This will open the PDR template (see below) and gives the option to edit the PDR. |
 |
|
| Figure: PDR Detail page | |
| 3 dot menu (Ellipsis) : View history | Use this menu option to see the details of the workflow. This contains all steps of the workflow, and the user who made a change: |
 |
|
| Figure: PDR workflow history | |
| 3 dot menu (Ellipsis) : Delete | This is used for deletioon of PDR from the list. |
| New | Use this option to add a new PDR to the list. |
 |
|
| Figure: Add new PDR | |
| For creation of PDR Template Click here and PDR Period Click here |
PDR Editing/Creating
Once a PDR form is created, the different tabs needs to be completed. The following fast tabs are available:

Figure: PDR form
Depending on the setup of the PDR template, different tabs might not be visible.
Explanation about the different tabs:
| Fast tab | Description |
|---|---|
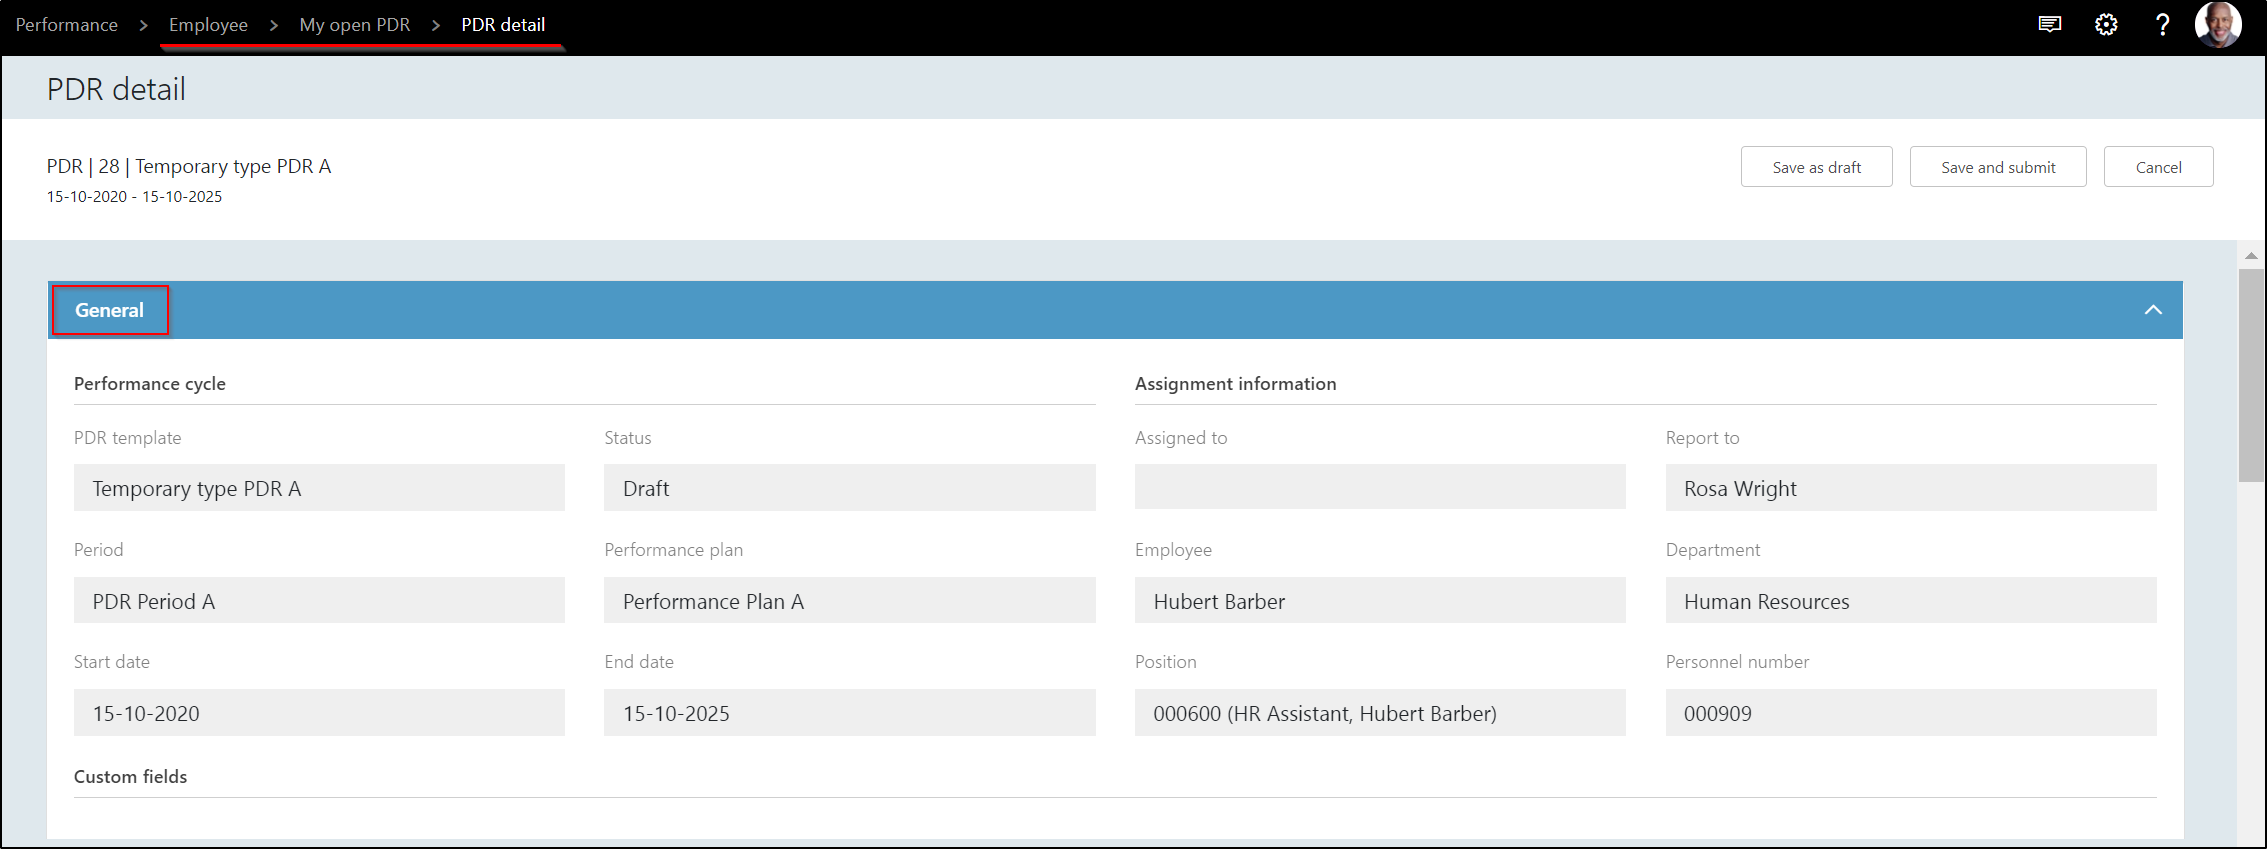
| General | The general fast tab contains information regarding the PDR. This contains the performance cycle, Assignment information and Custom fields |
| Performance cycle contains PDR Template name, PDR Period, Status, Performance plan, Start date and End date | |
| Assignment information contains Assigned to (person name), Reports to (person name), Employee name, Department, Position and its Personnel no. | |
| And Custon form for its working detail Click here | |
 |
|
| Figure: PDR fast tab - General | |
| Behaviours | The assigned behaviours to the employees. These will default from the assigned job (based on the position assignment): |
 |
|
| Figure: PDR fast tab - Behaviours | |
| Objective/Goals | This fast tab gives the option to maintain objective and goals that are set for the employee. These will be assigned to a objective category from the setup. |
| The objectives will be pre-populated based on the objectives maintained on the employee level: | |
| Per objective it's possible to add (in de details) activities to identify what's been done on the objective: | |
 |
|
| Figure: PDR fast tab - Objective/Goals | |
| CPD | As part of the CPD items can be added: |
 |
|
| Figure: PDR fast tab - CPD | |
| Operational portfolio | As part of the operational portfolio activities can be added. These activities will be assigned to activity groups. This will default from the employee record: |
 |
|
| Figure: PDR fast tab - Operational portfolio | |
| Reviews | This fast tabs shows previous (completed) reviews of the employee. This so it can be used as reference in the discussion and details can be seen: |
 |
|
| Figure: PDR fast tab - Reviews | |
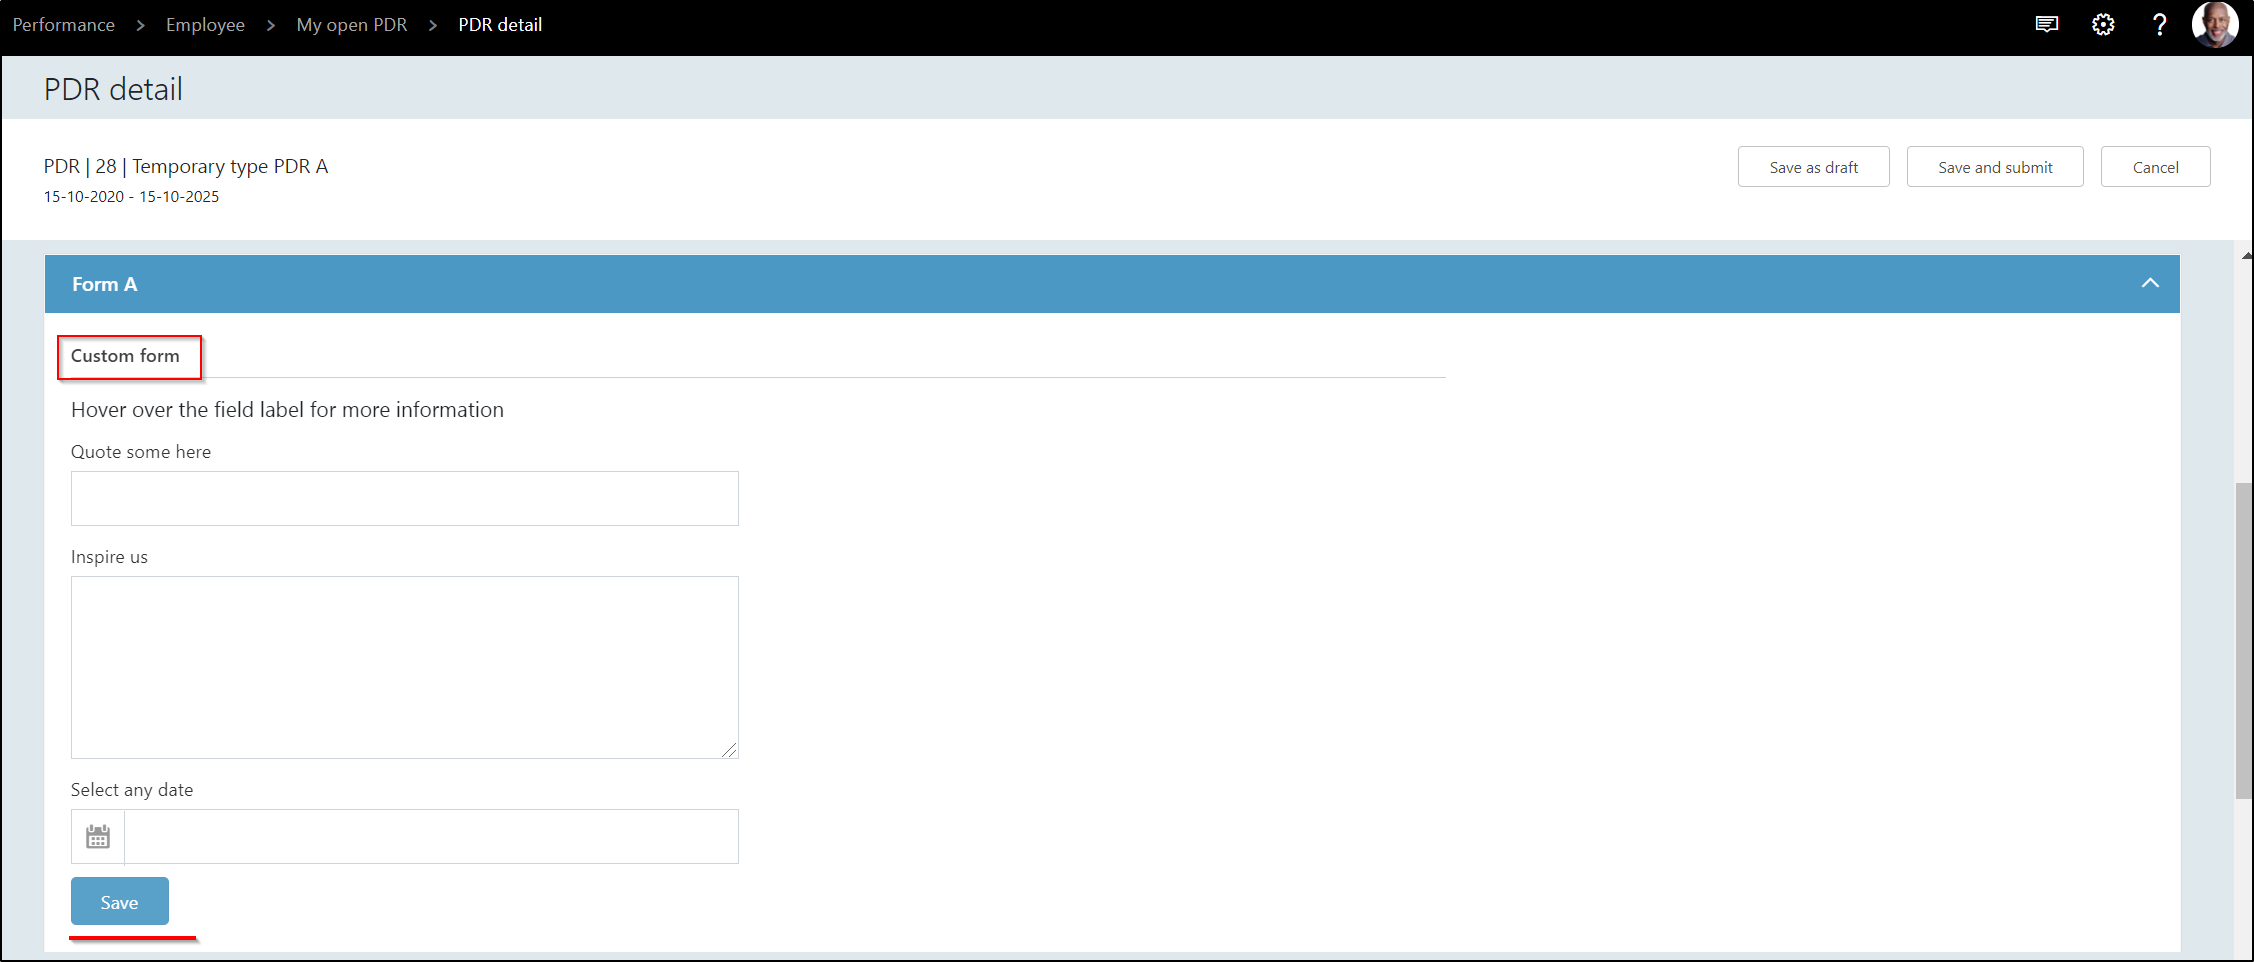
| Custom form | The annual review fast tab contains the custom form created in the setup. This is a flexible form to discuss the performance from the last year: |
 |
|
| Figure: PDR fast tab - Custom Form | |
| Attachments | This fast tab gives the option to upload attachments. This can be done as proof of some completed certificates/training or feedback e-mails from the organization: |
 |
|
| Figure: PDR fast tabs - Attachments | |
| Career development plan (CDP) | This fast tab gives the option to maintain details about the Career Development Plan. This can be detailed activities or training, or general items: |
 |
|
| Figure: PDR fast tab - CDP | |
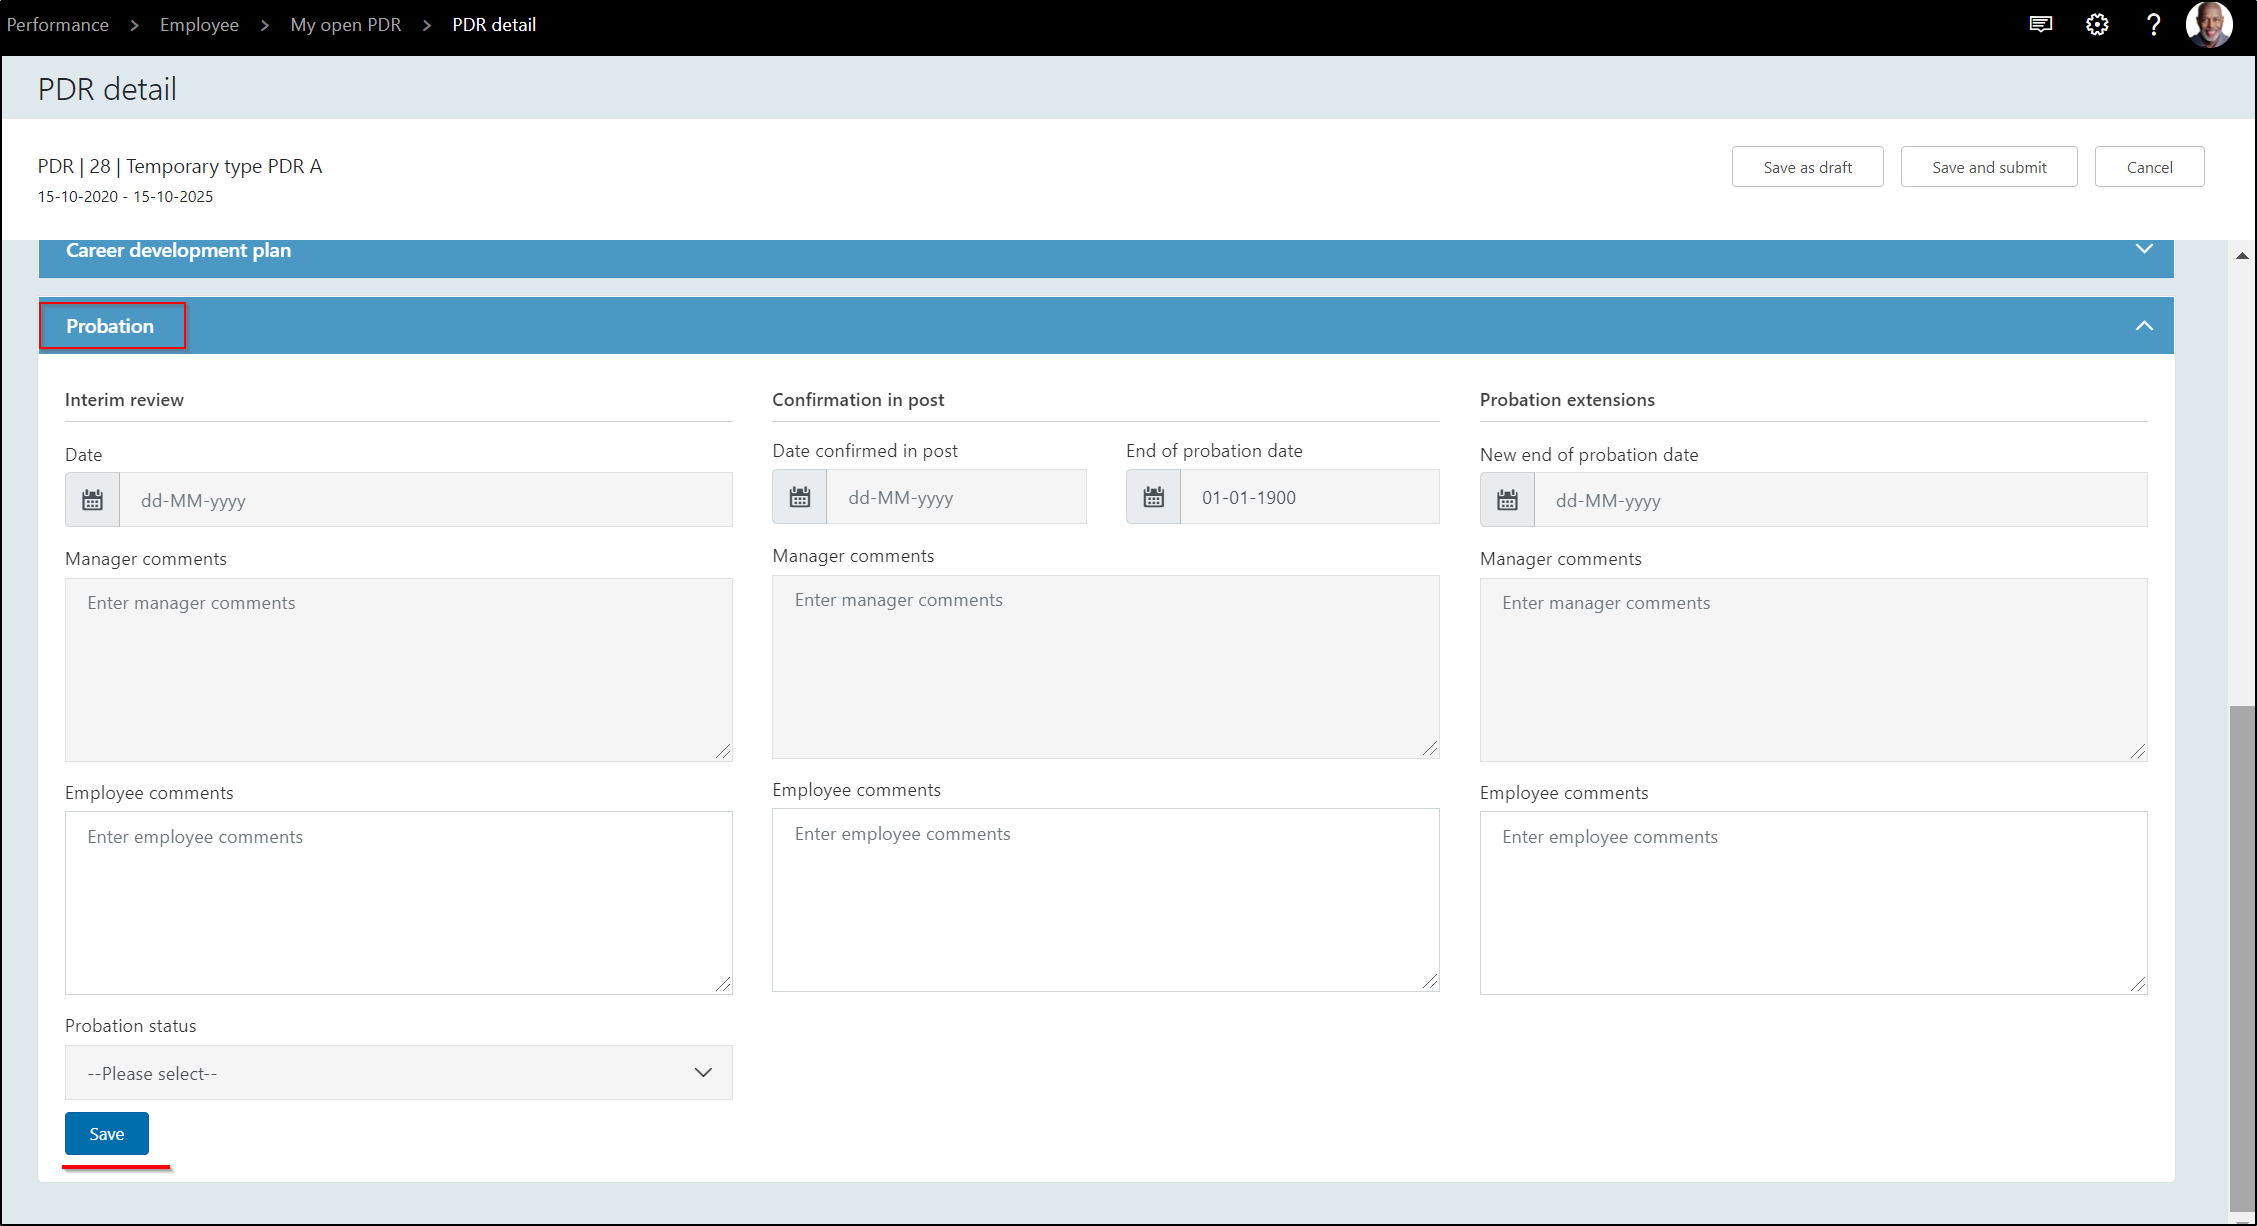
| Probation | In case of Probation discussions, this fast tab can be used. It contains 3 different parts on the tab: |
| 1. Interim review | |
| 2. Confirmation in post | |
| 3. Probation extensions | |
 |
|
| Figure: PDR fast tab - Probation |
Performance Manager
The Manager Dashboard shows an Overview of his/her Team's Objectives, CPDs, CDPs, Active PDRs, PDRs for approval, PDRs and number of Jobs without Behaviour. This Role access is provided to a Manager who is responsible for Goal/s setting, Performance Reviews/Appraisals, Periodic meetings and Feedback for Team members etc., .
Explanation of the fields/actions:
| Tile | Description |
|---|---|
| My team objectives | This will show the objectives assigned to the team of the manager. |
| This also gives the option to assign objectives: | |
| - Individual assignment to employee; | |
| - Mass assignment to a team; | |
| My team CPD | These are the CPD of the team members. Adding a learning event title per employee is possible from this menu for the manager. |
| My team CDP | The manager can create new CDP for individual team members. This also includes current CDP's of all team members. |
| My team active PDR | If any active PDRs are available this will be visible in this menu option. |
| This will only be PDRs that are open (so not status closed or rejected). | |
| PDR for my approval | In case a PDR is assigned (based on workflow) to the manager, it will show up on this menu. This will be actions assigned to the user who is logged in. |
| My team PDR | If any active PDRs are available this will be visible in this menu option. |
| This will include all PDRs (including status closed or rejected). | |
| Number of jobs without behaviour | These are the jobs that don't have a behaviour assigned. |
| In order to have a good performance cycle, this number should be zero in order to use this functionality correctly. | |
| This is display only, as this is part of the administrator tasks to setup. |
Depending on the company process and settings in the application, processes can be different. But in this example the manager will continue the following steps before approving the PDR in the workflow to his manager:
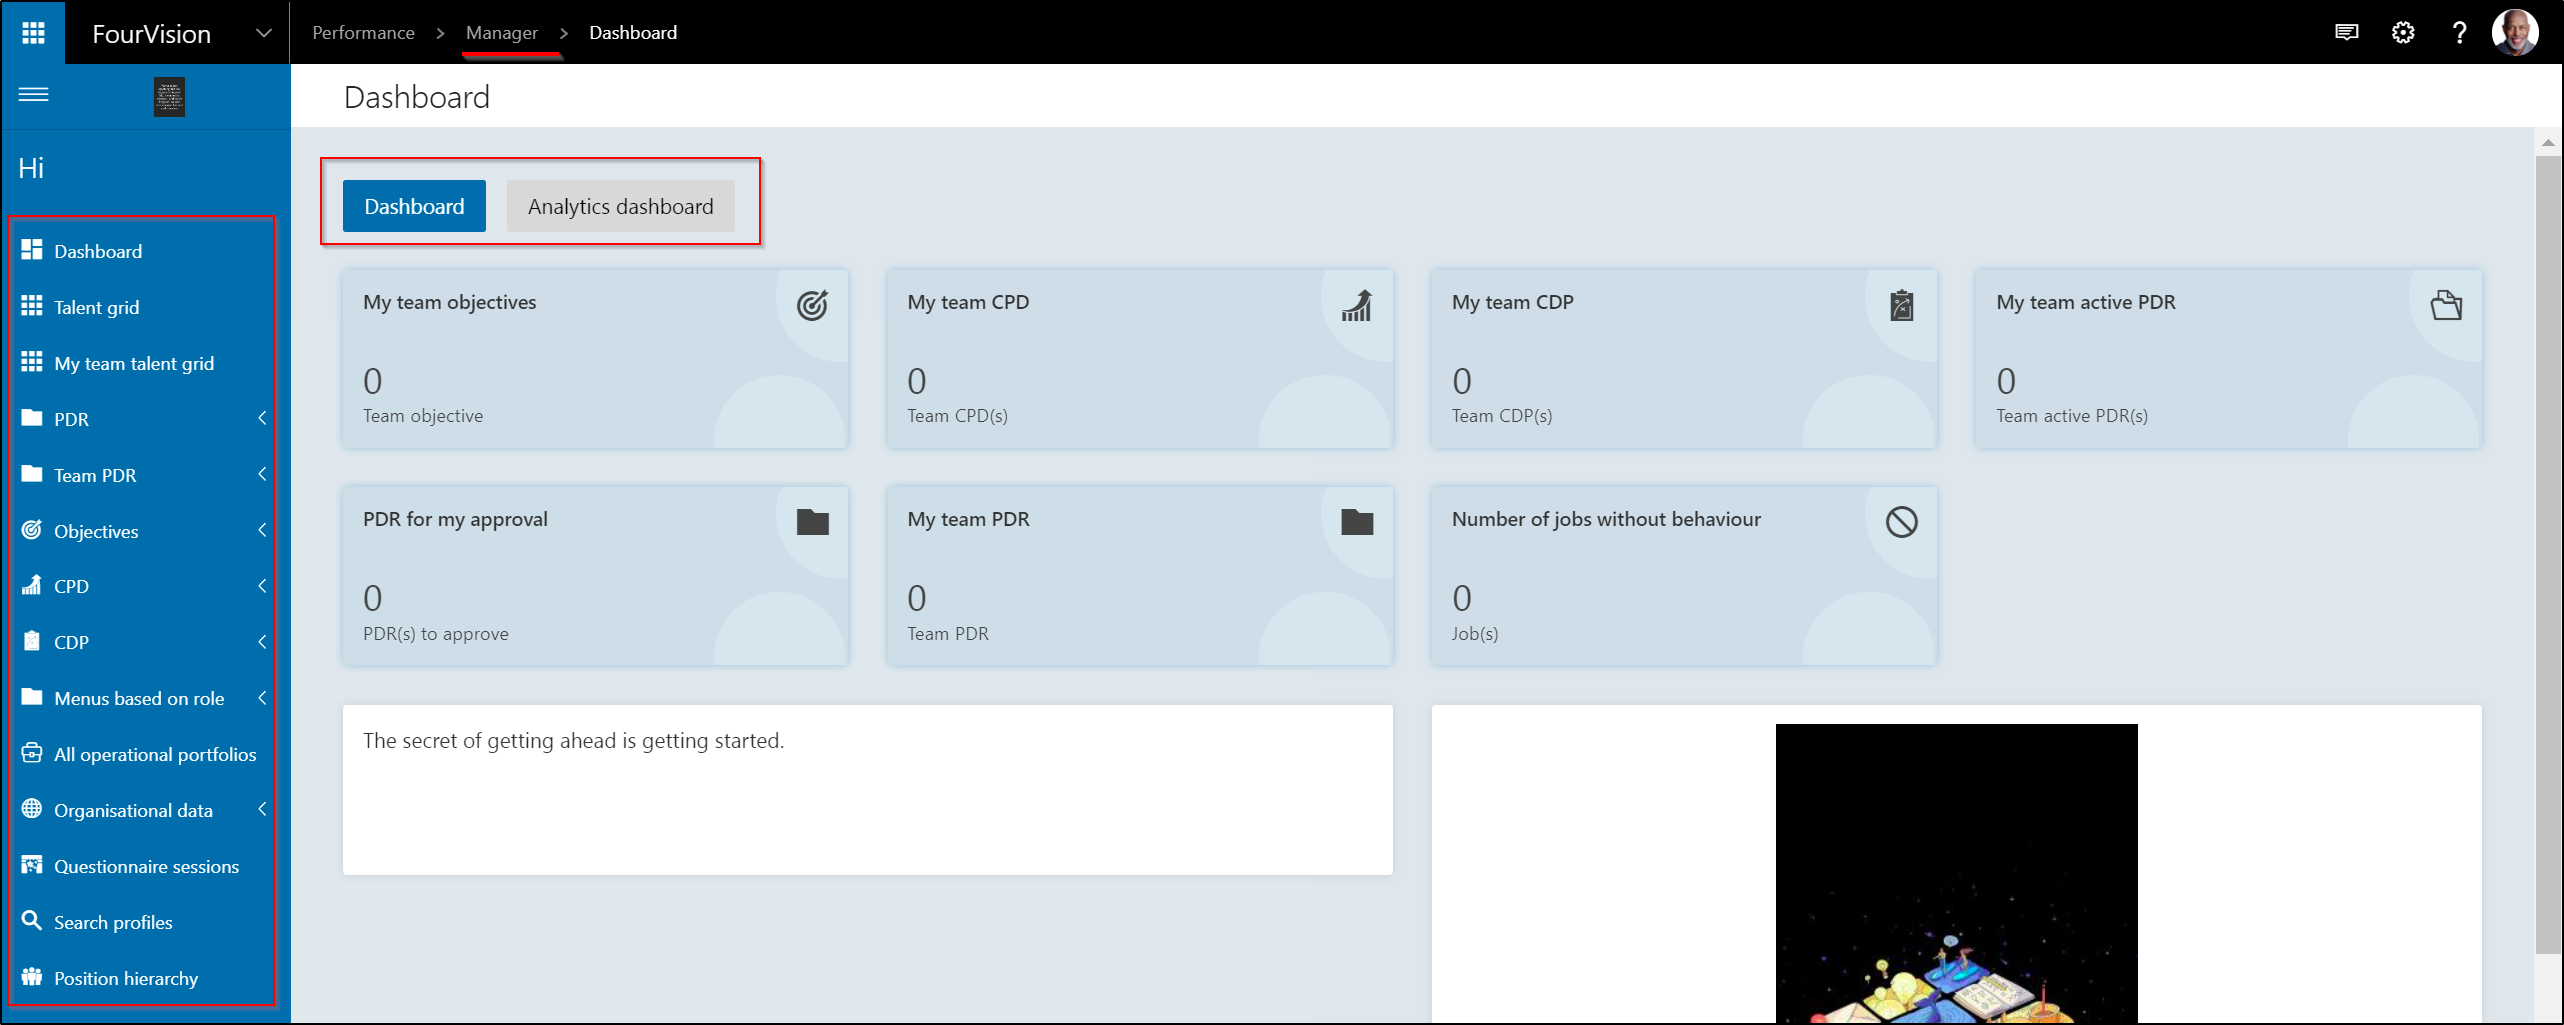
Figure: Manager
Manager: Maintain operational portfolio
A People Manager can add Operations related responsibilities based on an Employee Role/Charter.

Figure: Operational portfolio
Explanation of the fields/actions:
| Tile | Description |
|---|---|
| Title | The description of the title from the operational portfolio |
| Date | The date set with the operational portfolio / action |
| Worker | The name of the employee |
| Activity | The linked activity to the operational portfolio |
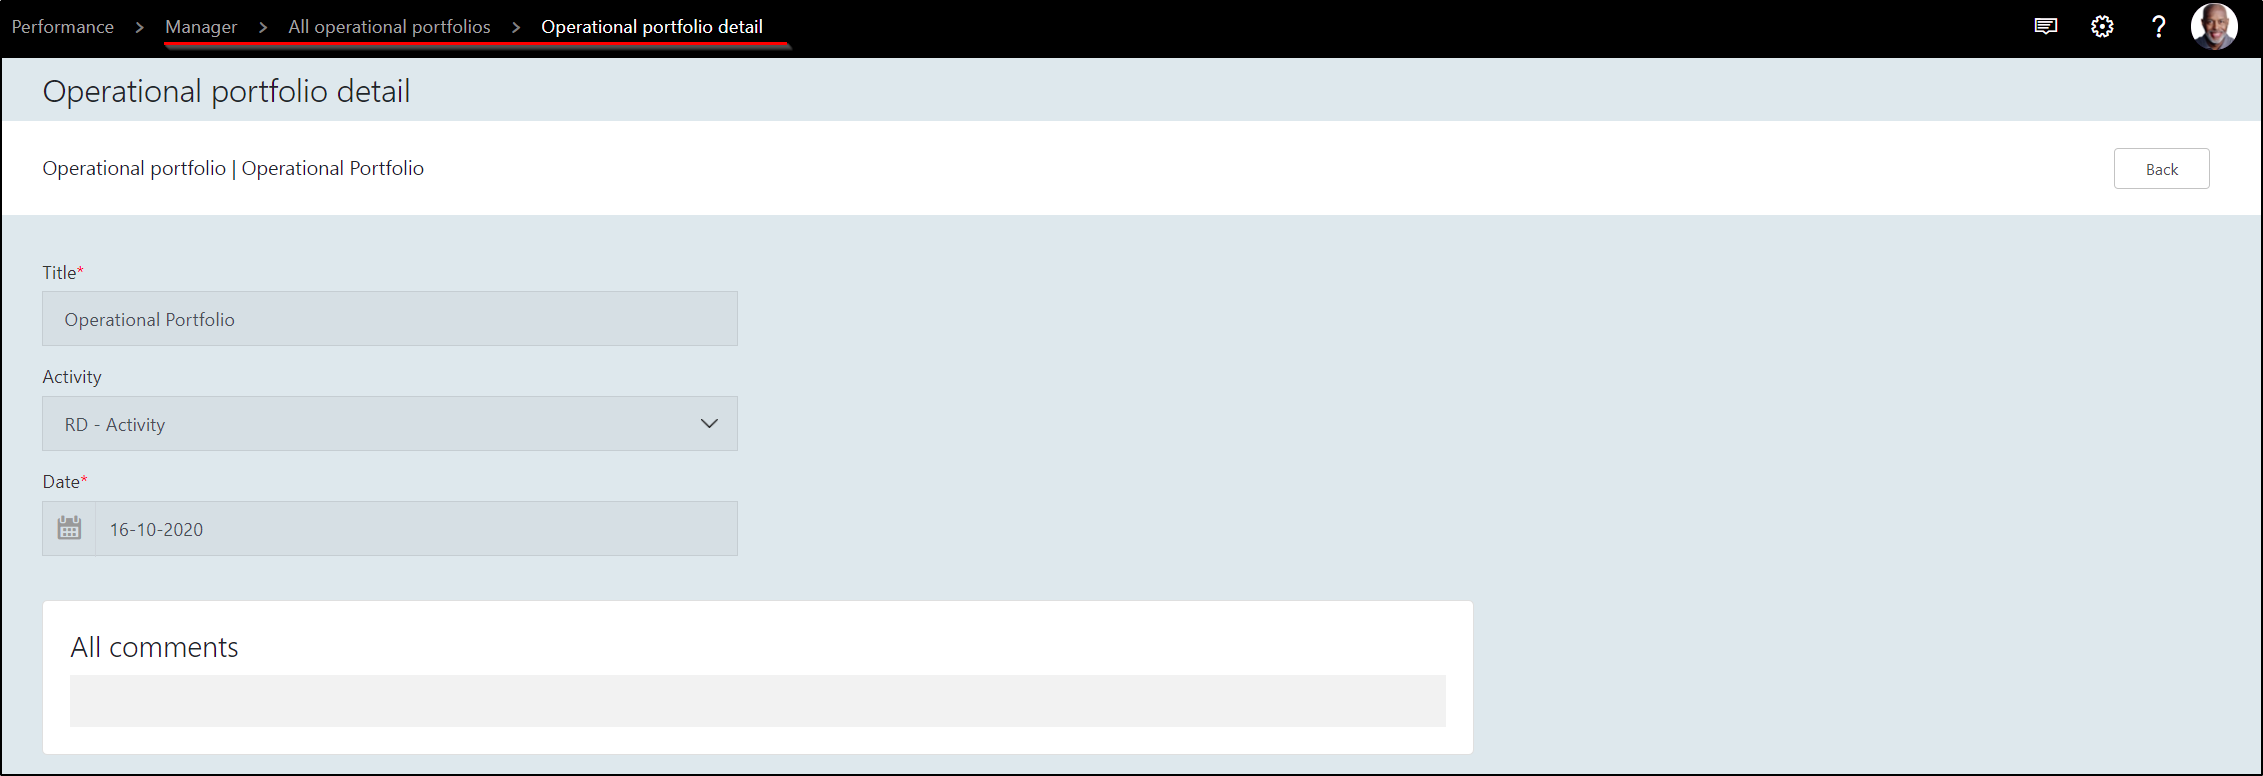
| 3 dot menu (Ellipsis) : Detail | This will open the operational portfolio of the employee and you will see the details and comments: |
 |
|
| Figure: Operational portfolio detail | |
| 3 dot menu (Ellipsis) : Delete | Use this option to delete an item from the list. This will only work if no comments are maintained. |
Manager: Add Team objective
The manager dashboard shows an overview of objectives, CPD and team activities and actions that are required. This is not necessary only assigned to employees who are responsible for a team, but could also be for a HR Business Partner who needs to action certain parts of the process:
A People Manager can set Objectives to his/her Team members under this functionality.
The team objectives can be assigned per two options:
Add individual objective
Add team objective

Figure: Add objectives
Explanation of the fields/actions:
| Tile | Description |
|---|---|
| Title | The title/description of the objective |
| Worker | The assigned worker to the objective |
| Objective Type | The objective type. This can be: |
| - Individual | |
| - Department | |
| - Strategic | |
| Objective Category | The category the objective is assigned to (corresponding with the setup) |
| Status | The status of the objectives. This can be |
| - Planned | |
| - On track | |
| - Needs improvement | |
| - Completed | |
| - Cancelled | |
| Completion | It shows the completion rate of the objective in % |
| Start & End Date | The dates associated with the objectives. |
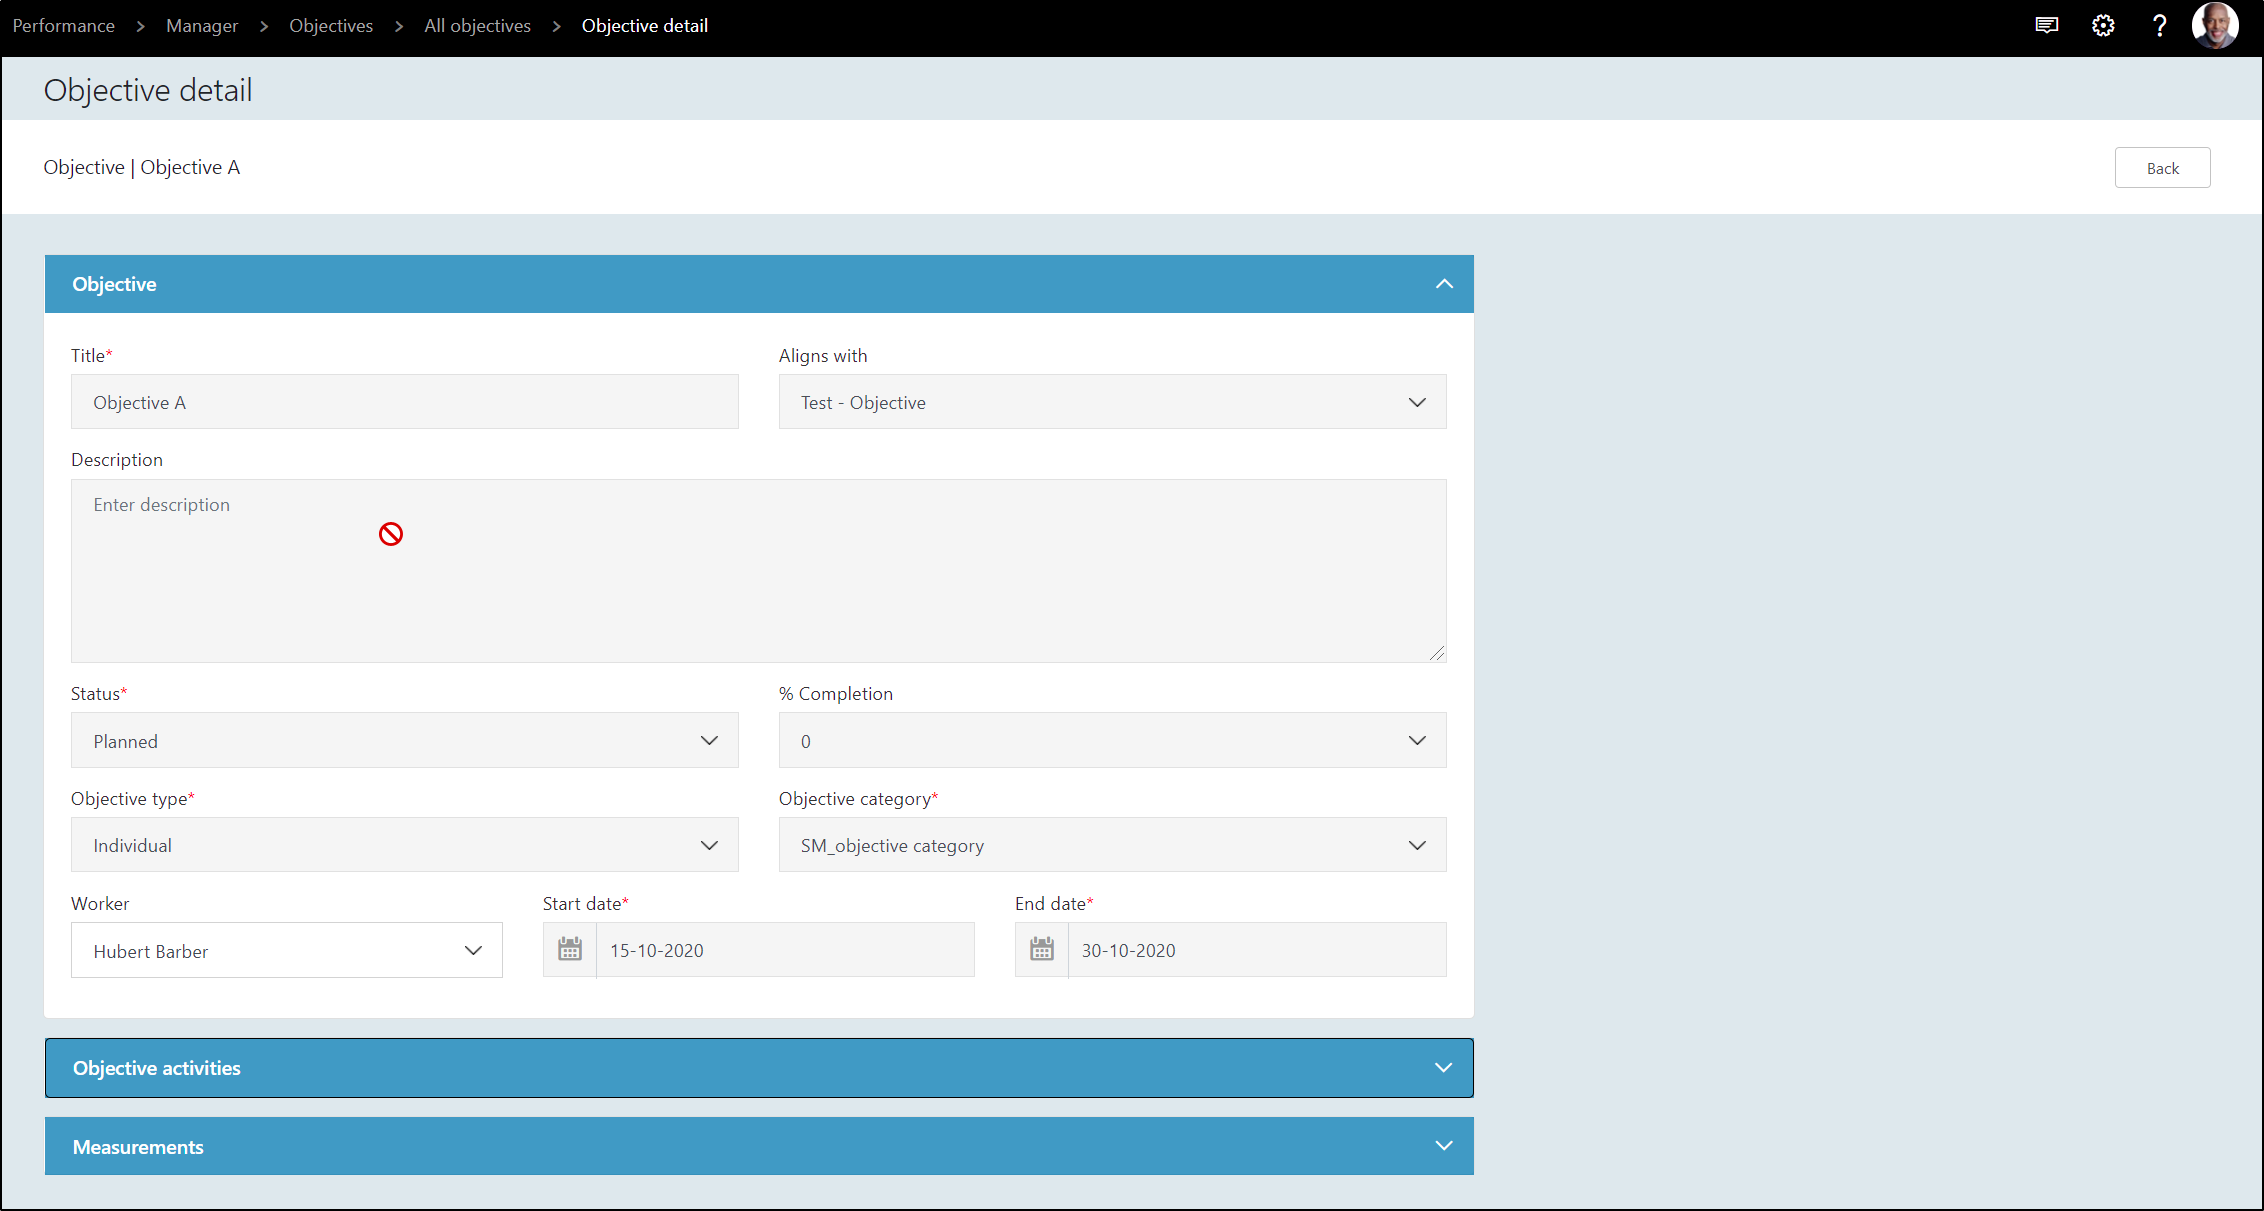
| 3 dot menu (Ellipsis) : Detail | Use this to see the details of the objectives: |
 |
|
| Figure: See detail of objective | |
| Al fields are greyed out and can't be changed. | |
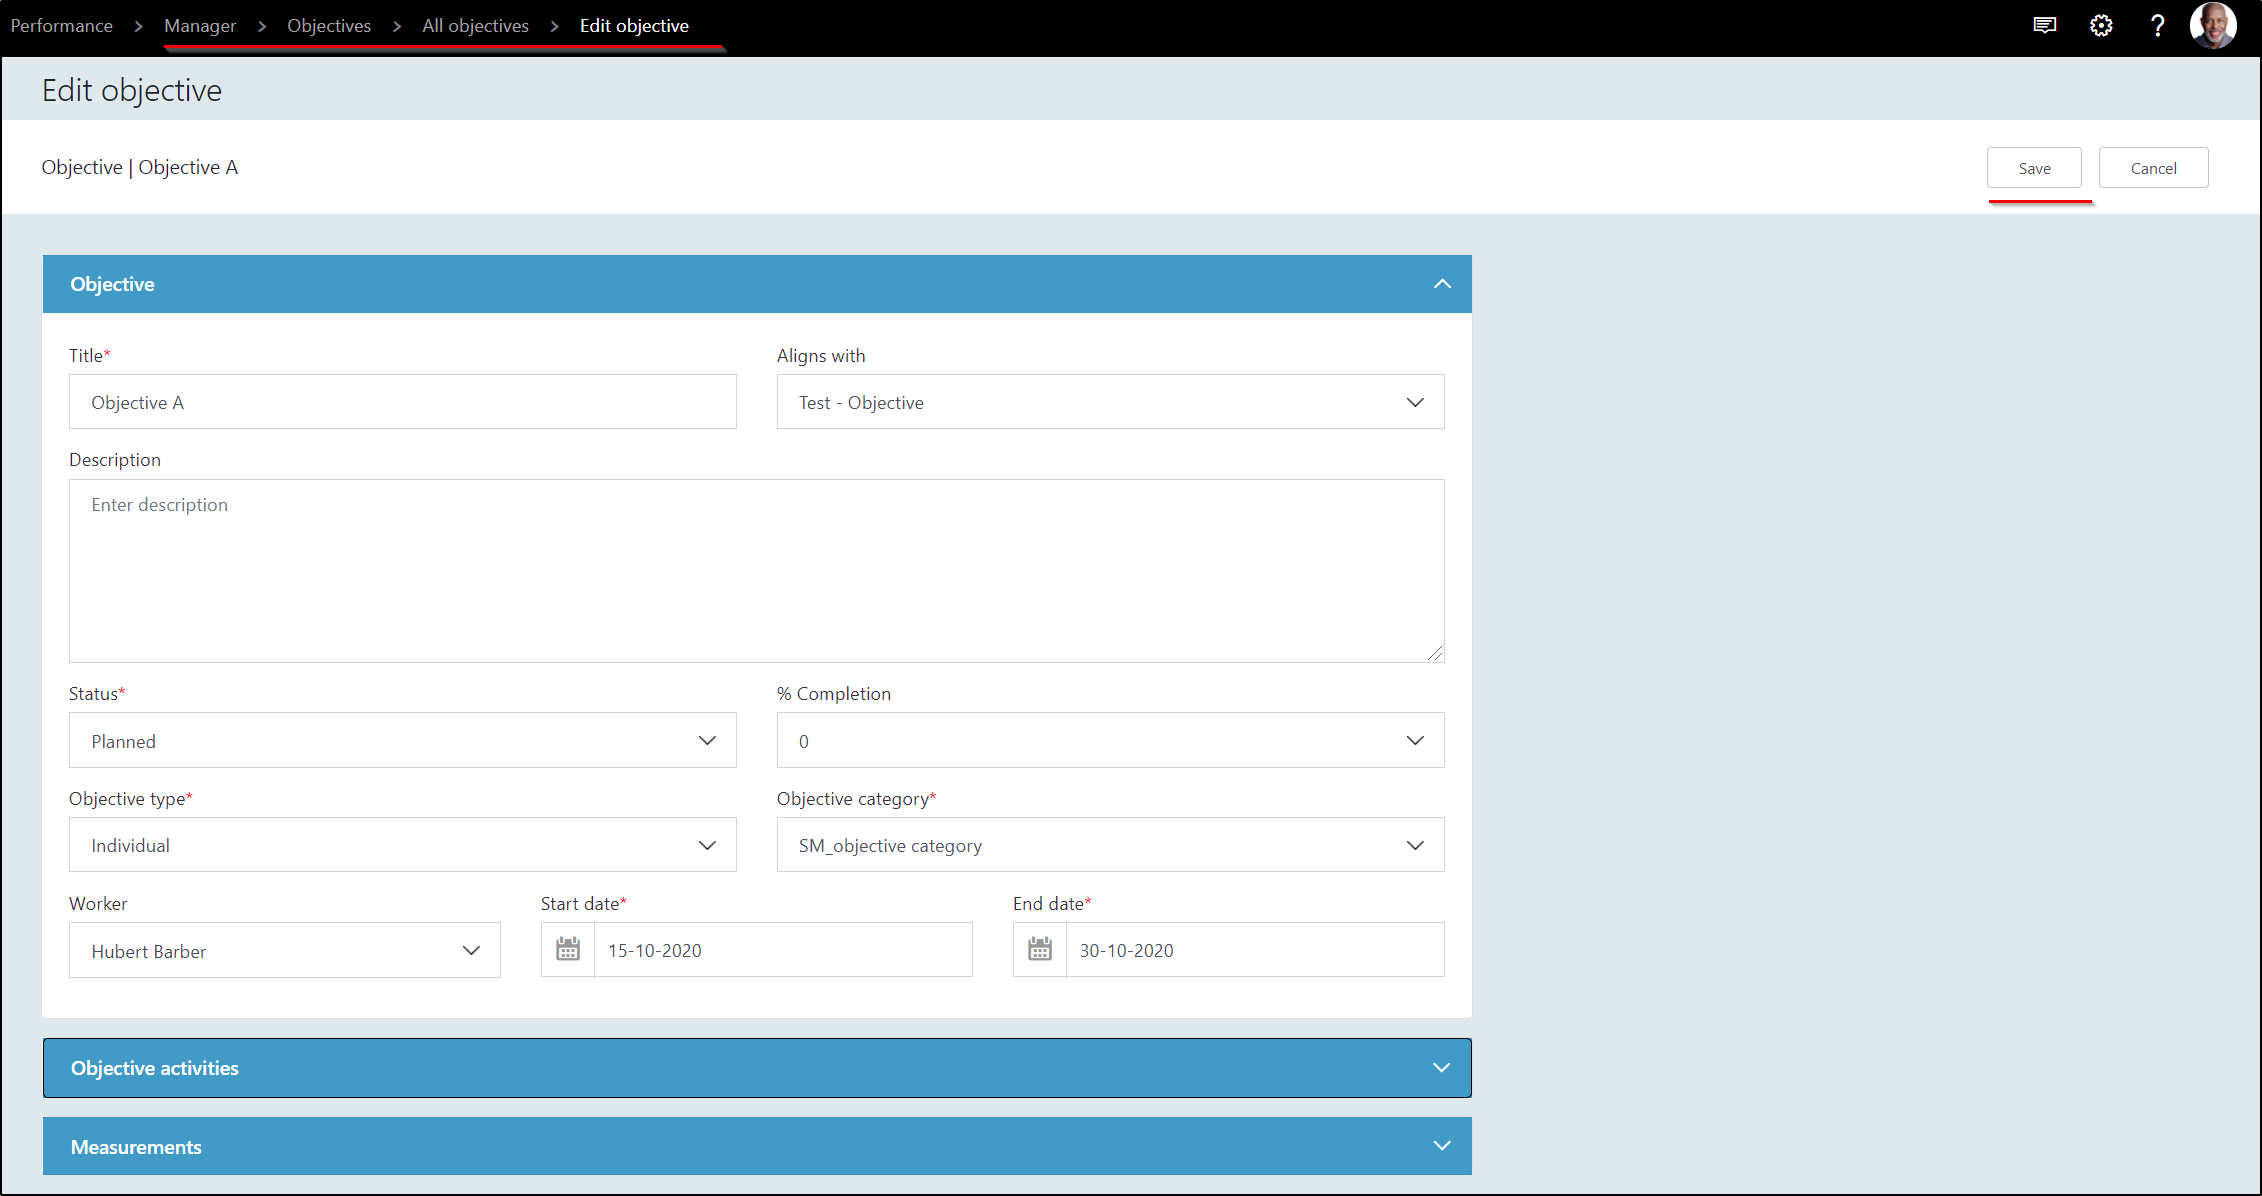
| 3 dot menu (Ellipsis) : Edit | Use this to change the objective maintained by team members |
 |
|
| Figure: Edit objective | |
| 3 dot menu (Ellipsis) : Delete | Use this to delete an item from the list. |
Manager: Cascade Objectives
CEO/Regional Heads/BU Heads/Department Heads/People Managers can cascade Company, Region, BU, Department Goals/Objectives down to the grass root level under this functionality.
In order to cascade Objectives, the parameter Click here to 'enable alignment objectives with', needs to be enabled.
Once that's completed a Strategic Objective needs to be created (as Individual Objective, part of standard process. Once completed, to set the strategic objective, click on edit a assigned objective, and make sure the 'Strategic Active' is enabled:
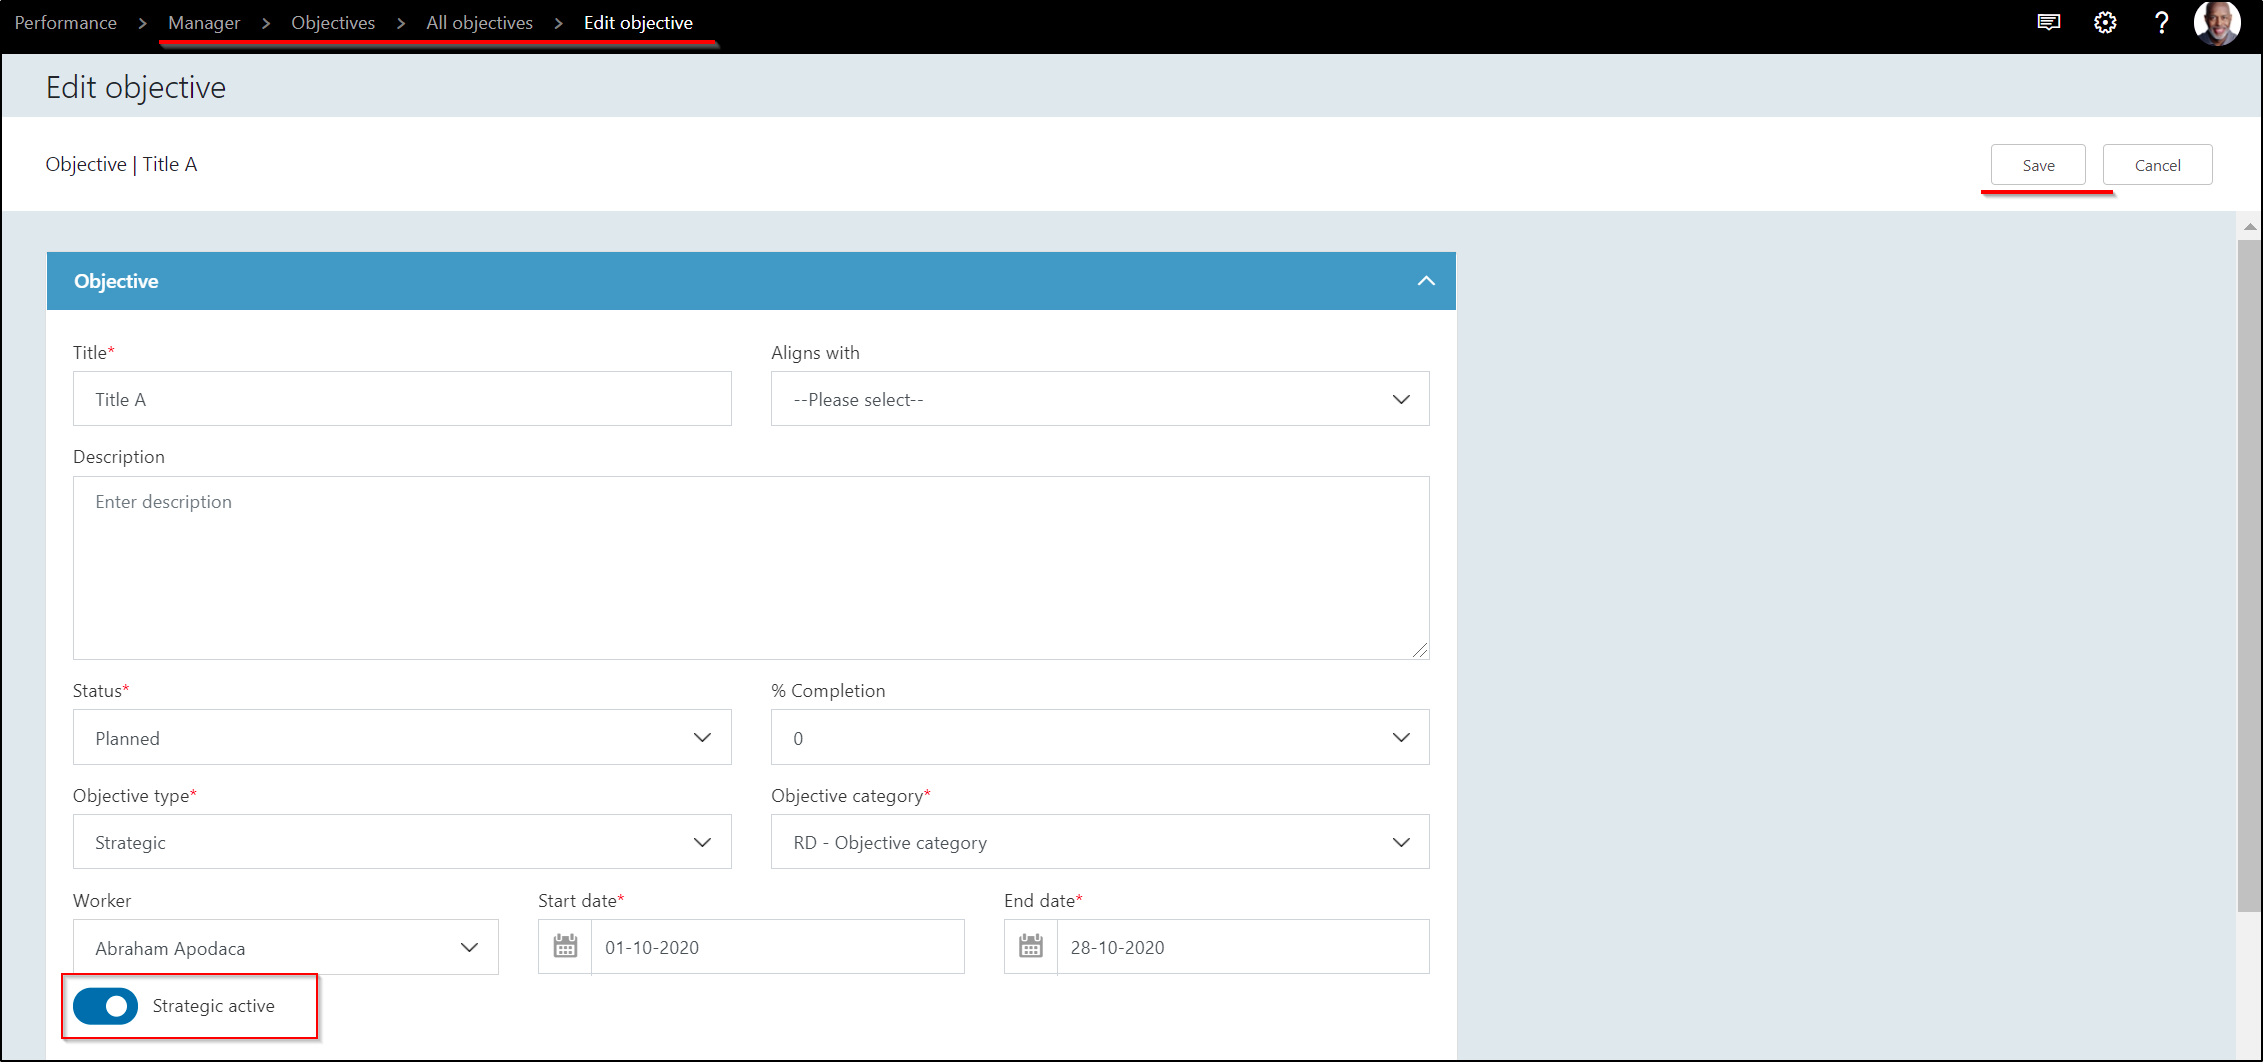
Figure: Strategic objective
Once that's completed new Mass Objectives can be assigned, linked to the strategic objective:
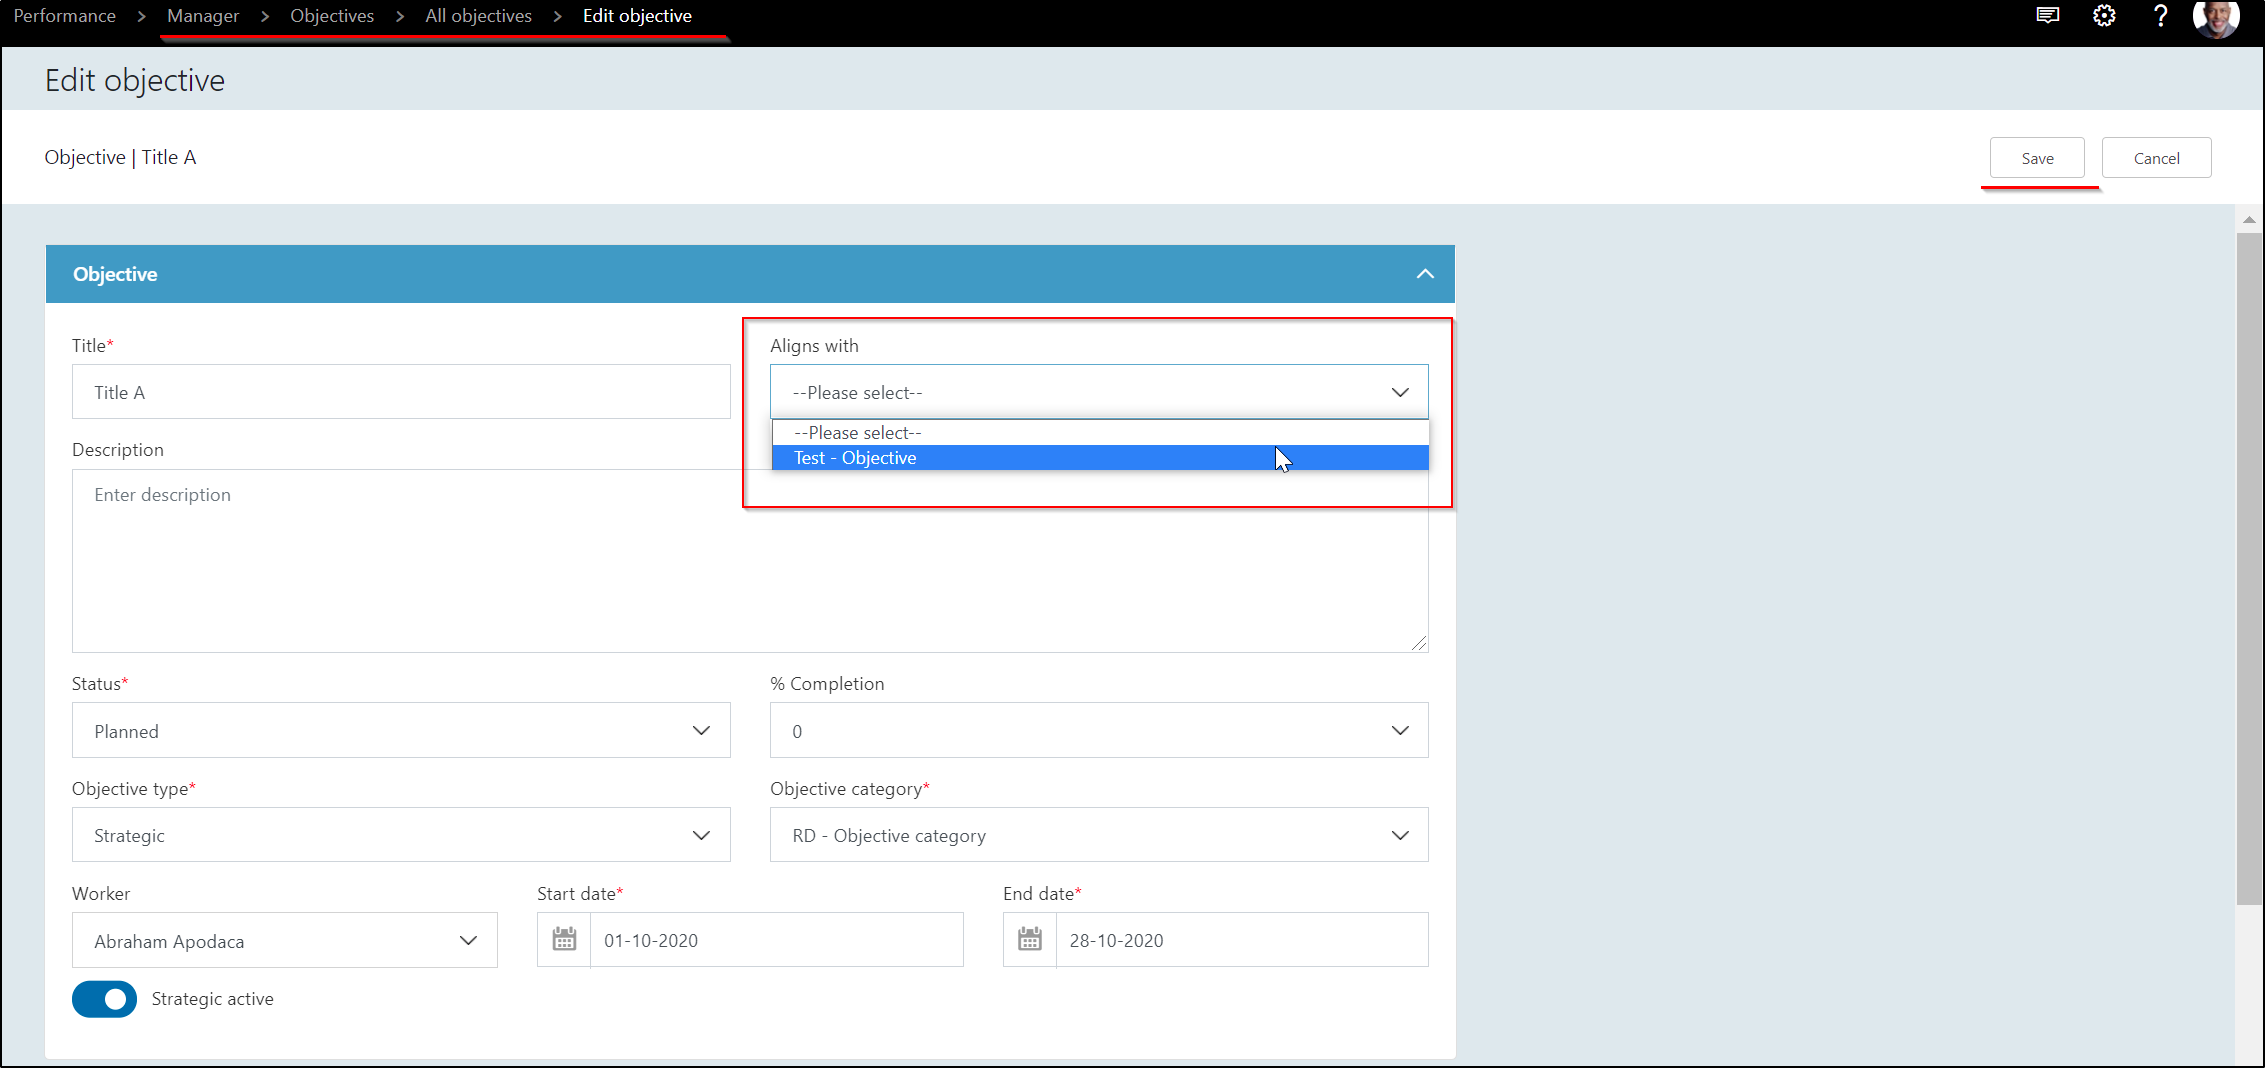
Figure: Cascade objective
If the mass assignment is used, this can be assigned to all members of a department as a shared objective:

Figure: Cascaded objectives
Manager: Mass create PDRs
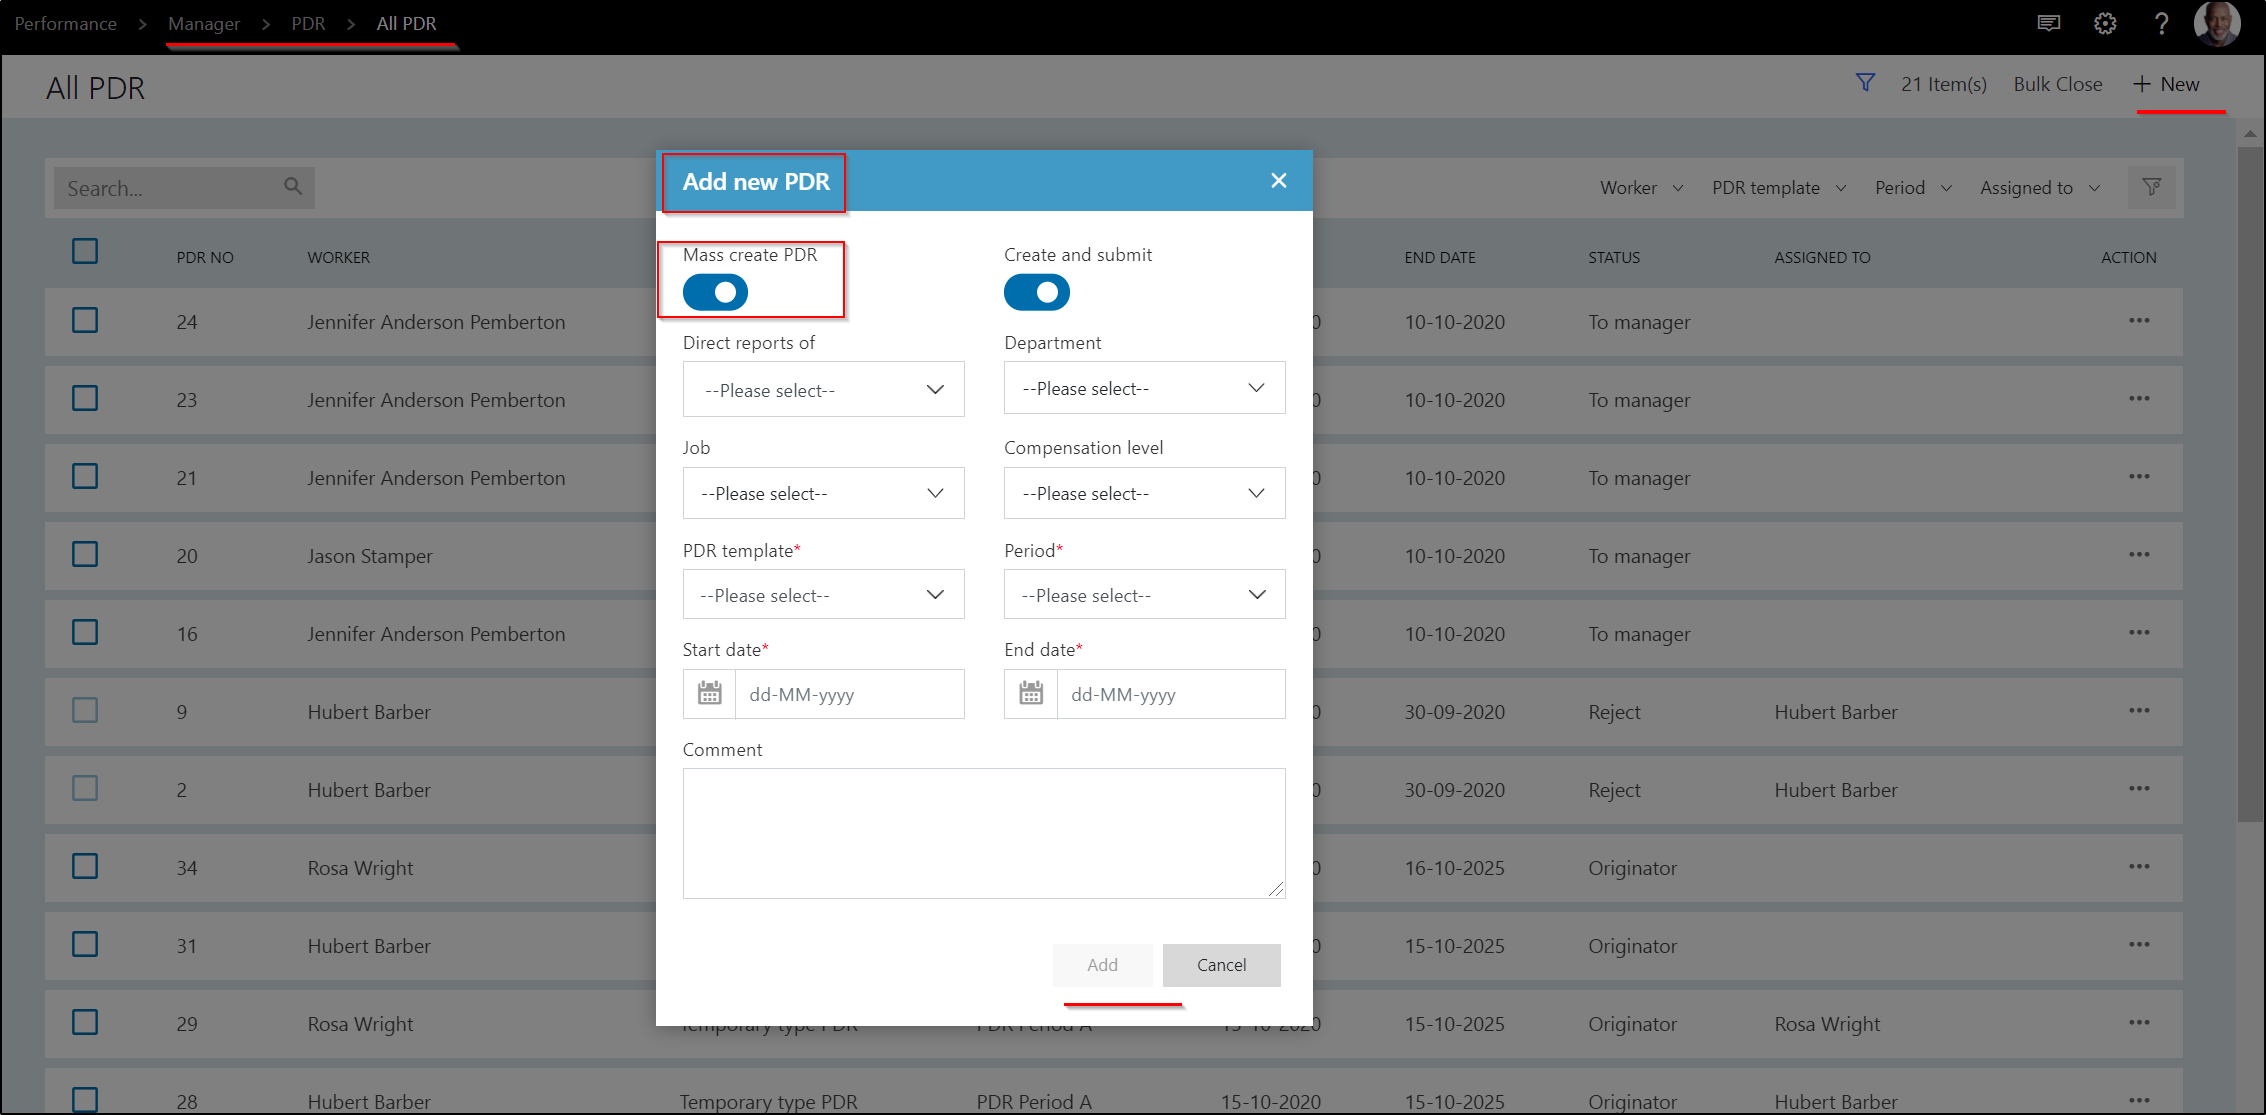
A People Manager can create Performance Development Review (PDR) forms for all of his/her Team members at a time.
From the Dashboard click on My team PDR to start the process (alternatively select from the hamburger menu):

Figure: All PDR
Explanation of the fields/actions:
| Tile | Description |
|---|---|
| PDR No | The number of the PDR |
| Worker | The employee for whom the PDR is started |
| PDR Template | The PDR template that's used for the selected conversation. This determines the fast tabs (and thereby discussion topics) |
| Period | The associated period the PDR is applicable to |
| Start & End Date | The dates corresponding with the selected period |
| Status | This is the workflow status, corresponding with the setup that's linked to the PDR template |
| Assigned to | If the PDR is still active, the assigned to is the person in the workflow who needs to action. This can be the manager, employee or for example HR Admin. |
| If the PDR is in draft, or closed, this field will be empty | |
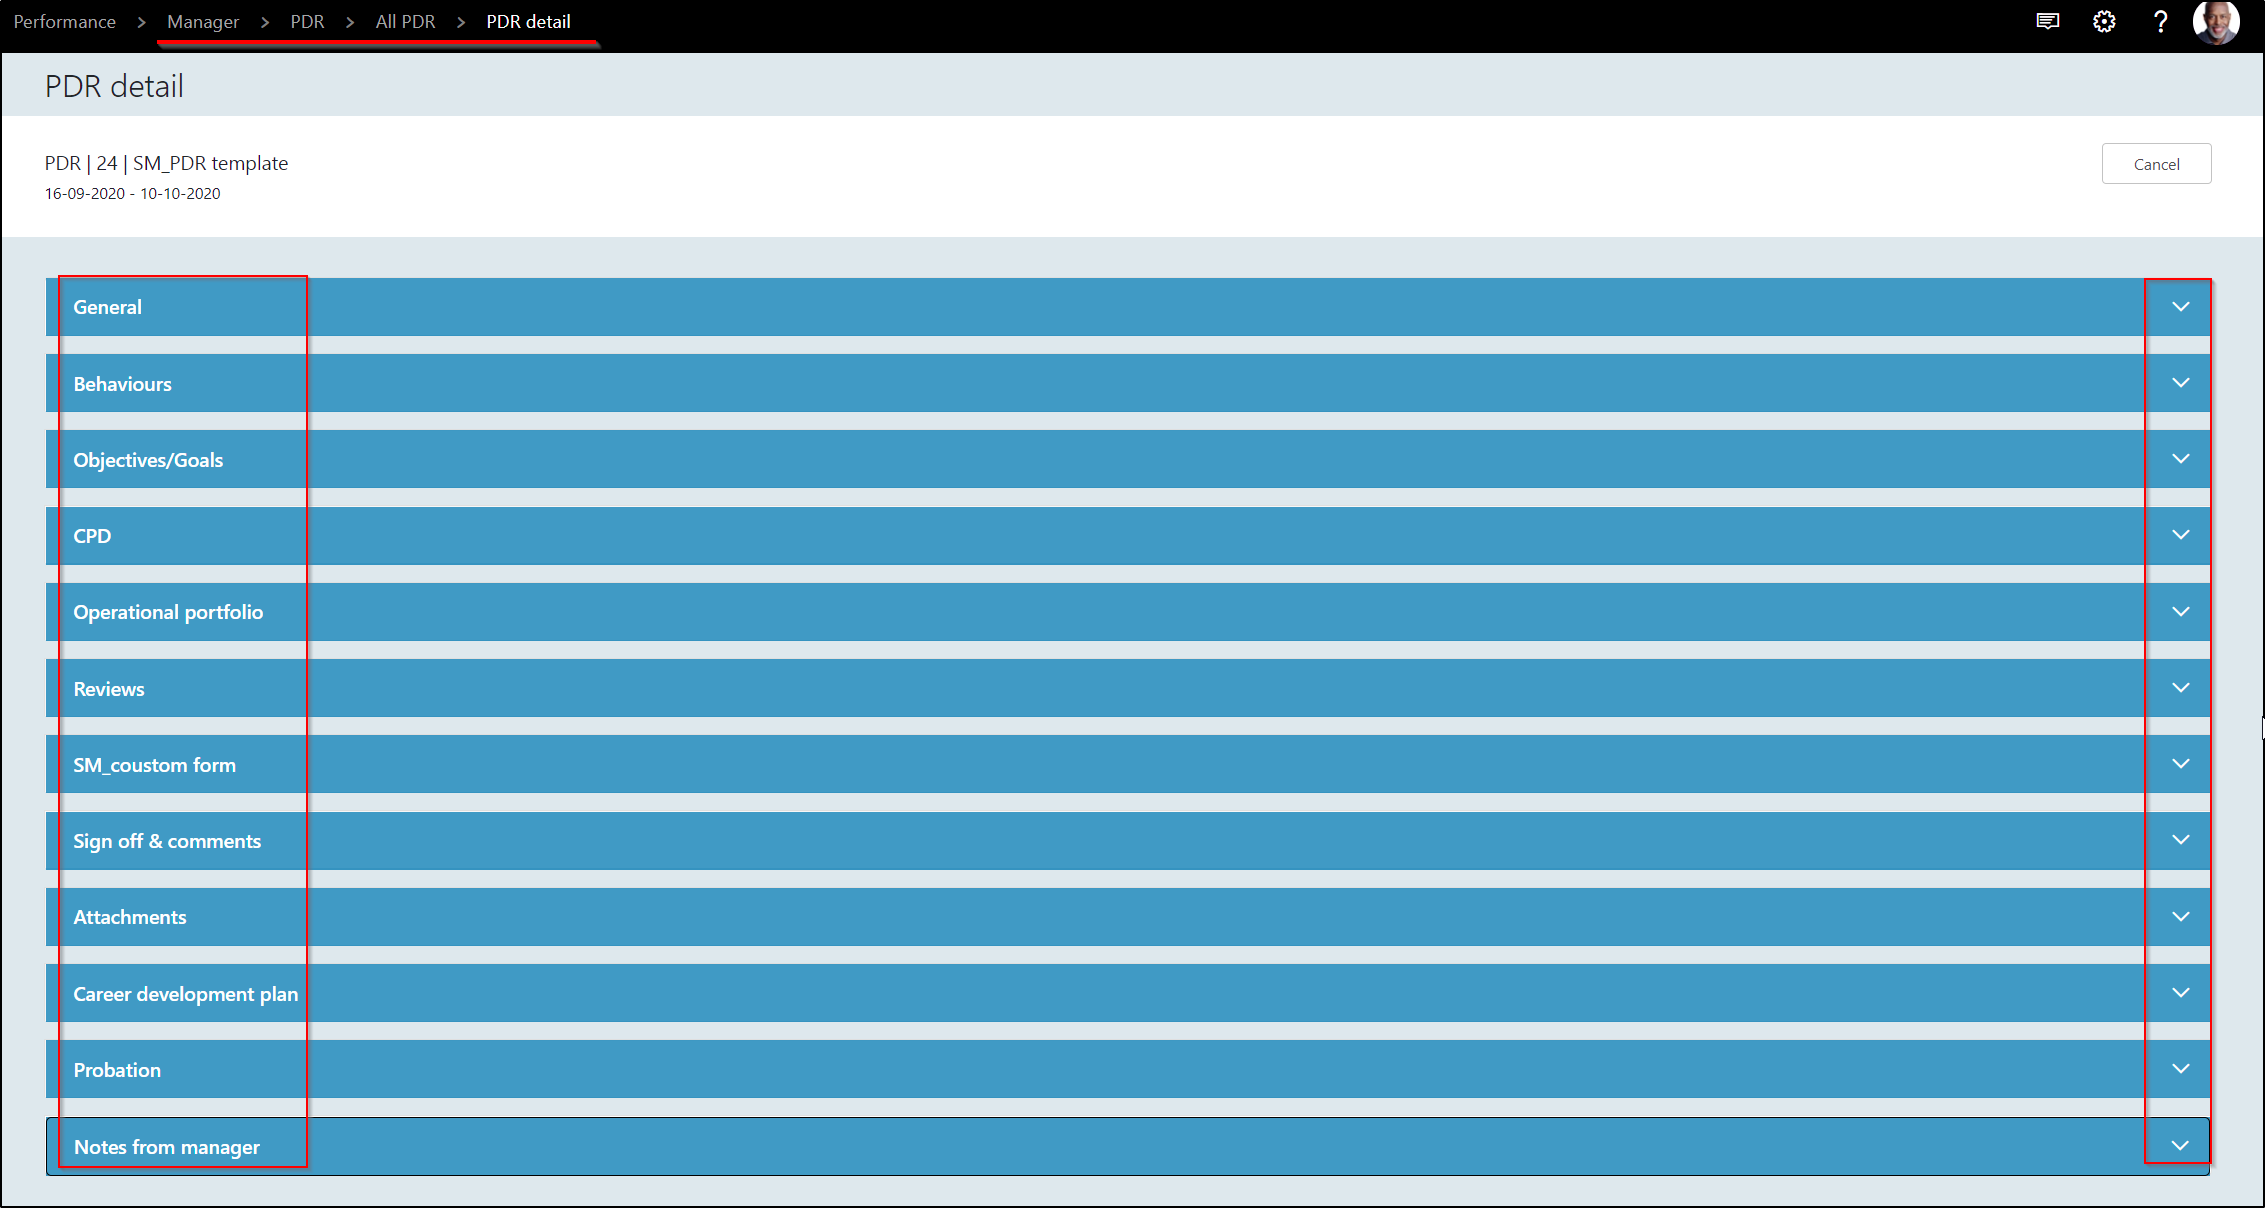
| 3 dot menu (Ellipsis) : Detail | This will open the PDR template and all fields will be greyed out (display only): |
 |
|
| Figure: PDR Detail | |
| 3 dot menu (Ellipsis) : View history | Use this option to see the workflow history. This also gives the option to see the comments that have been added upon submitting to workflow: |
 |
|
| Figure: Workflow history | |
| 3 dot menu (Ellipsis) : Reassignment | Use this option to reassign a PDR to a different person/user. |
| Reassignment can be done to a Worker or a **Position: | |
 |
|
| Figure: Reassign PDR | |
| 3 dot menu (Ellipsis) : Promote to next status | Use this to move the PDR to the next step in the workflow. |
| This will open the PDR and workflow options can be selected: | |
 |
|
| Figure: Promote to next status | |
| Bulk close | This option gives the possibility to change multiple PDR's at the same time. The following options are available: |
| - End Approved | |
| - End Rejected | |
| - Forced Closure | |
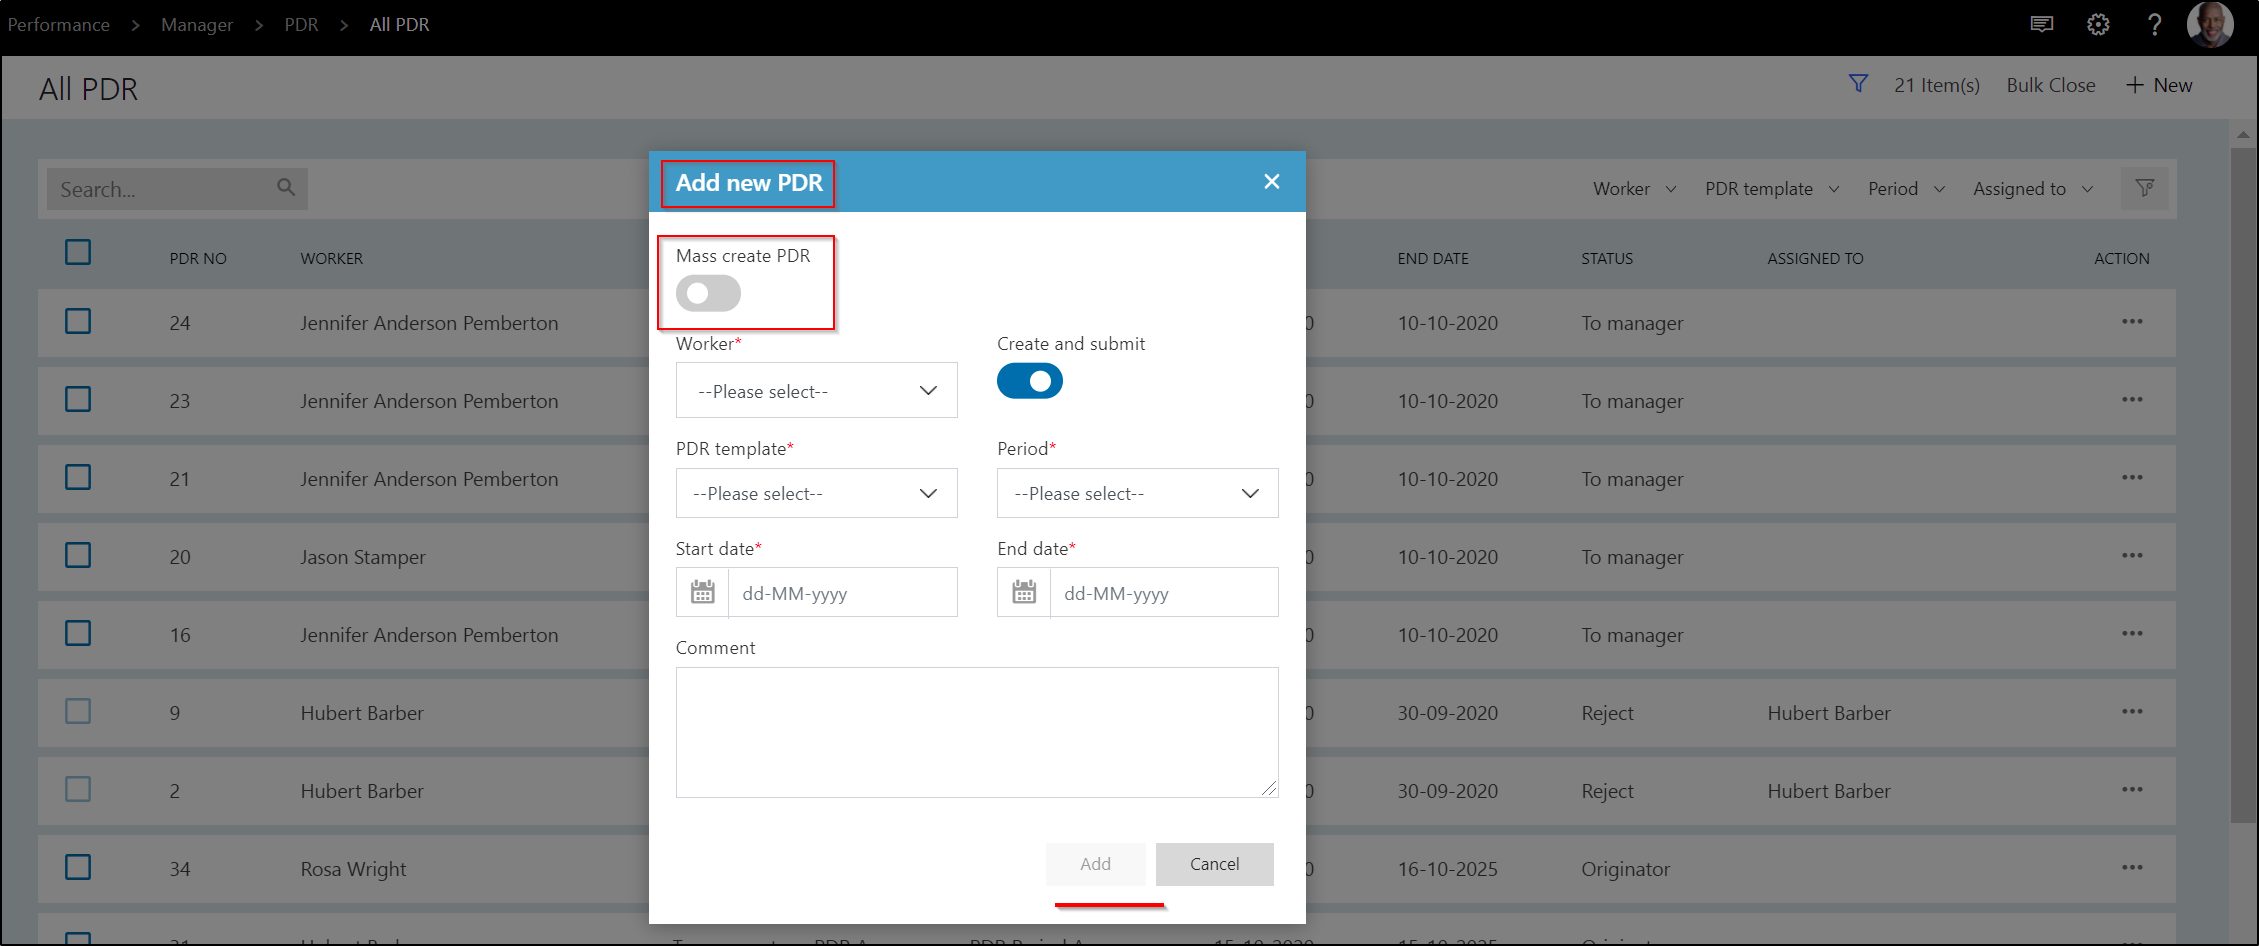
| New (one) | Use this option to add a new PDR: |
 |
|
| Figure: Add new PDR | |
 |
|
| Figure: Add new PDR | |
| If the button "create and submit" is enabled: the PDR will be submitted to workflow directly. If the button is disabled, it will be created in draft. | |
| Bulk Close | In order to perform same action (END APPROVED, END REJECTED and FORCED CLOSURE) more than one PDR |
 |
|
| Figure: Bulk close |
Manager: Add Team Continuous Professional Development (CPD)
A People Manager can add Continuous Professional Development (CPD) forms to his/her Team members under this functionality.

Figure: All CPD
Explanation of the fields/actions:
| Tile | Description |
|---|---|
| Learning event title | The description of the CPD of the worker |
| Date | The associated date of the CPD of the worker |
| Worker | The name of the employee |
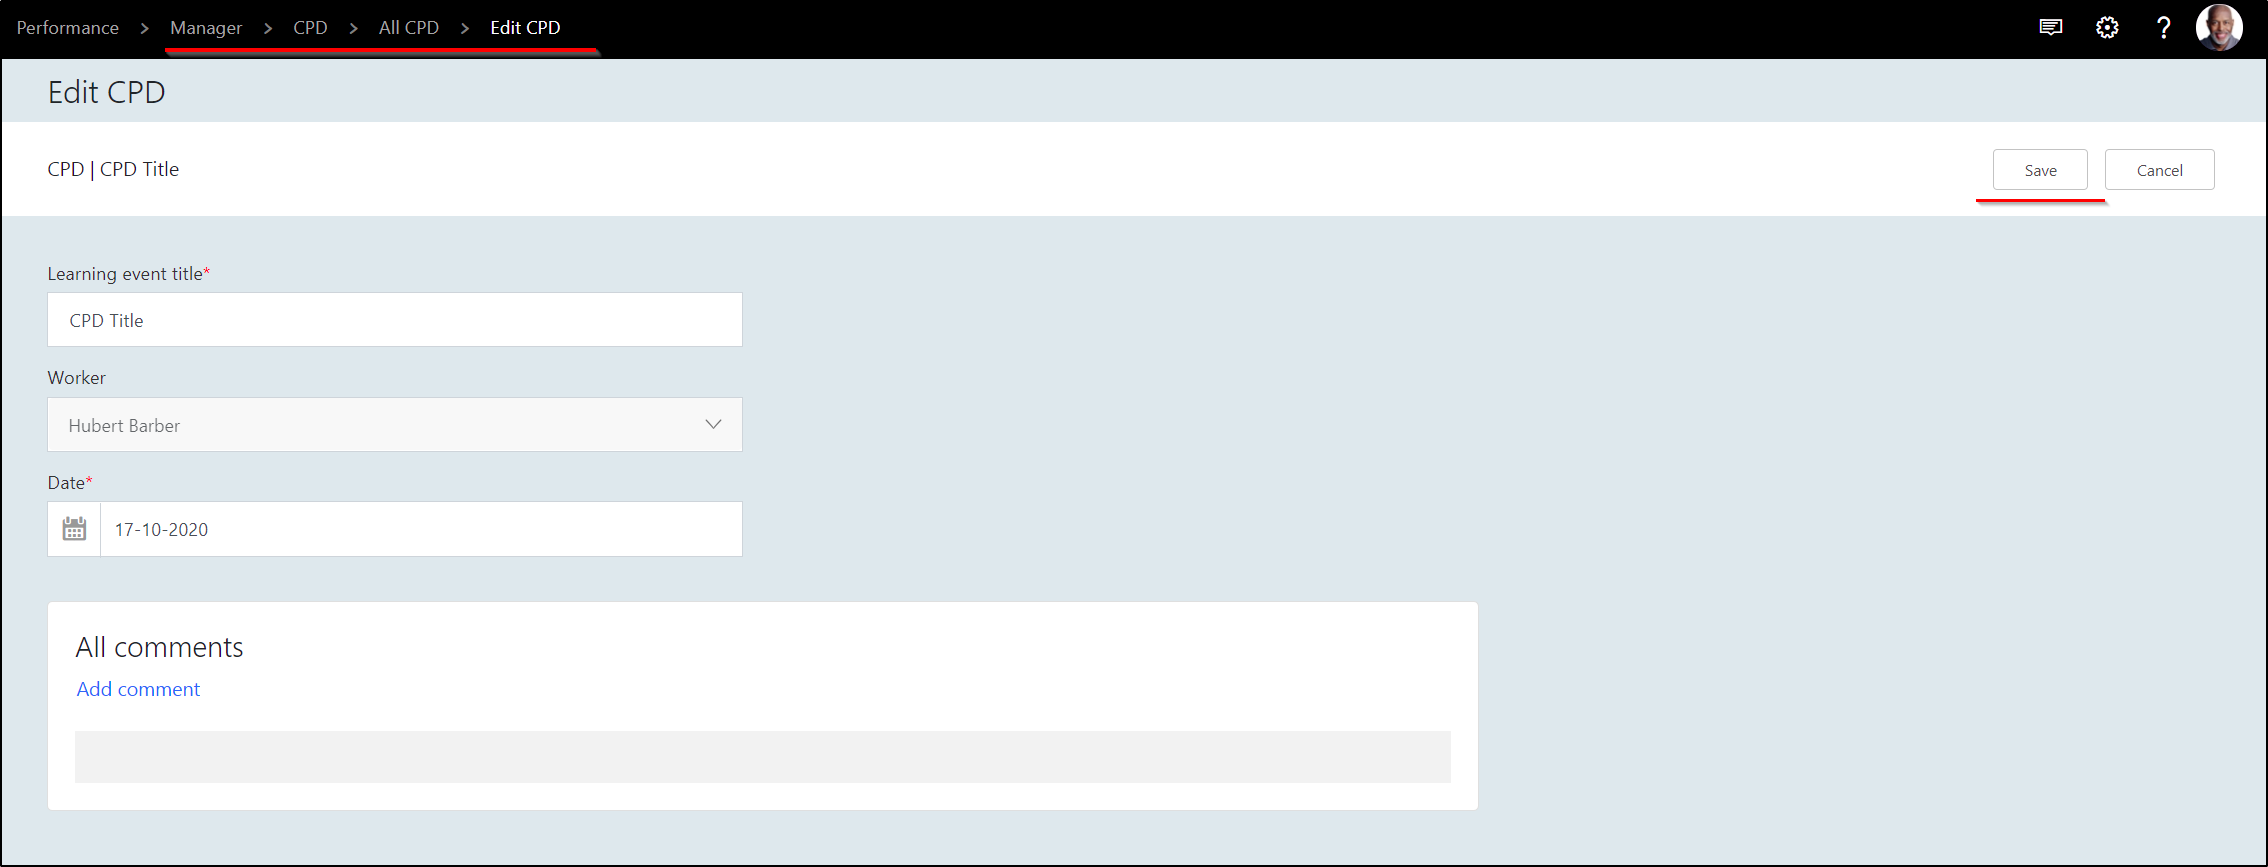
| 3 dot menu (Ellipsis) : Edit | Use this option to maintain the CPD. This can be the learning event title, but also adding comments: |
 |
|
| Figure: Edit CPD | |
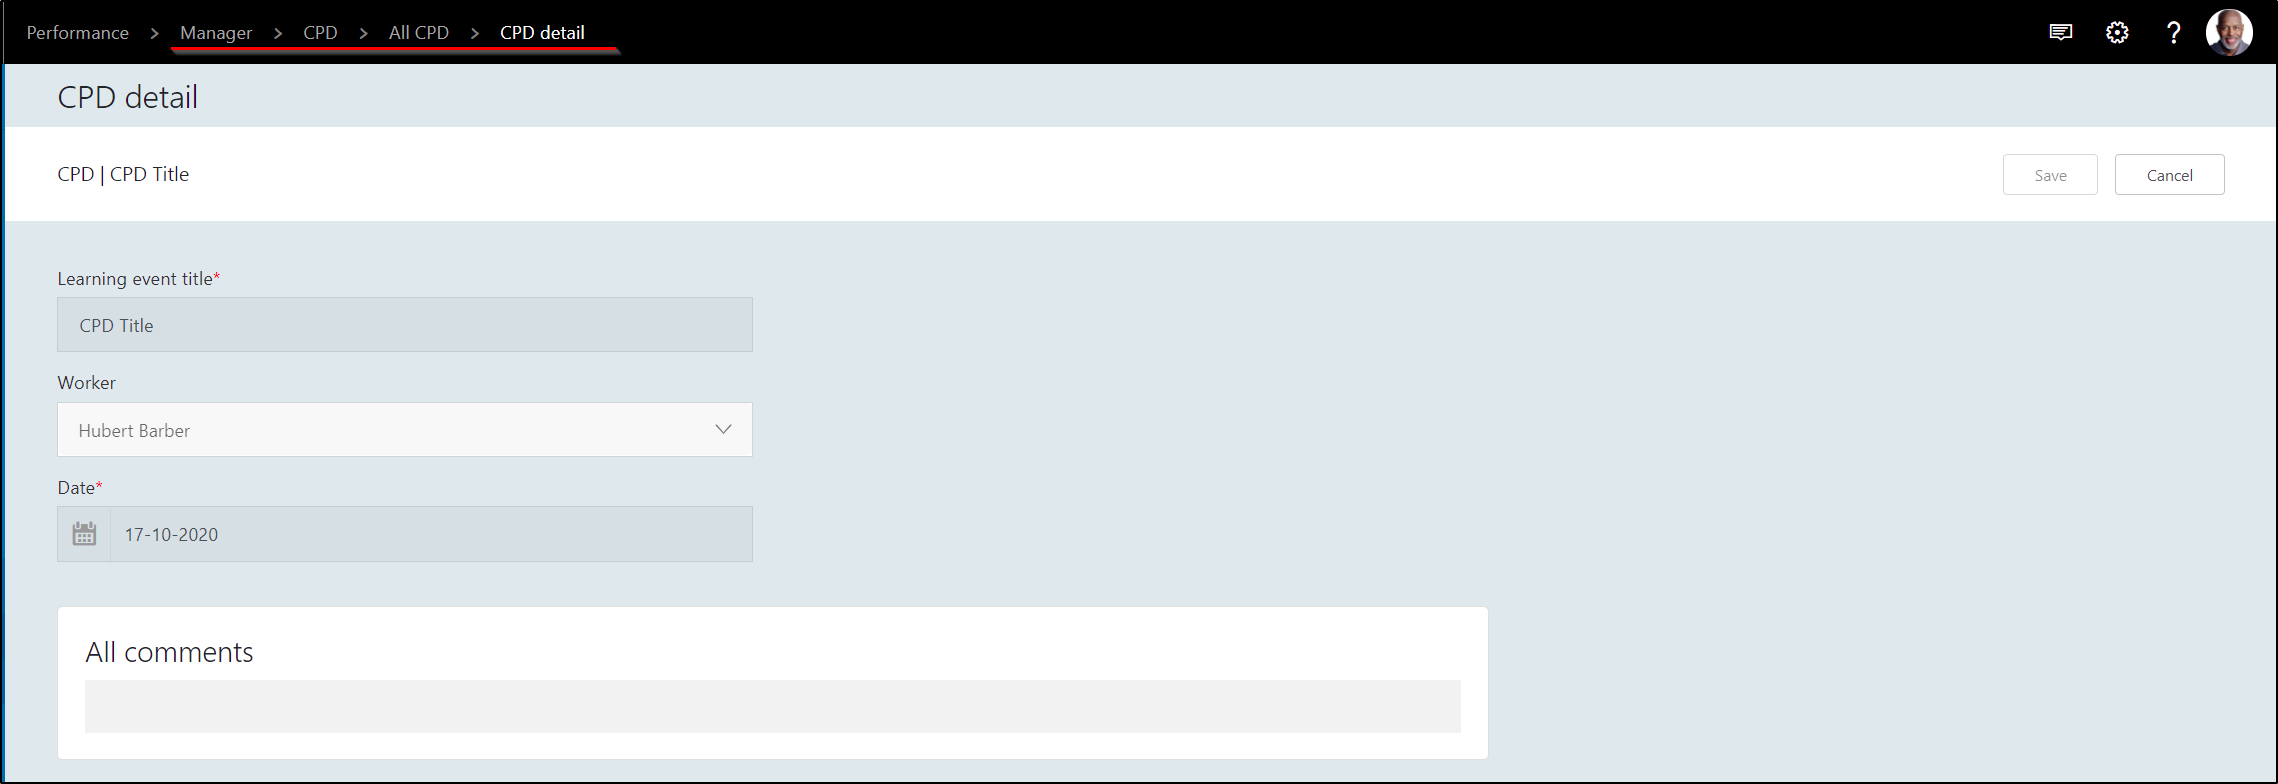
| 3 dot menu (Ellipsis) : Detail | This will open the CPD of the employee and see the details and comments: |
 |
|
| Figure: CPD detail | |
| 3 dot menu (Ellipsis) : Delete | Use this to remove an item from the list. |
| Note: This is only possible if there are no comments on the CPD | |
| New | Use this to add a new CPD to the list: |
 |
|
| Figure: Add new CPD |
Manager: Add Career Development Plan (CDP):
A People Manager can add Development related Goals/Activities/Tasks to his/her Team members.

Figure: All CDP
Explanation of the fields/actions:
| Tile | Description |
|---|---|
| Title | The description of the CDP of the worker |
| Start and End Date | The associated dates of the CDP of the worker |
| Worker | The name of the employee |
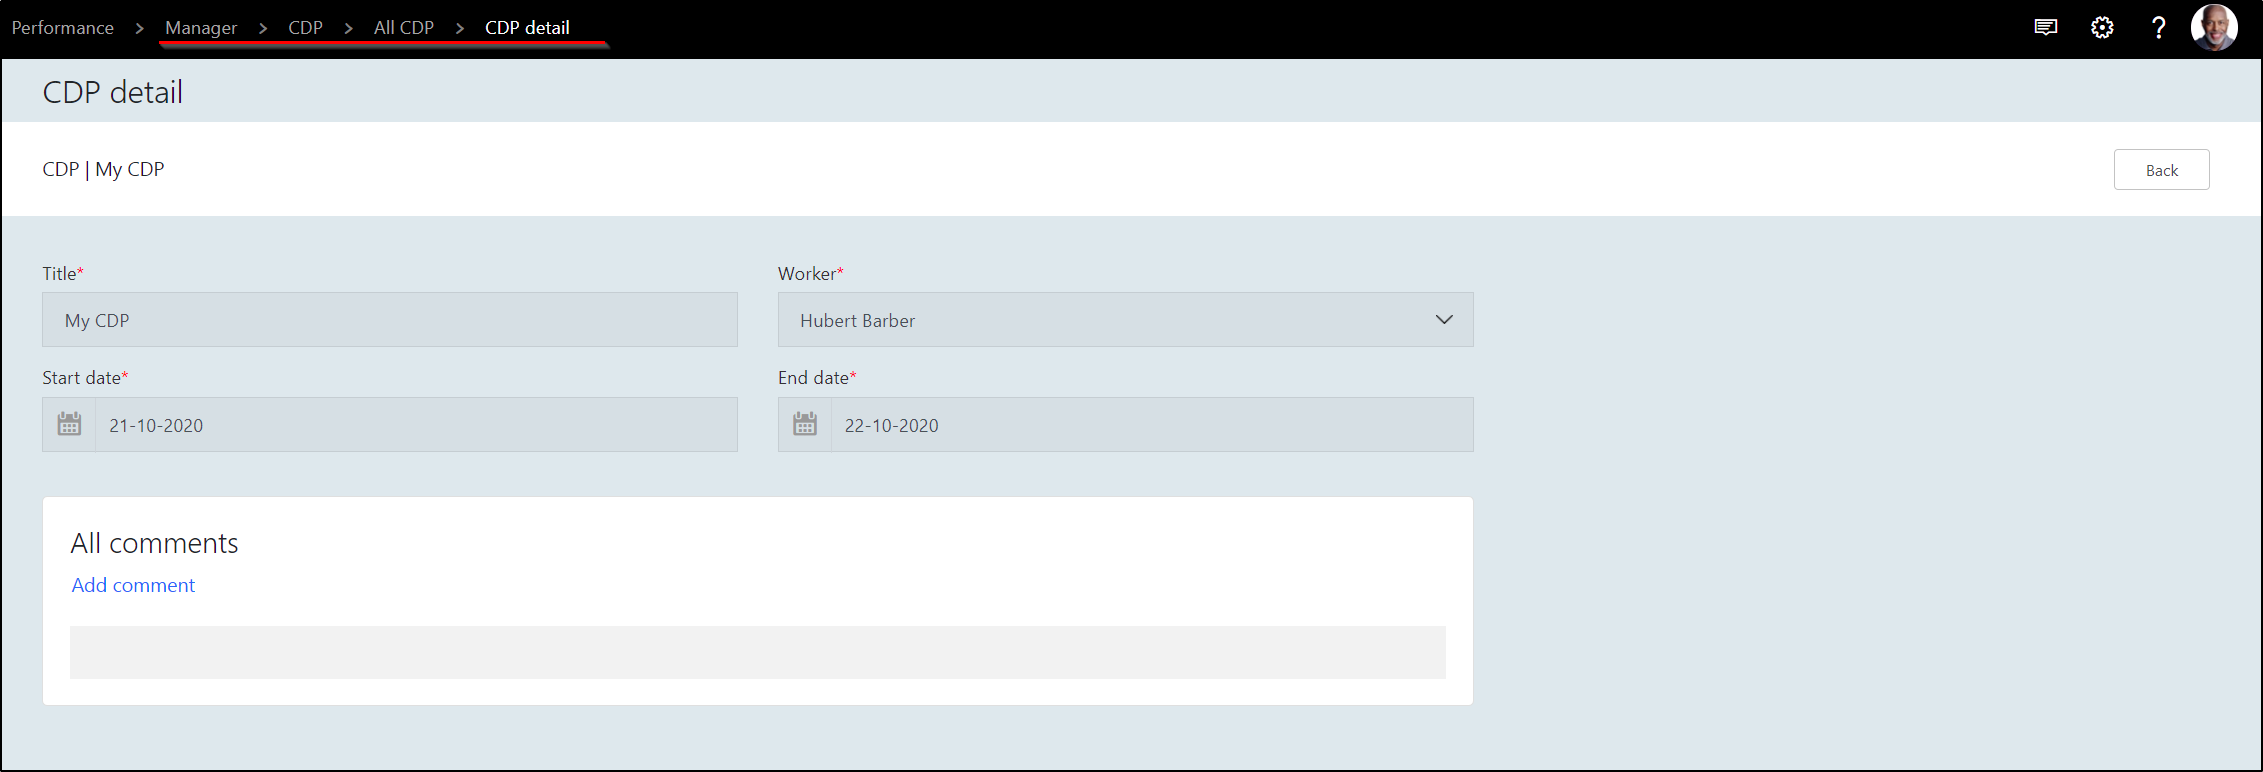
| 3 dot menu (Ellipsis) : Detail | This will open the CDP of the employee and see the details and comments: |
 |
|
| Figure: CDP detail | |
| 3 dot menu: Edit | Use this option to maintain the CDP of the worker. This includes adding comments: |
 |
|
| Figure: Edit CDP | |
| 3 dot menu (Ellipsis) : Delete | Use this to remove an item from the list. |
| Note: This is only possible if there are no comments on the CDP | |
| New | Use this to add a new CPD to the list: |
 |
|
| Figure: Add new CPD |
Manager: Approve PDR
This shows all the PDRs submitted by their respective Team members for approval by the Manager.

Figure: PDR for my approval
From here (depending on the workflow setup) the PDR can be adjusted (click on detail) or the history can be validated:
The form will open with the different fast tabs, and the workflow actions (as per setup):
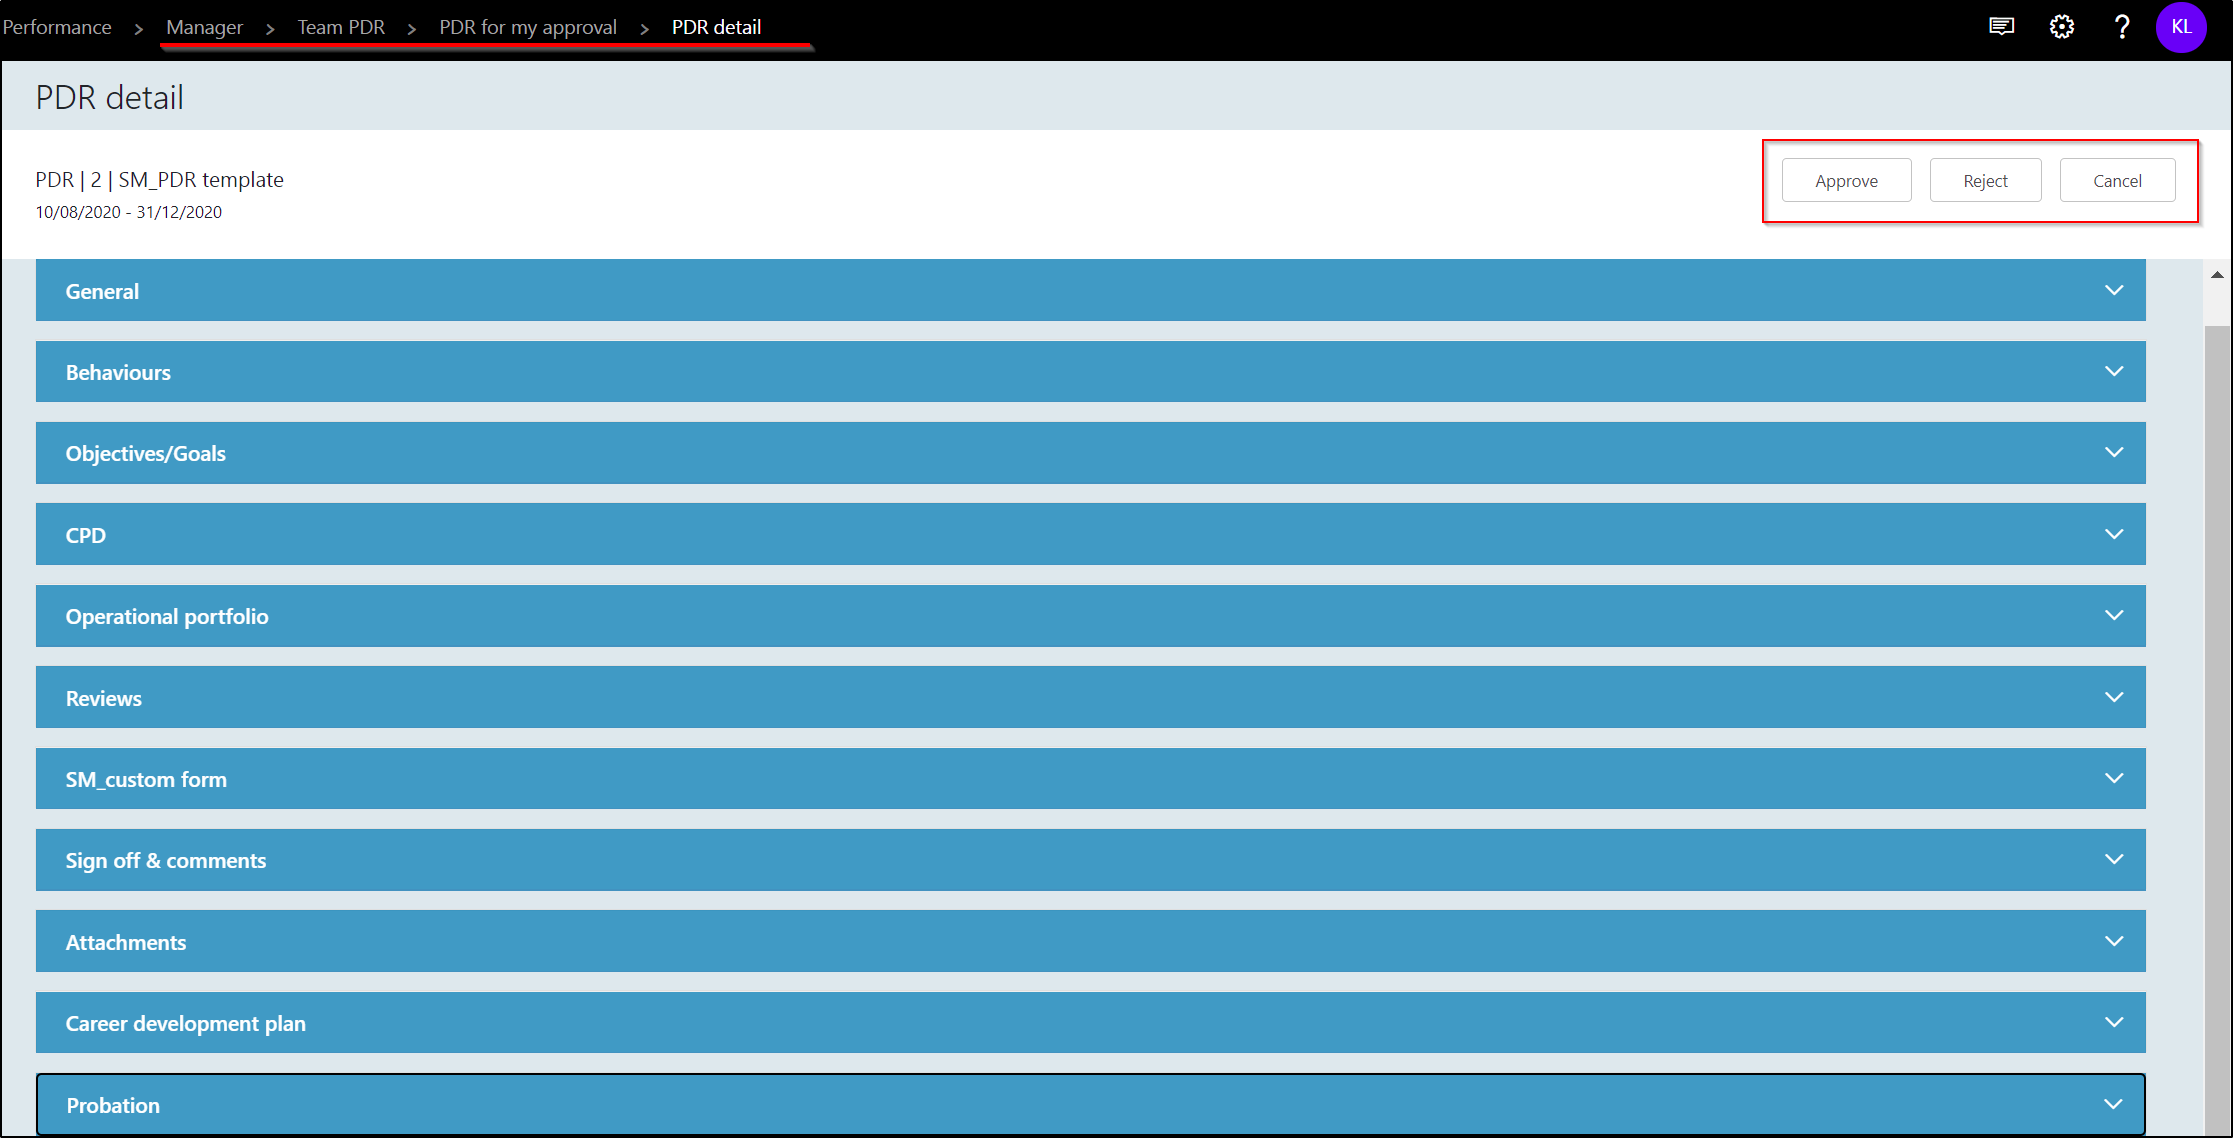
Figure: Manager and workflow options
Depending on the workflow and process, changes can be made or just validated.

Figure: Action Performed
Once PDR's are all actioned on, the PDR for my approval will be empty again:

Figure: PRD for my approval - empty
Manager -> Compensation
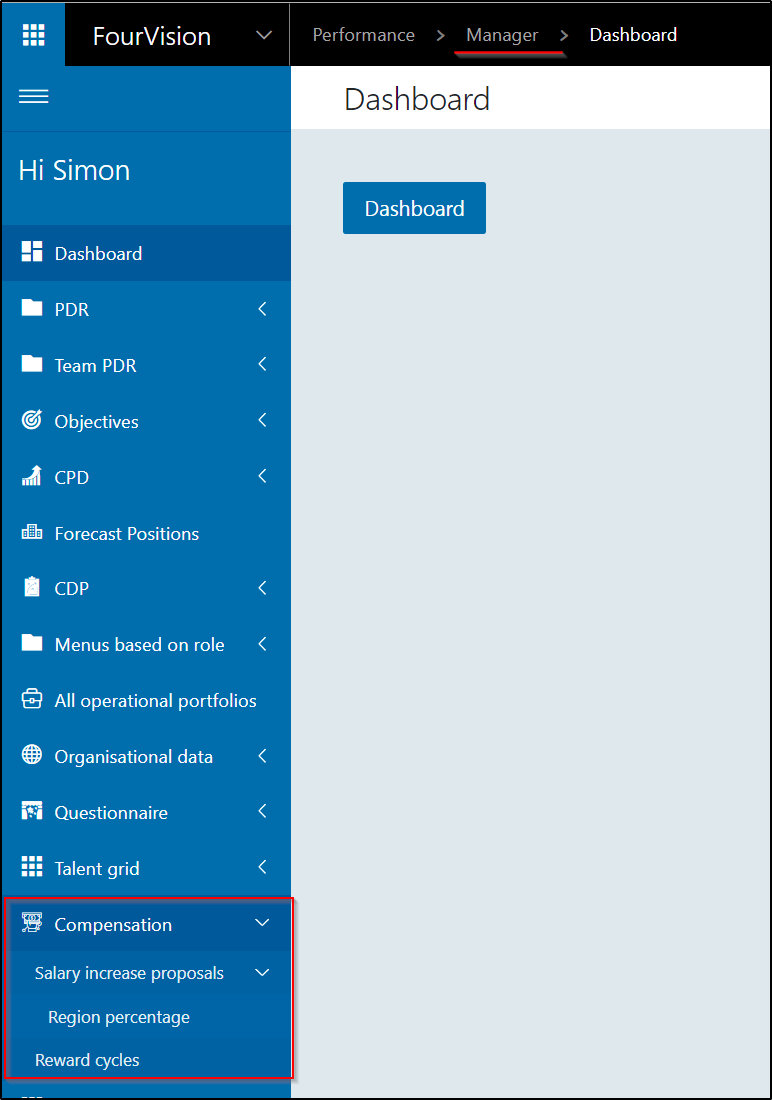
Figure: Compensation
For compensation cycle, user need to set percentage according to the region. And add compensation region as per need.
Salary increase proposals
Under Salary increase proposals, user add line budget and this will help to present all expenses in column format, wherein such expenses are grouped according to its category.
Region percentage

Figure: Region percentage
Explanation of the fields:
| Items | Description |
|---|---|
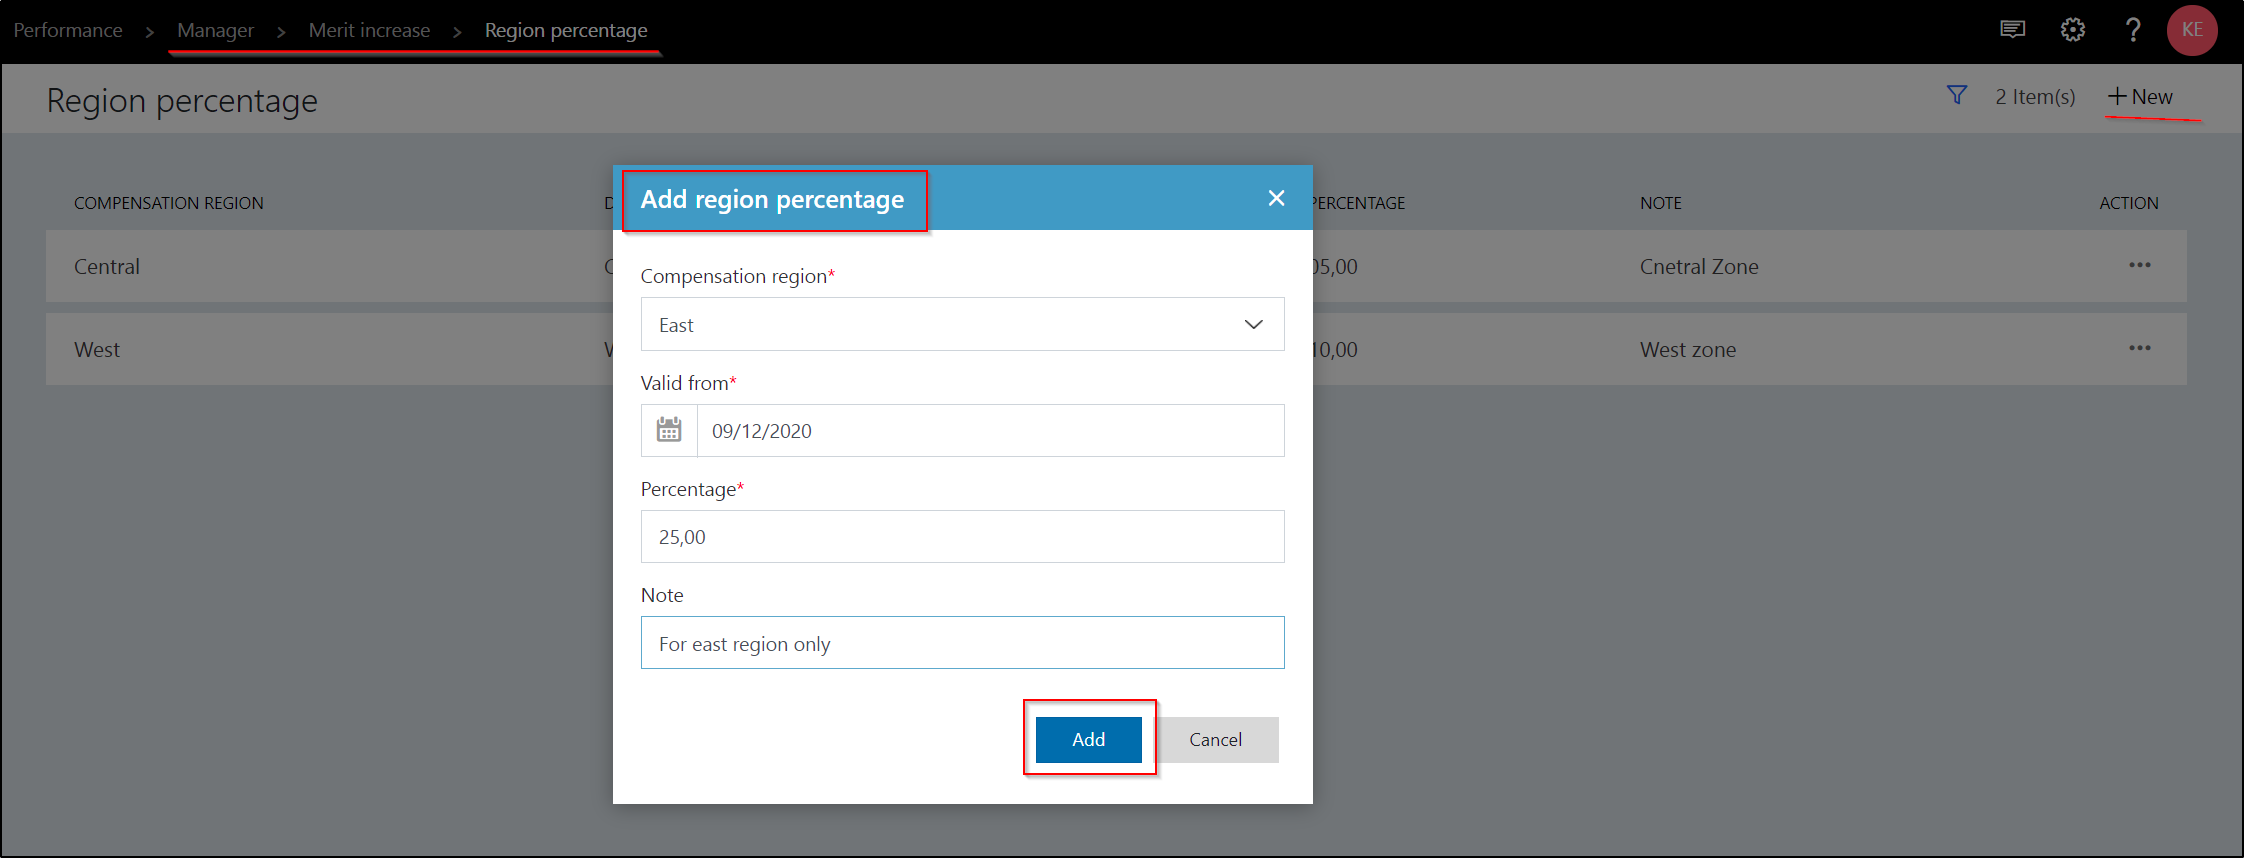
| Compensation region | This shows the compensation region. |
| Description | Description about compensation region. |
| Valid from | It shows the date from when that merit increase valid. |
| Percentage | It define the count of the percentage. |
| Note | User can use it to add any special note. |
| New | Click to add a new compensation region to the list |
 |
|
| Figure: Add new compensation region | |
| 3 dot menu: Edit | Click to edit a maintained compensation region |
| 3 dot menu: Delete | Click to remove a compensation region from the list |
Reward cycle
With the help of reward cycle, User will create his own reward cycle as per the requirement.

Figure: Reward cycle
Explanation of the fields:
| Items | Description |
|---|---|
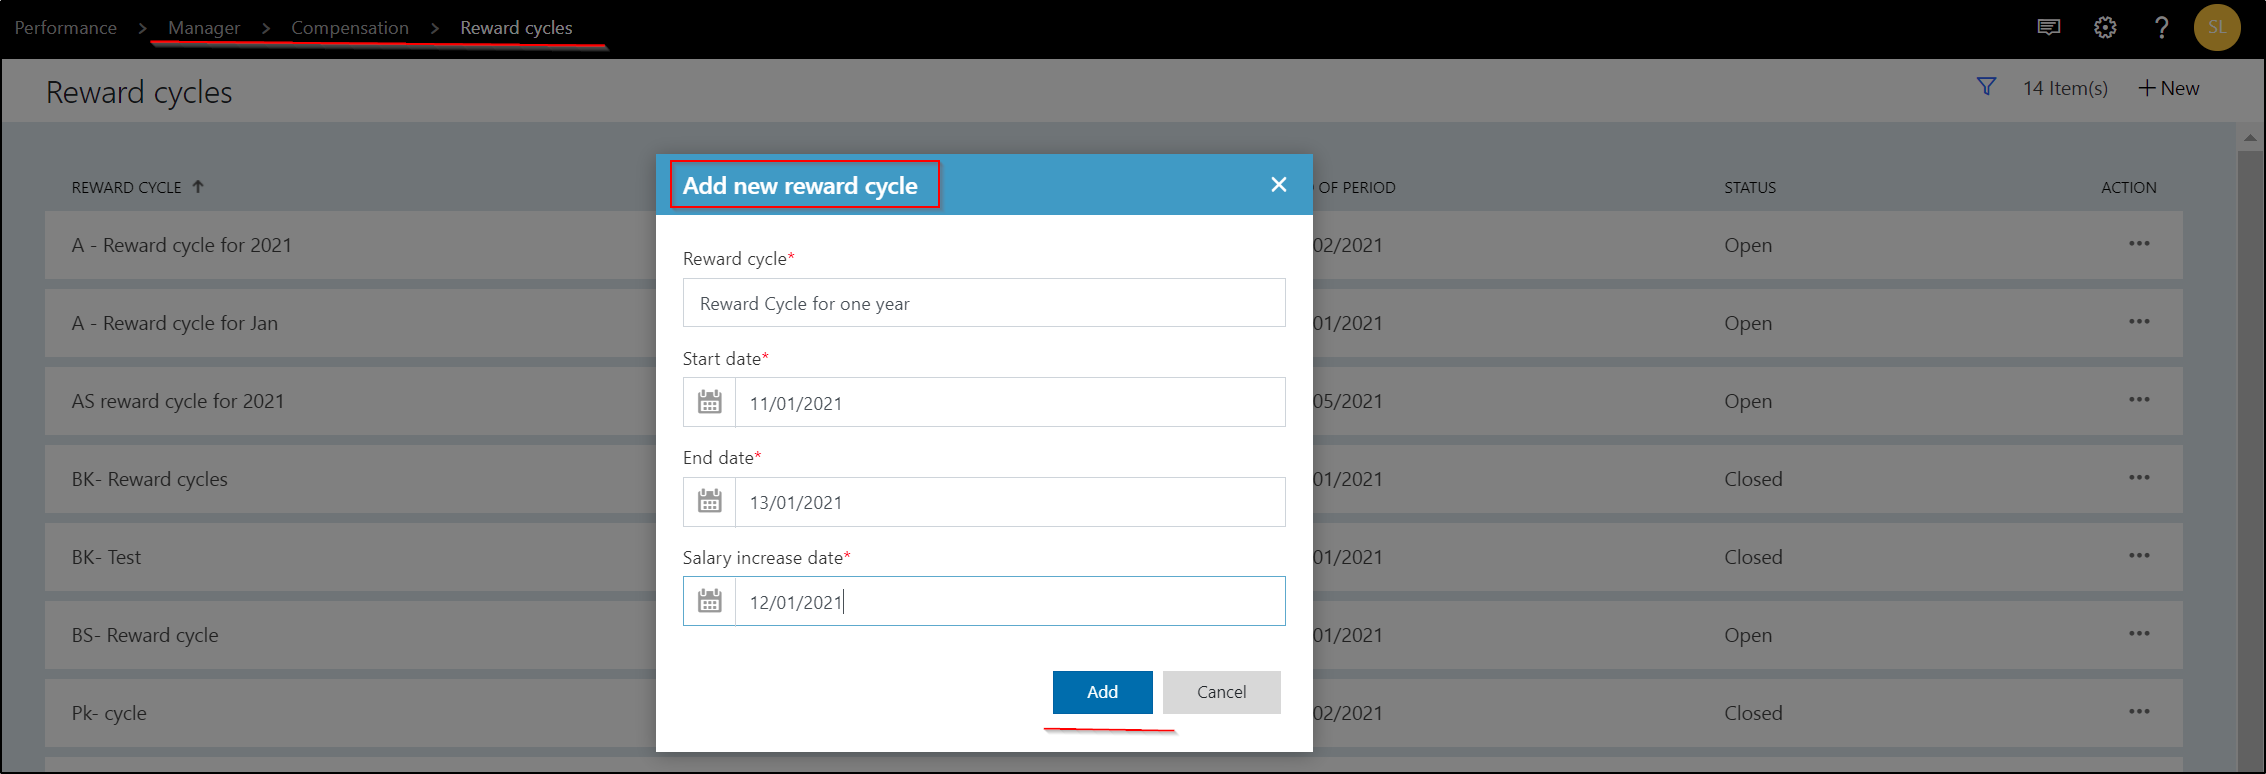
| Reward cycle | Name of the reward cycle. |
| Start of period | Start date of the reward cycle. |
| End of period | End date of the reward cycle. |
| Status | It define status of the reward cycle during process. |
| New | Click to add a new reward cycle to the list |
 |
|
| Figure: Add new reward cycle | |
| 3 dot menu: Details | Define the deatils about the reward cycle or redirect to the salary increase proposals page. |
| 3 dot menu: Edit | Click to edit a maintained compensation region |
| 3 dot menu: Delete | Click to remove a compensation region from the list |
Compensation Process
Working of compensation cycle in step by step guide.
Step by step
Explanation in detail:
Navigate to Admin App
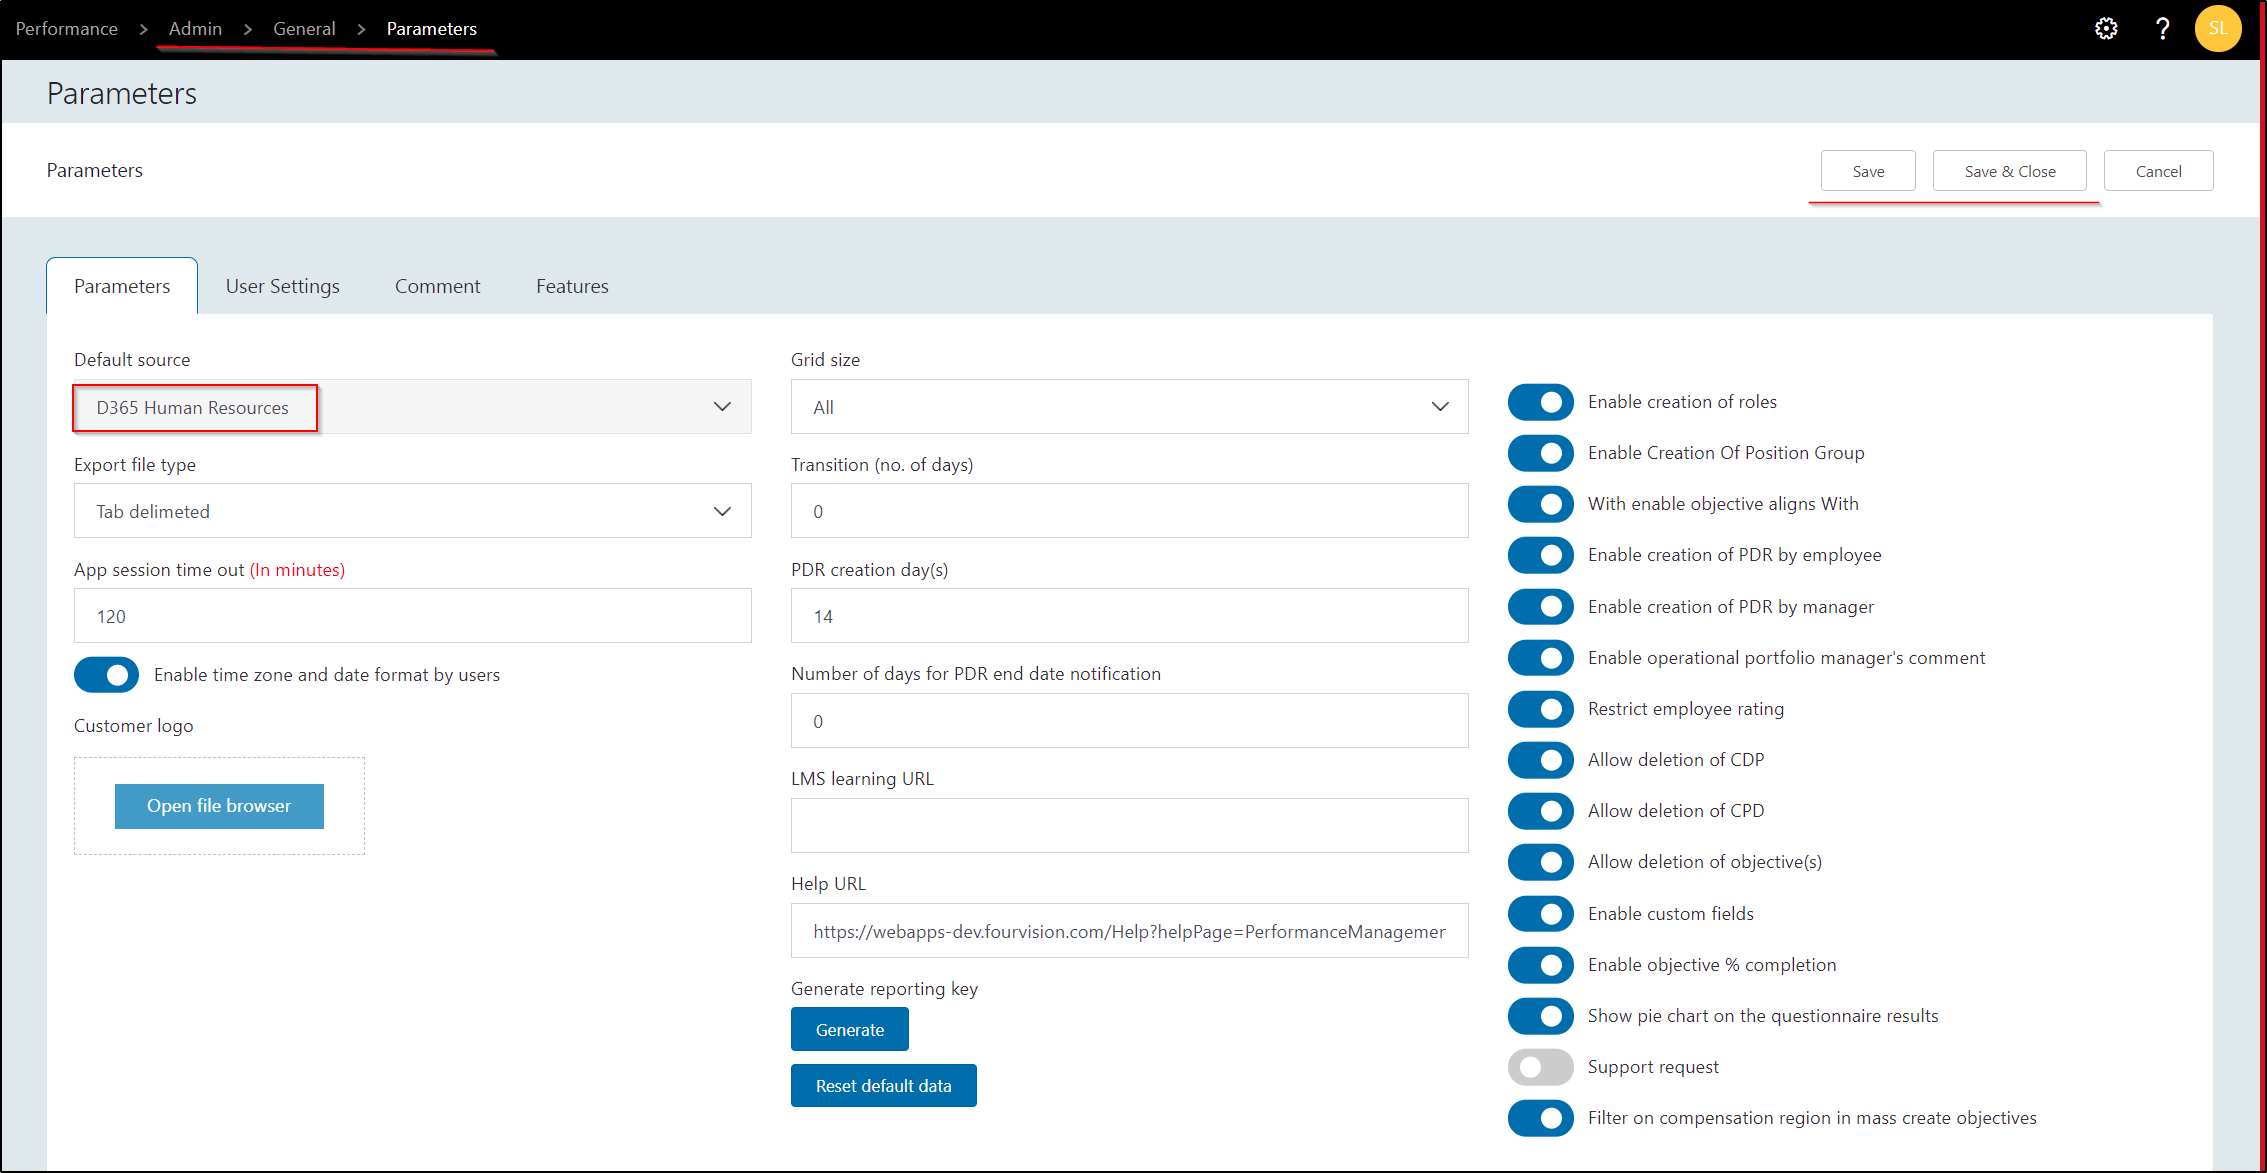
STEP 1: General -> Parameters: User make sure that the default source must be selected as D365 Human Resource.
STEP 2: Parameters -> Features: Under features tab salary and salary increase toggle must be On/Enabled.

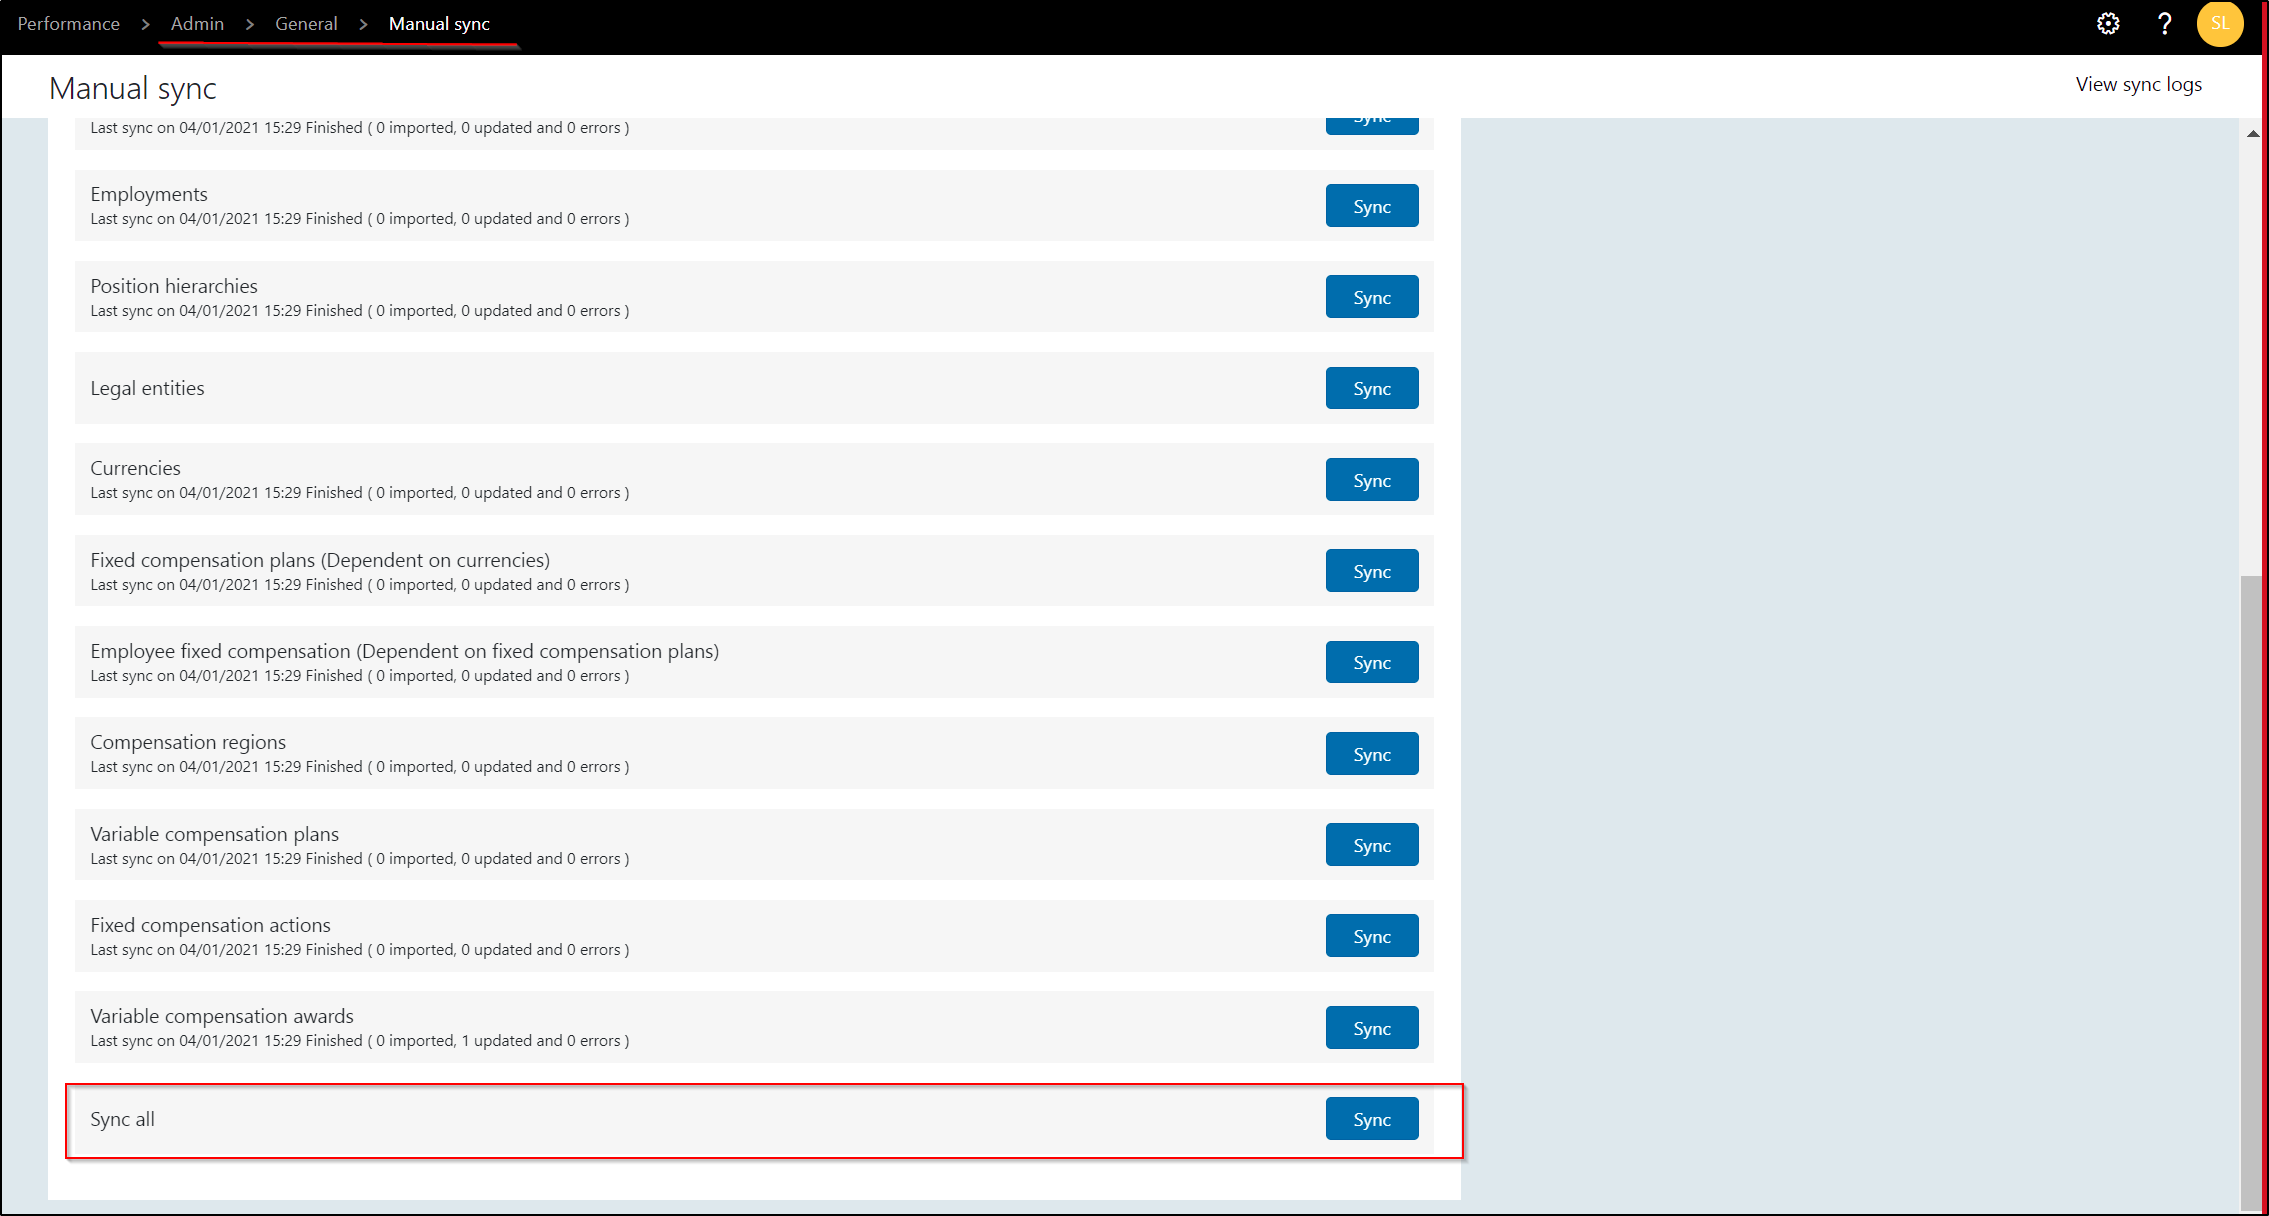
STEP 3: General -> Manual sync: This can be done automatically, or manual. Once the sync has been completed, sync logs can be validated. Upon successfully completing the syncs, the Compensation regions, Variable compensation plans and Fixed compensation actions will be updated. Click on Sync to synchronize 1 topic. Click Sync all > Sync (last option) to synchronize all data.
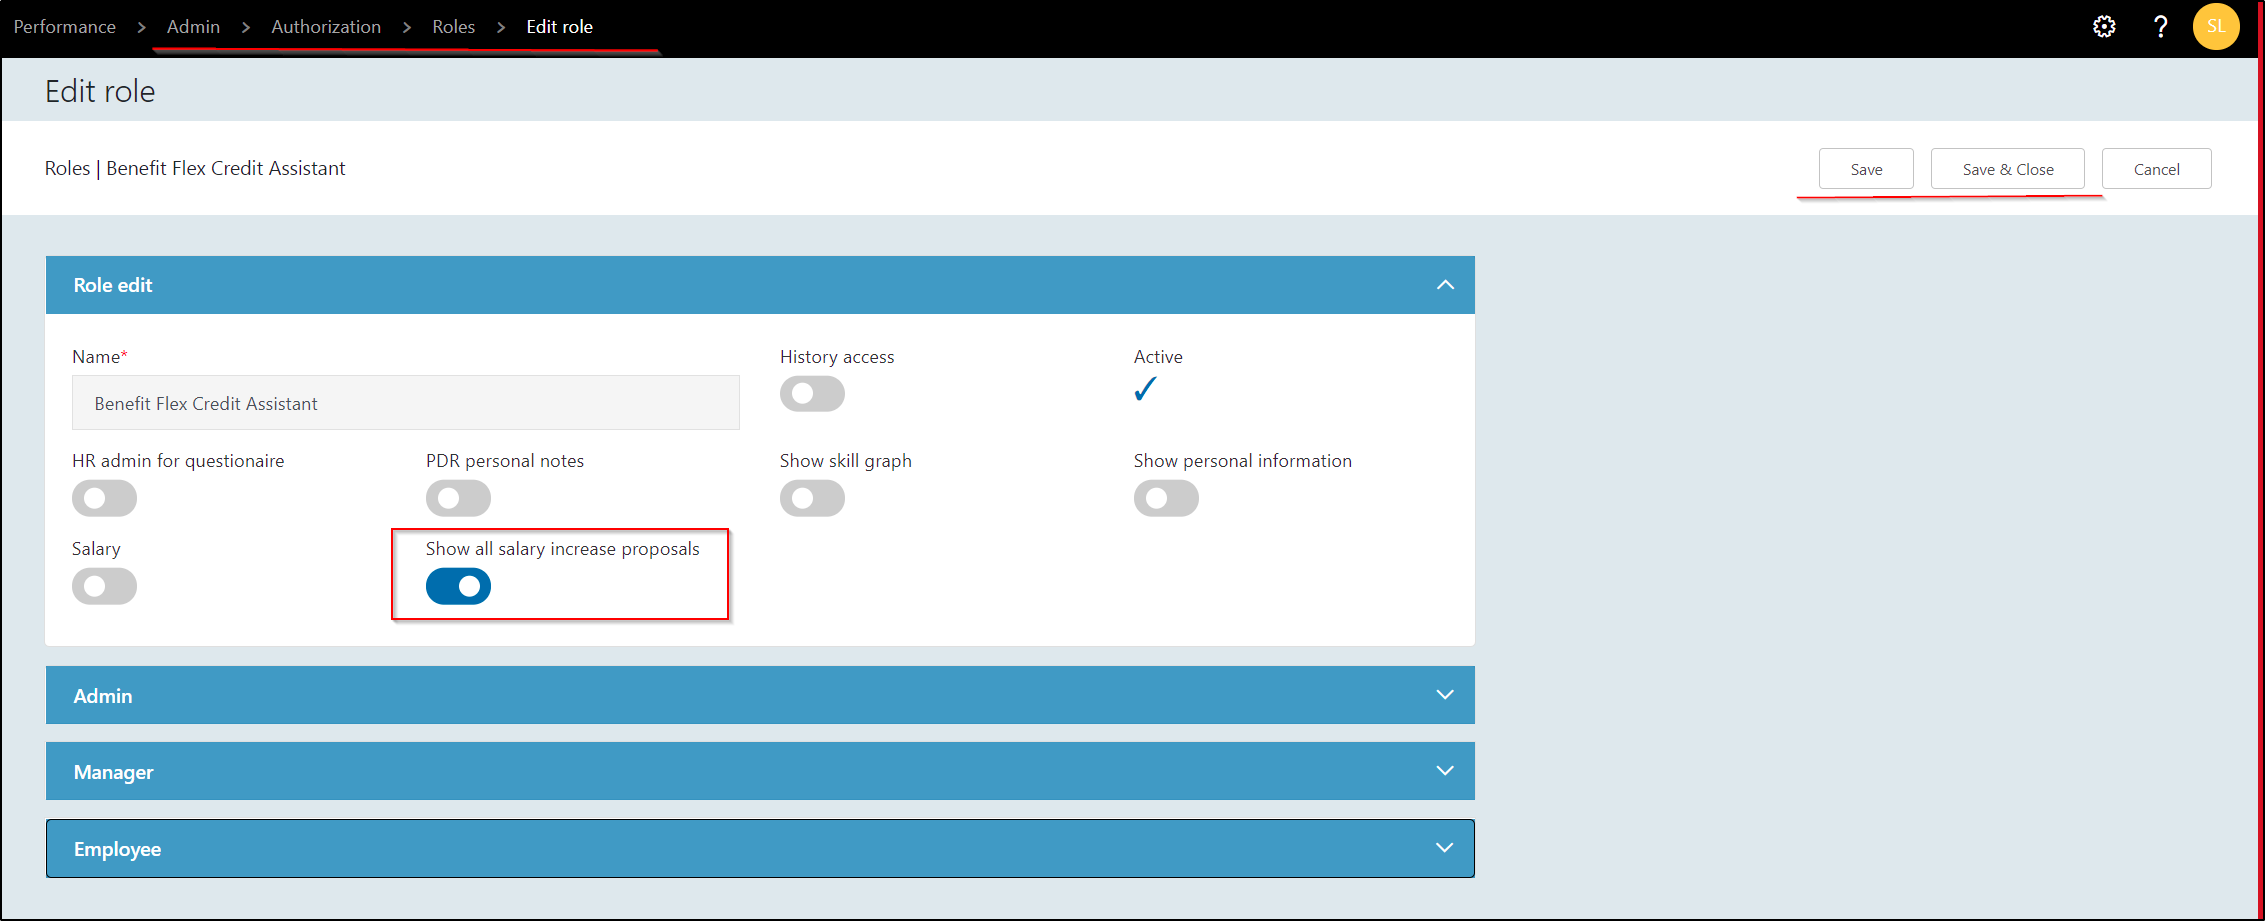
STEP 4: Roles -> Edit role: Enable the 'Show all salary increase proposals' for that role to whom make it compensation. It is not a mandetory step , if user want to see all the salary increase proposal then only enable it.
STEP 5: Workflows -> Worflow: For creation of workflow process, Click here

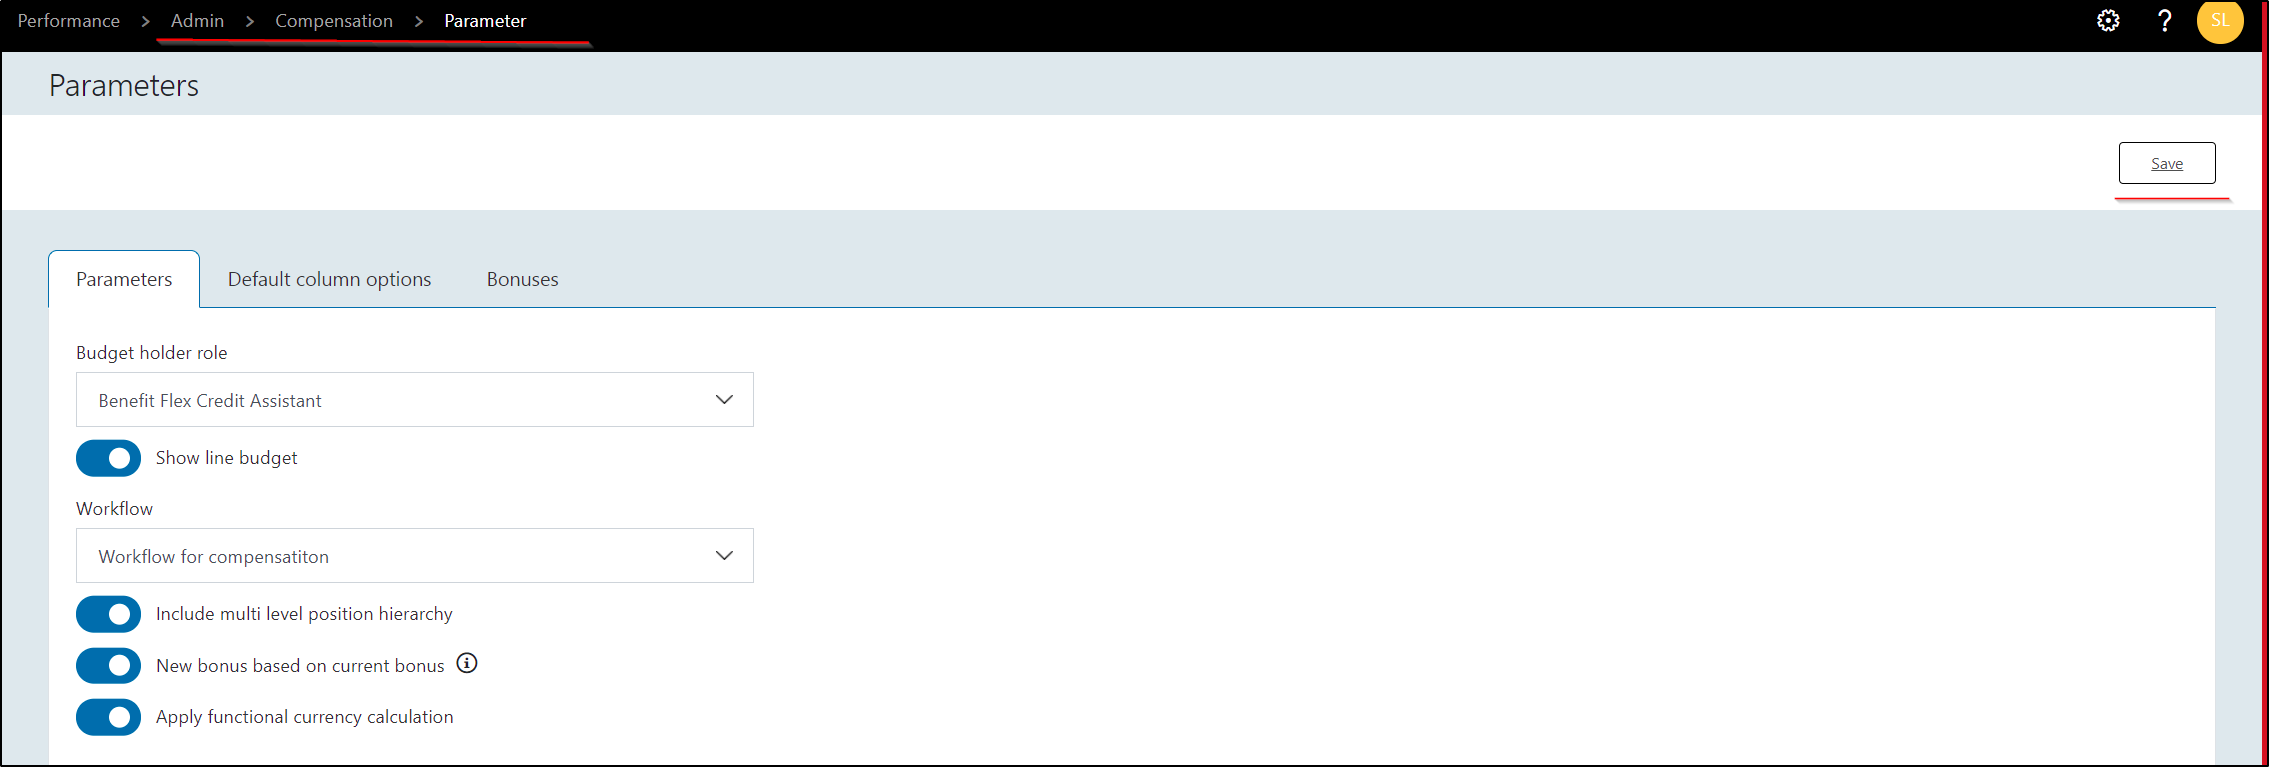
STEP 6: Compensation -> Parameter: Select appropriate data from the dropdown. for more details, Click here
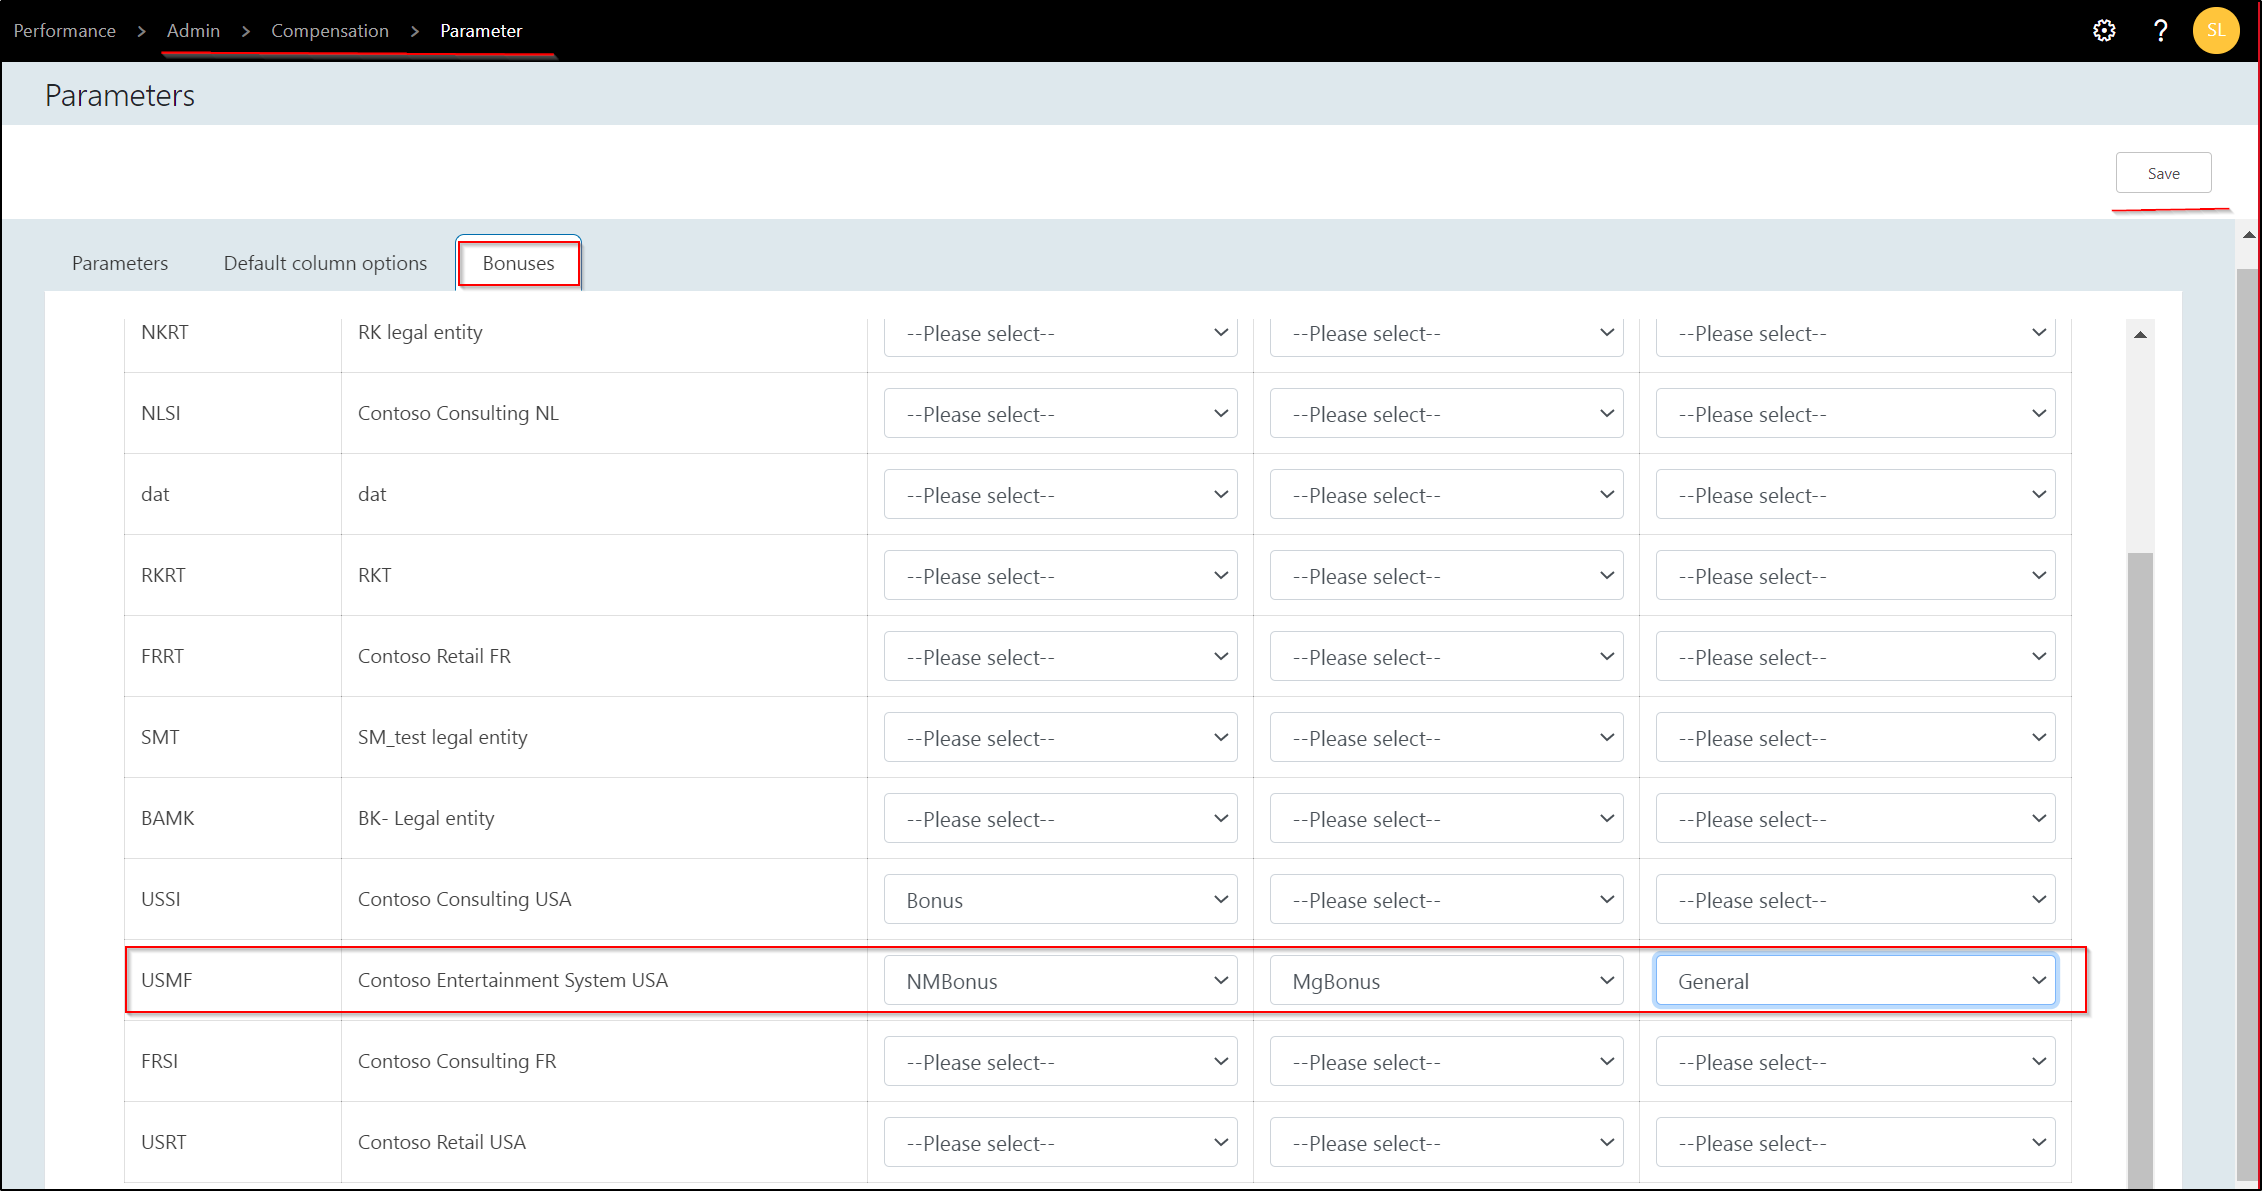
Add bonuses from the dropdown
STEP 7: Compensation -> Currency exchange rate: To add currency exchange rate and make one currency type into functional currency.

Navigate to Manager App
STEP 8: Compensation -> Salary increase proposal -> Region percentage: For more details,Click here

STEP 9: Compensation -> Reward cycle: Working/Creation of reward cycle, Click here
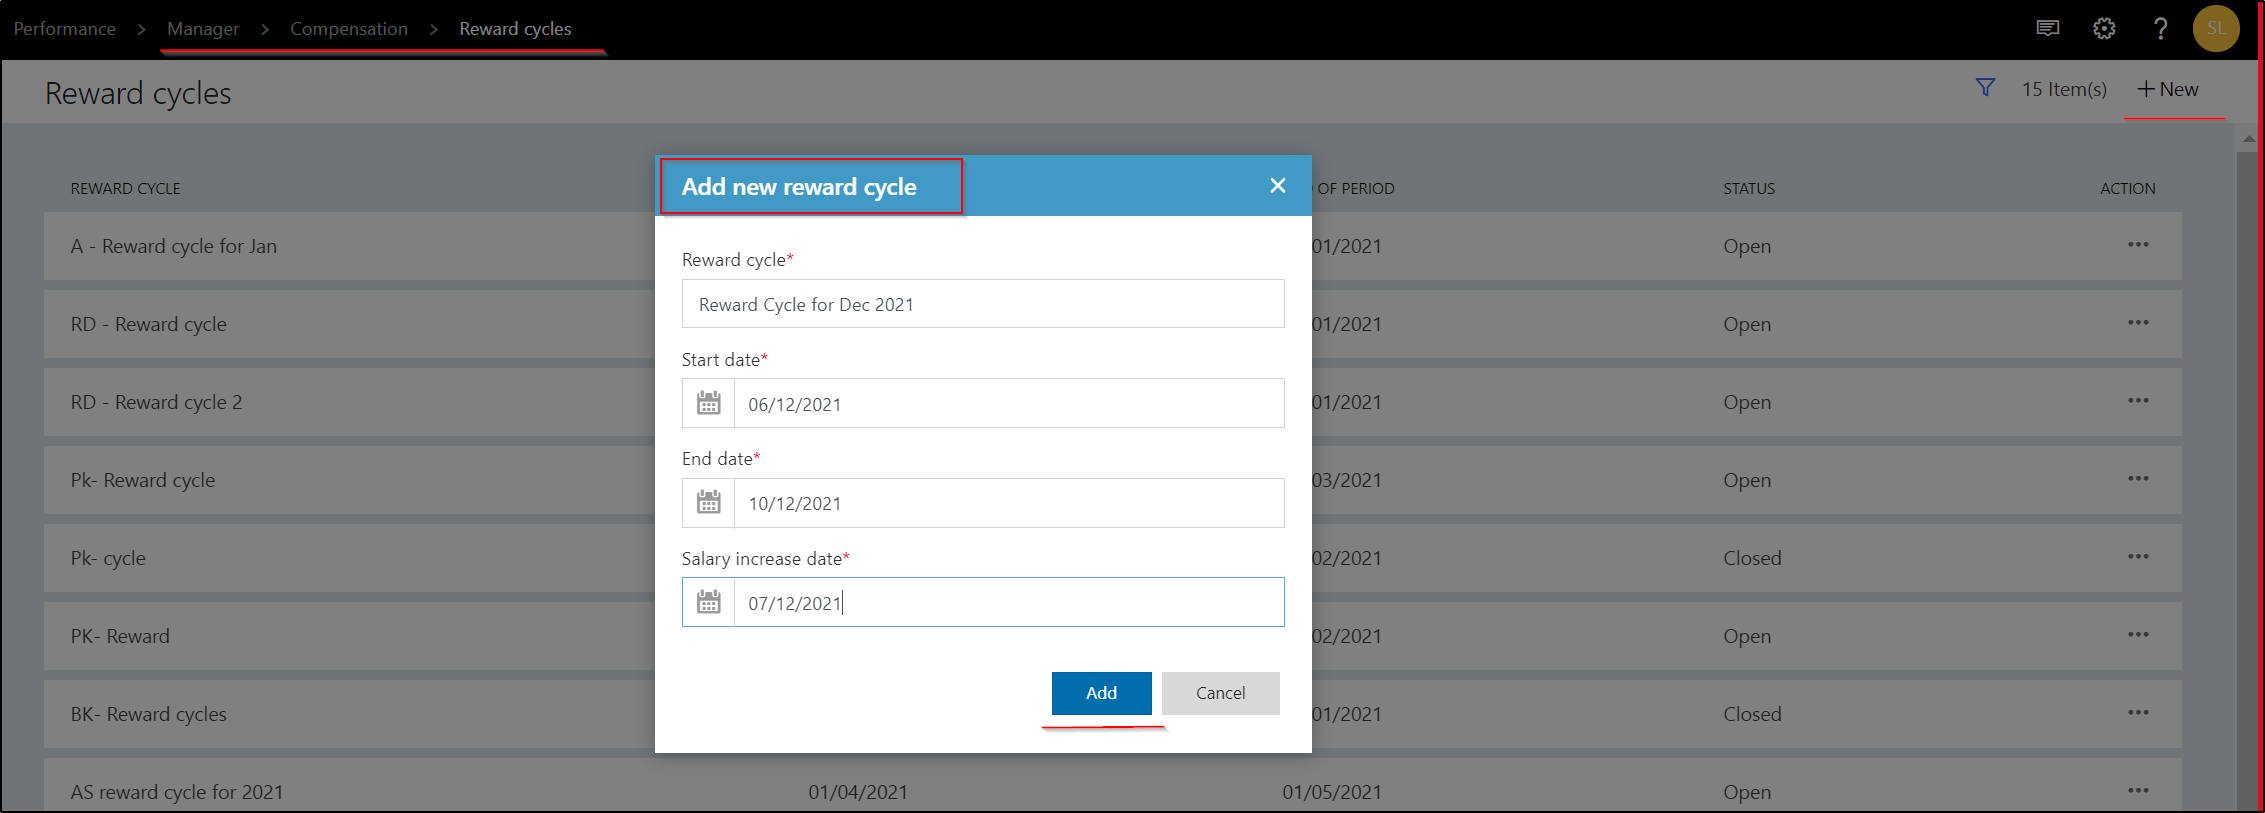
STEP 10: Reward Cycle -> Salary increase proposal: Note: User only add line budget when admin enable the toggle of 'Show line budget' under parameters tab in compensation menu.Otherwise user add manually. For details, Click here

STEP 11: Salary increase proposal -> Details: Here, 'ASSIGNED TO' person open the salary increase proposal and perform changes as per requirement.

On listing page 'ASSIGNED TO' person name shall shows to the user
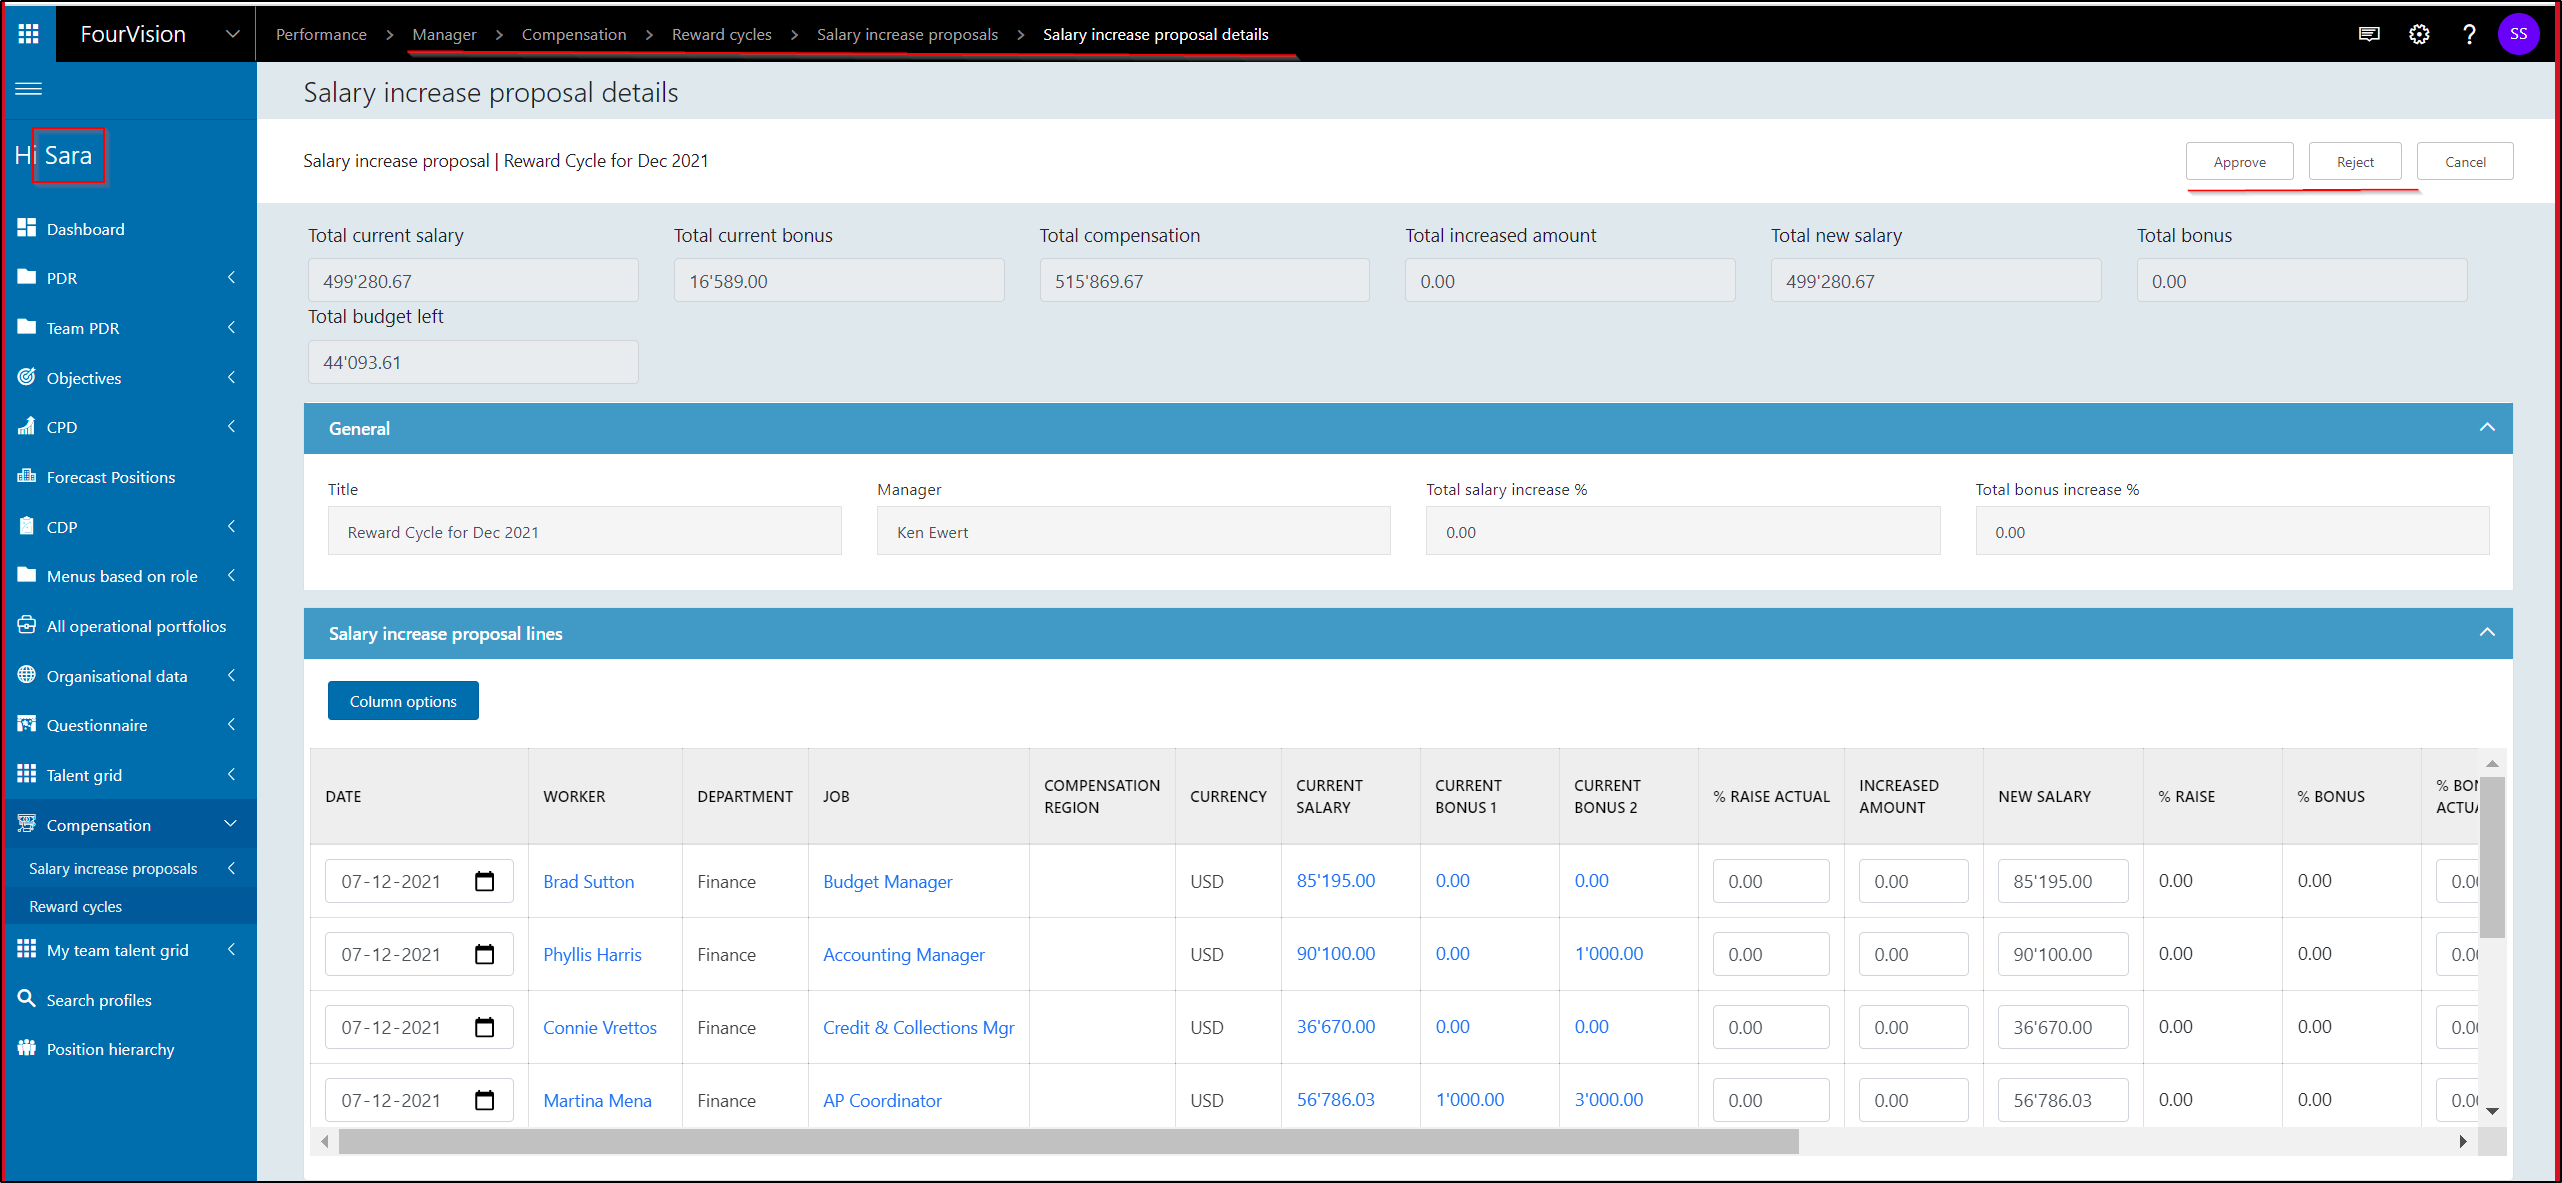
'ASSIGNED TO' person able to open 'Salary increase proposal details'
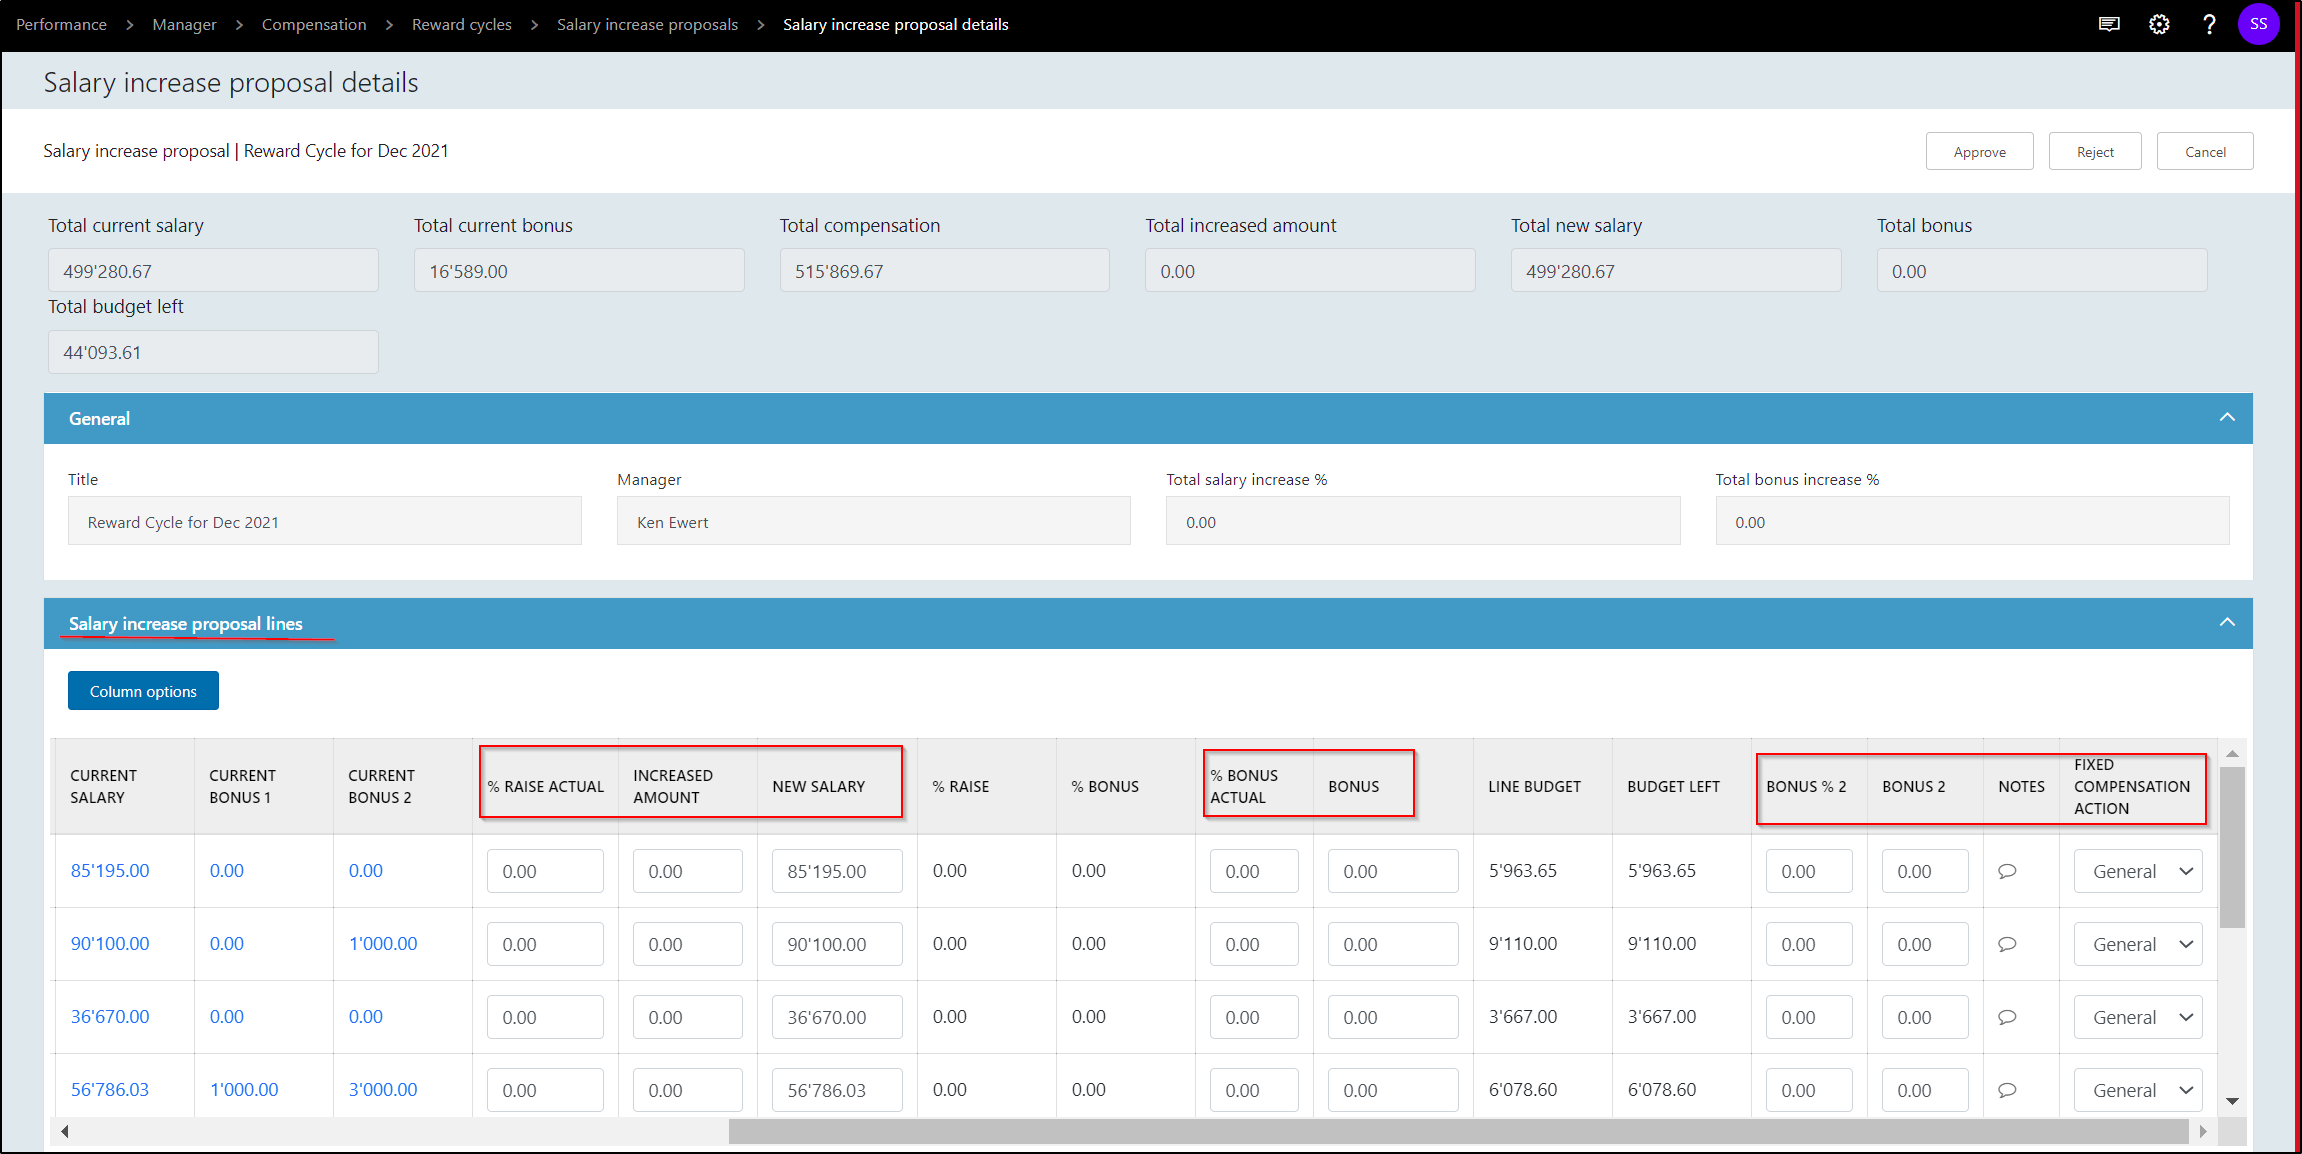
User shall able to perform change on marked columns Note: Here, column option should be rearrange and show/hide by using 'Column options'
STEP 12: Perform appropriate action on the salary increase proposal
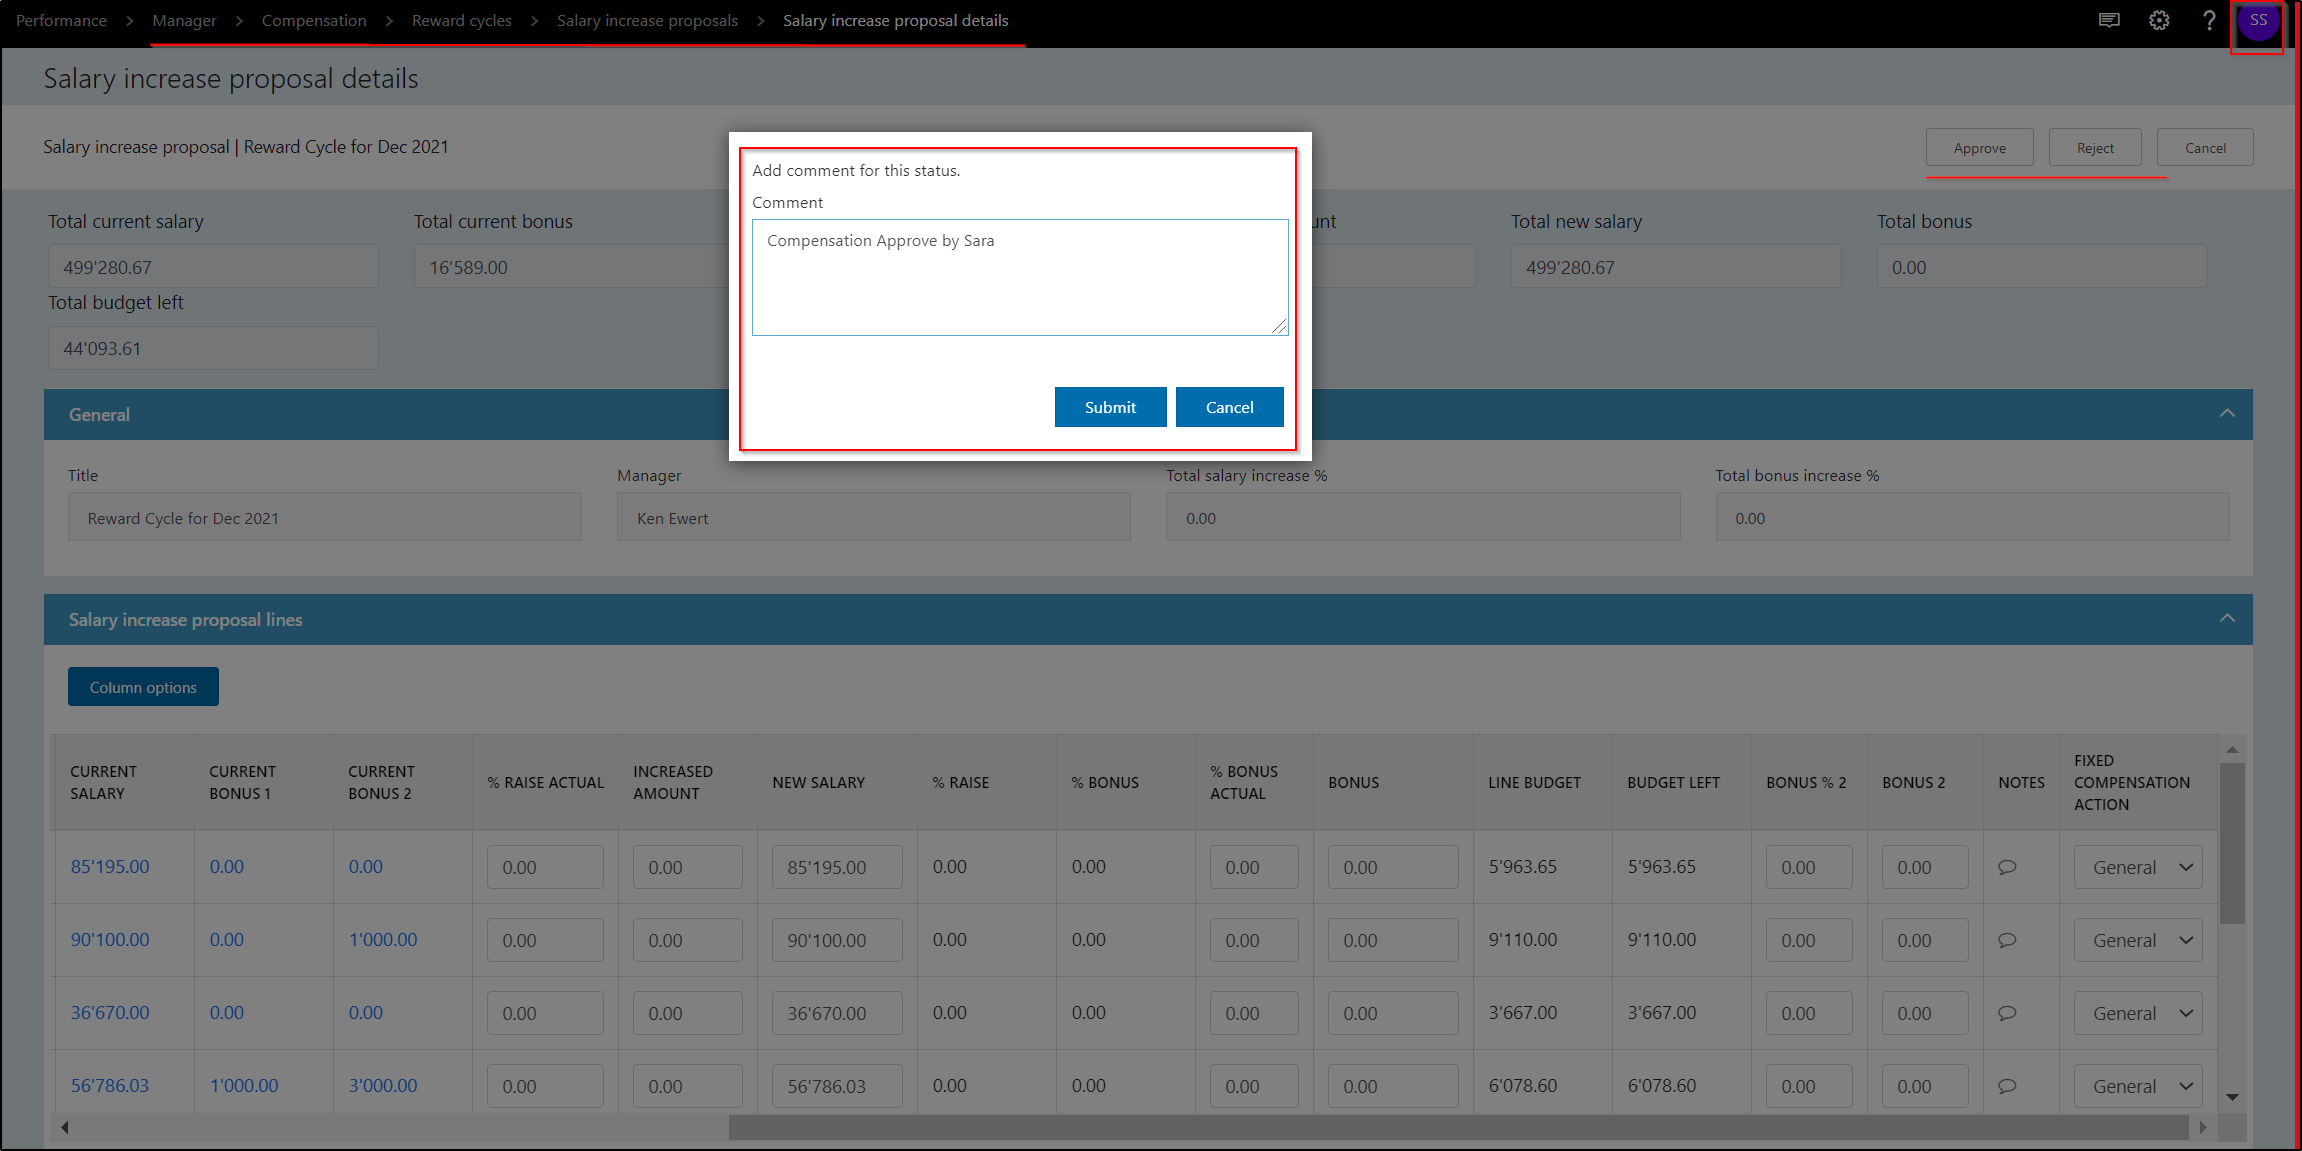
STEP 13: Compensation -> Reward cycle: Here, status of the 'Reward cycle' changed and performed action shall be show on detail page.
